1. Introduction
This manual provides detailed instructions for the setup, operation, and maintenance of your Eyoyo 10-Inch HD TFT LCD Monitor. Please read this manual thoroughly before using the product to ensure proper functionality and longevity. This versatile display is designed for various applications, including CCTV, DVD, PC, and DVR systems, offering a compact and multi-functional solution.
2. What's in the Box
Verify that all items are present in the package:
- 1 x Eyoyo 10-Inch LCD Monitor
- 1 x HDMI Cable
- 1 x BNC Cable
- 1 x VGA Cable
- 1 x AV Cable
- 1 x Power Adapter
- 1 x Stand
- 1 x Remote Control
- 1 x User Manual

Image: All components included in the Eyoyo 10-inch monitor package.
3. Product Overview and Key Features
The Eyoyo 10-Inch HD TFT LCD Monitor is a versatile display solution designed for various applications, including CCTV, DVD, PC, and DVR systems. Its compact size and multiple input options make it suitable for both professional and personal use.
Key Features:
- Clear and Colorful Display: This 10-inch high-brightness LCD display, with a resolution of 1024x600, ensures clear images and vibrant colors. Perfect for use as a CCTV monitor or security monitor, it provides a vivid viewing experience for tasks like surveillance monitoring and video playback.
- Mirror Flip Function: Provides horizontal or vertical image inversion options for diverse installation angles. It can flip the image, making it ideal for teleprompter setups, ensuring smooth integration into teleprompting systems for improved content delivery.
- Versatile Connectivity: Supports AV, HDMI, BNC, VGA, and USB inputs, catering to various setups such as computers and security systems. With its high sensitivity and strong anti-jamming features, it excels in surveillance and multimedia applications.
- Flexible Installation: Supports desktop placement for a neat home office arrangement or 75mm VESA bracket mounting (bracket not included) for a space-efficient entertainment setup.
- Lightweight Mobility: The 10-inch small monitor shines in its portability, effortlessly connecting to different devices via various input ports. Perfect for outdoor enthusiasts wanting a compact display for streaming movies at campsites or for gamers seeking a portable second screen for on-the-go gaming sessions.

Image: The Eyoyo 10-inch monitor showcasing its compact design and clear display.
4. Setup Guide
Follow these steps for the initial setup of your Eyoyo monitor.
4.1 Assembling the Stand
The monitor includes a detachable stand for desktop use. Assemble it as follows:
- Attach the stand arm to the base using the provided screw.
- Secure the monitor to the assembled stand by aligning the mounting points and tightening the screw.
- Ensure the monitor is stable on the stand before connecting any cables.

Image: Components of the monitor stand and assembly process.
4.2 Initial Connection and Power On
Connect the power adapter to the DC/12V port on the monitor and then plug it into a power outlet. The monitor should power on automatically or can be turned on using the power button.
Video: A demonstration of the Eyoyo 10-inch monitor's features, including image mirror function, various input connections (HDMI, BNC, AV, USB), and stand assembly.
5. Connectivity and Input Options
The Eyoyo monitor offers multiple input ports for diverse device connections. Please use the original cables or good-quality cables to prevent screen flickering.
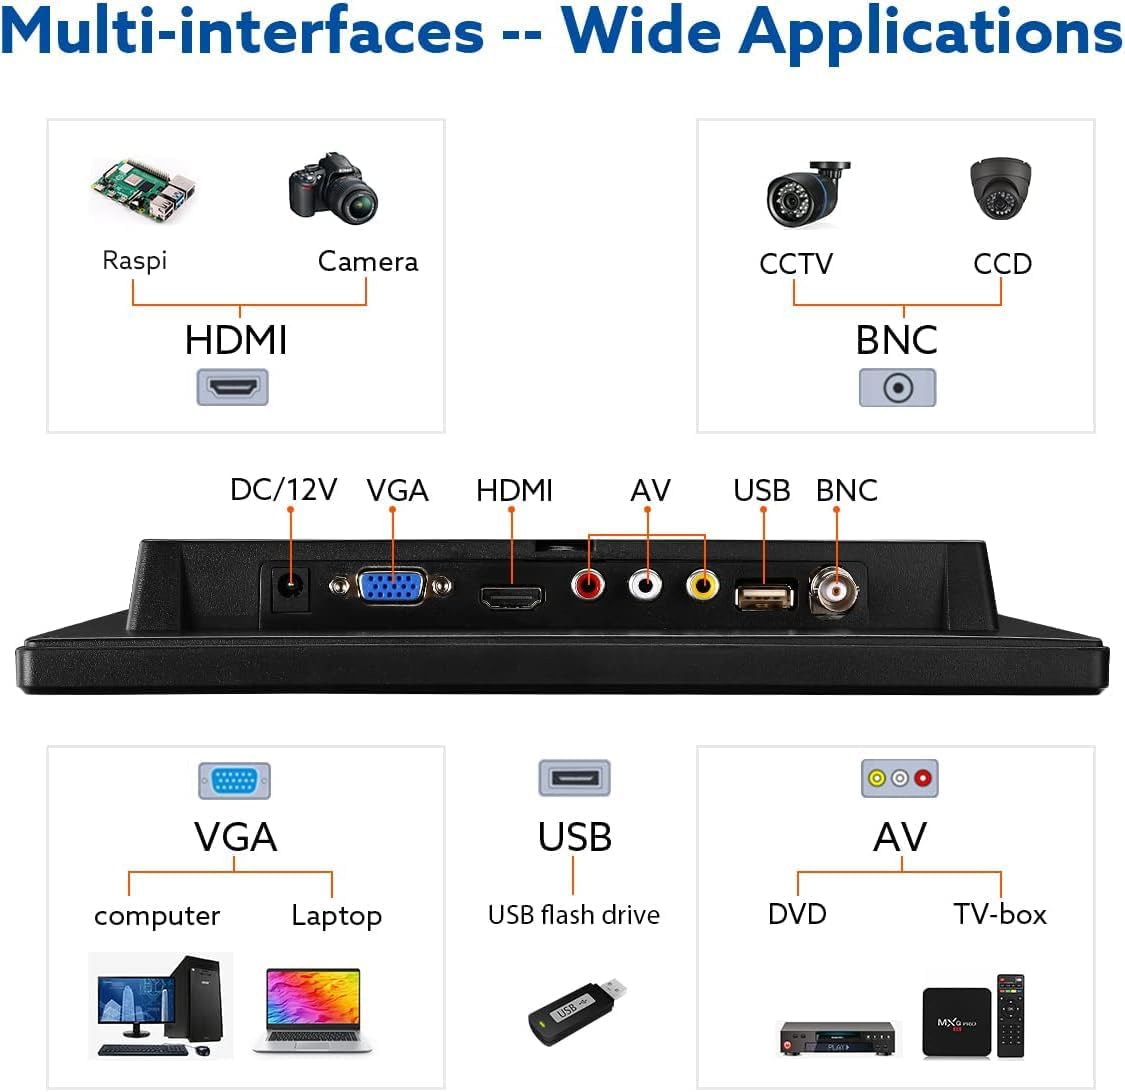
Image: Rear panel of the monitor displaying all available input ports and their labels.
- DC/12V: Power input for the monitor.
- VGA: Connect to computers or laptops for video input.
- HDMI: Connect to devices such as PCs, laptops, gaming consoles, or media players for high-definition video and audio.
- AV (RCA): Connect to DVD players, older gaming consoles, or other analog video sources using composite video (yellow) and stereo audio (white/red) cables.
- USB: For media playback from USB flash drives.
- BNC: Primarily used for connecting to CCTV cameras and security systems.
5.1 Connecting to a PC via HDMI
Connect one end of the HDMI cable to the HDMI port on the monitor and the other end to your computer's HDMI output. Ensure the monitor's input source is set to HDMI using the 'AV1/AV2' button.

Image: The monitor connected to a laptop, functioning as a secondary display for extended workspace.
5.2 Connecting to a CCTV Camera via BNC
Connect the BNC cable from your CCTV camera to the BNC input on the monitor. Switch the monitor's input source to BNC using the 'AV1/AV2' button.

Image: A CCTV camera connected to the monitor, showing the live surveillance feed for security monitoring.
5.3 Connecting to a DVD Player via AV
Use the AV cables (yellow for video, white/red for audio) to connect your DVD player to the monitor's AV input. Switch the monitor's input source to AV using the 'AV1/AV2' button.

Image: The monitor connected to a DVD player, displaying video content for entertainment.
6. Operating Instructions
6.1 Power On/Off
Press the power button located on the front panel to turn the monitor on or off.
6.2 Menu Navigation
Use the 'MENU' button to access the on-screen display (OSD) menu. Use the '+' and '-' buttons to navigate through options and adjust settings. The 'AV1/AV2' button typically functions as an 'Enter' or 'Confirm' button within the menu, or for quick input switching.
6.3 Input Source Selection
Repeatedly press the 'AV1/AV2' button to cycle through available input sources (AV, VGA, HDMI, USB, BNC).
6.4 Image Mirror Function
The monitor supports horizontal and vertical image inversion. This feature is useful for specific setups like teleprompters or unique display orientations.

Image: Demonstrates the monitor's image mirror function, showing horizontal and vertical flips for flexible viewing.
To activate or adjust the image mirror function:
- Press the 'MENU' button to open the OSD menu.
- Navigate to the 'Image' or 'Display' settings.
- Look for options such as 'Flip Image Horizontally', 'Flip Image Vertically', or 'Rotate' (e.g., LD/RD/RU/LU).
- Select the desired inversion option and confirm your choice.
7. Installation Options
The Eyoyo monitor offers flexible installation methods to suit your needs.
7.1 Desktop Placement
The included stand allows for stable desktop placement, suitable for home offices, security monitoring stations, or entertainment setups.
Image: The monitor positioned on a desk using its included stand, ready for use.
7.2 VESA Wall Mounting
The monitor is compatible with 75mm VESA mounting brackets (not included) for wall or arm mounting, providing a space-saving solution.
Image: Rear of the monitor highlighting the VESA mounting points for wall or arm installation.
To wall mount:
- Remove the desktop stand if it is attached.
- Secure a compatible 75mm VESA mounting bracket (purchased separately) to the four screw holes on the back of the monitor.
- Follow the instructions provided with your VESA mount to securely attach the monitor to a wall or an articulating arm.
8. Technical Specifications
| Feature | Detail |
|---|---|
| Product Dimensions | 0.51 x 9.96 x 6.54 inches |
| Item Weight | 1.76 pounds |
| Manufacturer | Eyoyo |
| ASIN | B075KBK896 |
| Item Model Number | EM10M |
| Standing Screen Display Size | 10.1 Inches |
| Aspect Ratio | 16:9 |
| Voltage | 12 Volts |
| Resolution | 1024 x 600 Pixels |
| Image Brightness | 500cd/㎡ Candela |
| Total USB Ports | 1 |
| Screen Surface Description | Glossy |
9. Troubleshooting
This section addresses common issues you might encounter with your Eyoyo monitor and provides potential solutions.
9.1 No Power / Monitor Not Turning On
- Ensure the power adapter is securely connected to both the monitor's DC/12V port and a functional power outlet.
- Verify that the power outlet is working by plugging in another device.
- Check the power adapter and cable for any visible damage. If damaged, replace it with an original or compatible adapter.
- Press the power button firmly on the monitor's front panel.
9.2 No Signal / Blank Screen
- Confirm that the video cable (HDMI, VGA, BNC, AV) is securely connected to both the monitor and the source device.
- Press the 'AV1/AV2' button on the monitor to cycle through all available input sources and ensure the correct input is selected for your connected device.
- Verify that the source device (PC, DVD player, CCTV camera) is powered on and actively outputting a video signal.
- Try using a different video cable to rule out a faulty cable.
- If connecting to a PC, ensure the display settings on your computer are configured to extend or duplicate the display to the external monitor.
9.3 Flickering Screen / Unstable Image
- Ensure you are using the original cables or high-quality, shielded cables for all connections. Low-quality cables can cause signal interference.
- Check for any nearby electronic devices that might be causing electromagnetic interference.
- Adjust the resolution and refresh rate settings on your source device to match the monitor's supported specifications (e.g., 1024x600 resolution).
9.4 Image is Flipped or Mirrored Incorrectly
- Access the monitor's OSD menu by pressing the 'MENU' button.
- Navigate to the 'Image' or 'Display' settings.
- Locate the 'Flip Image' or 'Rotate' options and adjust them to the desired orientation (e.g., normal, horizontal flip, vertical flip).
9.5 No Sound from Speakers
- Increase the volume on the monitor using the OSD menu or the remote control.
- If using AV input, ensure the audio cables (white and red RCA) are correctly connected to both the source and the monitor.
- If using HDMI, check the audio output settings on your source device to ensure audio is being sent to the monitor.
- Verify that the monitor's internal speakers are not muted in the OSD menu.
10. Care and Maintenance
Proper care ensures the longevity and optimal performance of your Eyoyo monitor.
- Cleaning: Use a soft, lint-free cloth to gently wipe the screen and exterior surfaces. For stubborn marks, slightly dampen the cloth with water or a mild, non-abrasive screen cleaner. Avoid harsh chemicals, alcohol, or ammonia-based cleaners, as these can damage the display.
- Handling: Avoid placing heavy objects on the monitor. Do not expose it to extreme temperatures, high humidity, or direct sunlight, which can degrade performance and lifespan.
- Ventilation: Ensure the ventilation openings on the back of the monitor are not blocked. Adequate airflow is crucial to prevent overheating and maintain stable operation.
- Storage: If storing the monitor for an extended period, disconnect it from power and store it in a cool, dry place, preferably in its original packaging to protect it from dust and physical damage.
11. Warranty and Customer Support
Your Eyoyo monitor is covered by a standard manufacturer's warranty. Please refer to the warranty card included in your package for specific terms and conditions regarding coverage and duration.
For technical assistance, troubleshooting, or warranty claims, please contact Eyoyo customer support through their official website or the contact information provided in your product documentation. You can also visit the Eyoyo Store on Amazon for additional product information and support resources.


