Introduction
The Saramonic UWMIC9 is a 96-channel digital UHF wireless dual lavalier microphone system designed for professional audio capture with cameras, DSLRs, camcorders, and smartphones. This system provides a reliable and high-quality audio solution for field recording, interviews, broadcast TV, and electronic news gathering (ENG) applications.
Consumer Alert: Most users do not require a license to operate this wireless microphone system. However, operation without a license is subject to specific restrictions: the system must not cause harmful interference, operate at a low power level (not exceeding 50 milliwatts), and has no protection from interference received from other devices.
Package Contents
Verify that all items listed below are included in your package:
- 1 x RX9 Portable Receiver
- 2 x TX9 Bodypack Transmitters
- 2 x Lavalier Microphones
- 1 x 1/8" to XLR Output Cable
- 1 x 1/8" to 1/8" Output Cable
- 2 x Windscreen
- 2 x Belt Clip
- 1 x Shoe-Mount Adapter

Image: Contents of the Saramonic UWMIC9 system package.
Product Features
The Saramonic UWMIC9 system offers the following key features:
- 96 channels in the UHF frequency band.
- Operating range of over 100 meters (328 feet) in optimal conditions.
- Auto-scan function for easy channel selection.
- Backlit LCD panel displaying RF signal level, channel, group, and battery status.
- Crystal-controlled PLL synthesizer for stable transmission.
- Dual antennas for improved signal reception.
- Two 3.5 mm output ports for real-time audio monitoring.
- Lavalier microphone with removable windscreen to reduce noise.
- Shoe adapter plus a 1/4-inch thread for easy camera attachment.
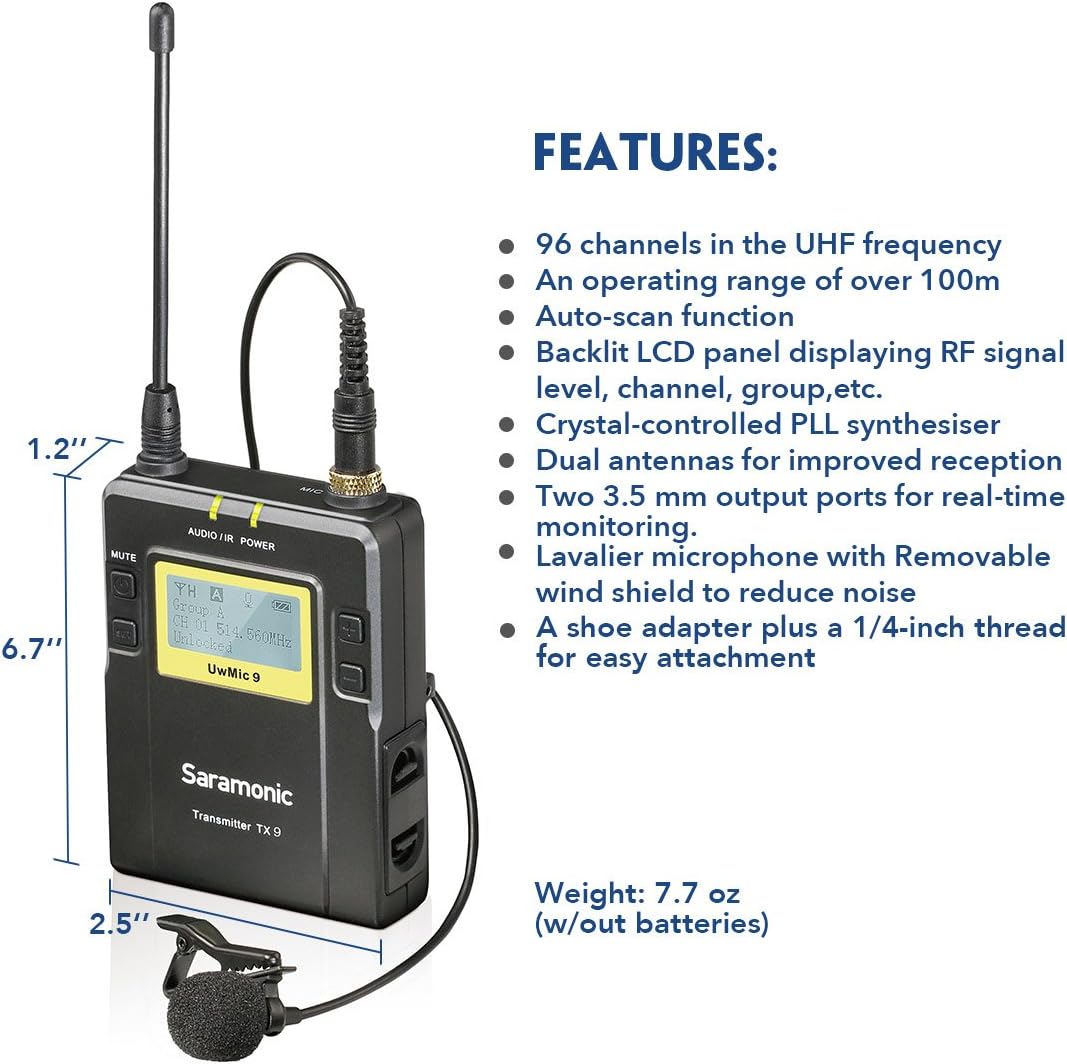
Image: Key features and dimensions of the Saramonic TX9 transmitter.
Component Identification
Familiarize yourself with the main components of the UWMIC9 system:

Image: Labeled diagram of TX9 transmitters and RX9 receiver.
- RX9 Portable Receiver: The central unit that receives audio signals from the transmitters. Features include an LCD display, power button, volume controls, earphone jack for monitoring, and audio output for connecting to recording devices.
- TX9 Bodypack Transmitters: Two compact units worn by subjects, each connecting to a lavalier microphone. They transmit audio wirelessly to the RX9 receiver. Each features an LCD display, power button, and microphone input.
- Lavalier Microphones: Small, omnidirectional microphones designed for discreet placement on clothing, capturing clear speech.
- Antennas: Detachable antennas for both transmitters and receiver, crucial for stable wireless signal transmission and reception.
- Belt Clip: Allows easy attachment of transmitters and receiver to clothing or camera rigs.
- Shoe-Mount Adapter: For mounting the RX9 receiver directly onto a camera's hot shoe.
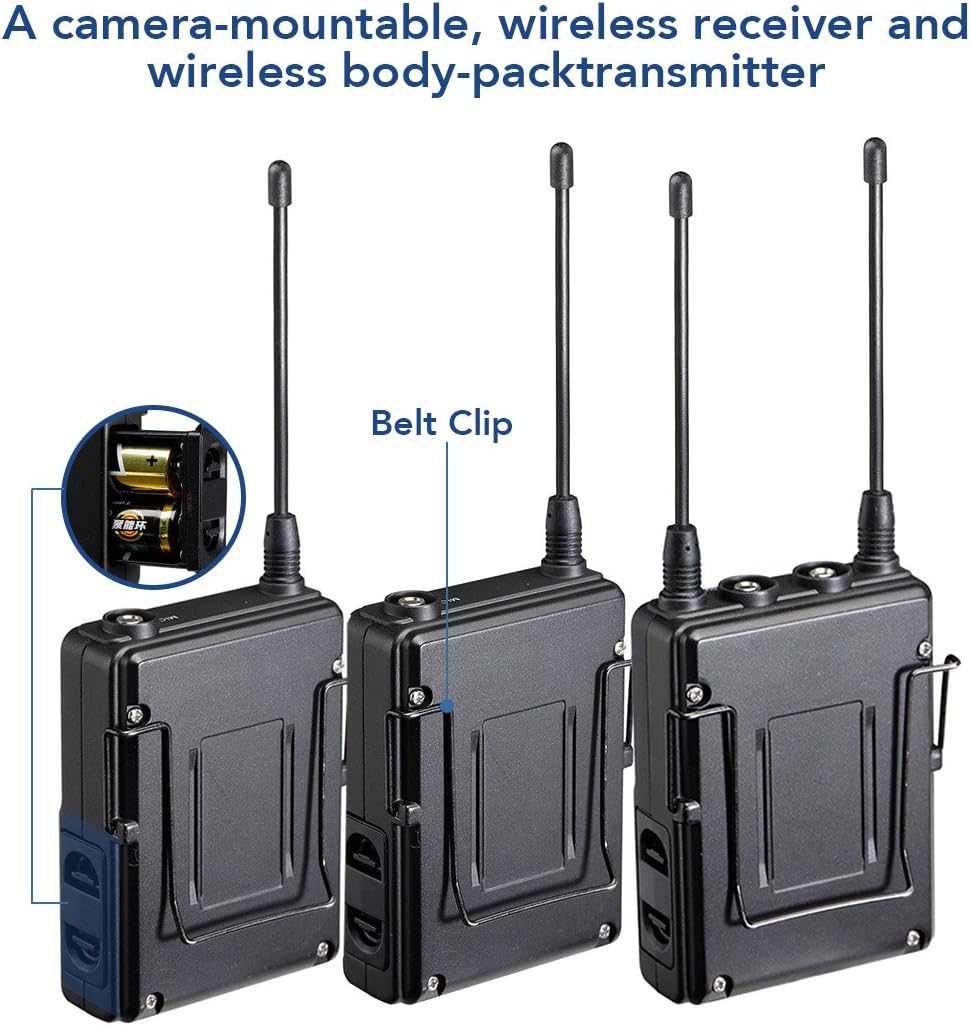
Image: Rear view of Saramonic bodypack units, showing belt clip and battery compartment.
Setup Guide
1. Battery Installation
- Open the battery compartment cover on the back of each TX9 transmitter and the RX9 receiver.
- Insert two AA size batteries into each unit, ensuring correct polarity (+/-).
- Close the battery compartment cover securely.
2. Attaching Antennas
Screw the provided antennas onto the antenna connectors of both TX9 transmitters and the RX9 receiver until finger-tight.
3. Connecting Lavalier Microphones
Plug each lavalier microphone into the "MIC IN" jack on the top of each TX9 transmitter. Ensure the connector clicks into place.
4. Mounting the Receiver
- Camera Mounting: Attach the shoe-mount adapter to the bottom of the RX9 receiver, then slide it onto your camera's hot shoe.
- Belt Clip: Alternatively, use the belt clip to attach the receiver to your belt or a camera rig.
5. Connecting to Recording Device
- DSLR/Camcorder: Use the 1/8" to 1/8" output cable to connect the RX9 receiver's "LINE OUT" to your camera's microphone input. For devices requiring XLR, use the 1/8" to XLR output cable.
- Smartphone: An appropriate adapter (not included) may be required to connect the 1/8" output cable to your smartphone's audio input.
Image: Example setup of the Saramonic UWMIC9 system with a camera rig.
Operating Instructions
1. Powering On/Off
Press and hold the Power button on each TX9 transmitter and the RX9 receiver until the LCD screen illuminates to power on. Repeat to power off.
2. Channel Pairing
- Ensure both transmitters and the receiver are powered on.
- On the RX9 receiver, use the "Mode" button to navigate to the channel selection menu.
- Utilize the "Volume" buttons to select an available channel. The auto-scan function can help find clear frequencies.
- On each TX9 transmitter, navigate to the channel selection menu and set it to the same channel as the RX9 receiver.
- Confirm that the RF signal indicator on the RX9 receiver shows a stable connection.
3. Adjusting Audio Levels
Use the volume buttons on the RX9 receiver to adjust the output audio level. Monitor the audio through headphones connected to the receiver's earphone jack to ensure optimal levels without clipping.
4. Monitoring Audio
Connect headphones to the "EARPHONE" jack on the RX9 receiver to monitor the incoming audio in real-time. This helps in verifying sound quality and detecting any interference.

Image: Saramonic UWMIC9 in use for field recording and interviews.
Maintenance
- Battery Care: Remove batteries from all units when not in use for extended periods to prevent leakage. Replace batteries promptly when the low battery indicator appears on the LCD screen.
- Cleaning: Use a soft, dry cloth to clean the exterior of the units. Avoid using harsh chemicals or abrasive materials.
- Storage: Store the system in a cool, dry place away from direct sunlight and extreme temperatures. Use the original packaging or a protective case for transport.
- Antennas: Handle antennas carefully to avoid bending or breaking. Ensure they are securely attached during operation.
Troubleshooting
| Problem | Possible Cause | Solution |
|---|---|---|
| No audio output |
|
|
| Static or intermittent audio |
|
|
| LCD screen not working |
|
|
Specifications
| Feature | Detail |
|---|---|
| Microphone Form Factor | Microphone System |
| Power Source | Battery Powered (2x AA per unit) |
| Signal-to-Noise Ratio | 70 dB |
| Number of Channels | 96 |
| Frequency Response | 596 MHz |
| Item Weight (Receiver/Transmitter) | 7.7 ounces (without batteries) |
| Package Dimensions | 13.5 x 10.2 x 2.4 inches |
| Model Number | UWMIC9 (Internal: 10789246) |
| Connectivity Technology | Wireless (UHF), XLR |
| Connector Type | 3.5 mm Jack, XLR |
| Special Feature | Clip-on design |
| Compatible Devices | Camcorder, Camera, Smartphone |
| Polar Pattern | Omnidirectional (Lavalier Microphones) |
| Audio Sensitivity | 95 Decibels |
Warranty and Support
For detailed warranty information, please refer to the warranty card included with your product or visit the official Saramonic website. If you encounter any issues not covered in this manual or require technical assistance, please contact Saramonic customer support through their official website or authorized service centers.
Saramonic Official Website: www.saramonic.com