Introduction
This manual provides detailed instructions for the installation, operation, and maintenance of your Yosoo Health Gear Universal Motorcycle Handlebar Control Switch Set. This set includes both left and right handlebar switches designed for motorcycles and motorbikes with 7/8 inch (22mm) diameter handlebars. Please read this manual thoroughly before installation and use to ensure proper function and safety.
Product Features
- Universal Fit: Designed for most motorcycles and motorbikes with 7/8 inch (22mm) diameter handlebars.
- Left Handlebar Switch Functions: Includes controls for turn signals, horn, and high/low beam headlights.
- Right Handlebar Switch Functions: Controls headlight on/off, ignition, and engine stop.
- Durable Construction: Made from high-quality plastic and aluminum for weather resistance and longevity.
- Complete Set: Comes as a pair (left and right switches) for comprehensive control.
Package Contents
The package includes the following items:
- 1 x Left Motorcycle Handlebar Control Switch
- 1 x Right Motorcycle Handlebar Control Switch

Image: The complete set of left and right handlebar control switches with their wiring harnesses.
Specifications
| Attribute | Value |
|---|---|
| Material | Plastic + Aluminum |
| Color | Black (White optional, depending on model) |
| Voltage | 12V DC |
| Suitable Handlebar Diameter | 22mm (7/8 inch) |
| Operation Mode | ON-OFF |
| Switch Type | Push Button |
| Mounting Type | Handlebar Mount |
| Item Weight | Approx. 514 g |
Installation Instructions
Important: Installation should be performed by a qualified technician if you are not familiar with motorcycle electrical systems. Disconnect the motorcycle's battery before beginning installation to prevent electrical shorts or damage.
- Prepare the Handlebar: Ensure your motorcycle's handlebar has a 7/8 inch (22mm) diameter. Clean the area where the switches will be mounted.
- Mount the Left Switch: Slide the left control switch onto the left side of the handlebar. Position it comfortably for easy access to the turn signal, horn, and high/low beam buttons. Secure it using the integrated clamps and screws.
- Mount the Right Switch: Slide the right control switch onto the right side of the handlebar. Position it for easy access to the headlight, ignition, and stop controls. Secure it using the integrated clamps and screws.
- Wiring Connection:
- Identify the existing wiring harness for your motorcycle's original switches.
- The Yosoo Health Gear switches come with multi-pin connectors. Match these connectors to your motorcycle's wiring. Note: Wiring colors may vary between motorcycle models. It is recommended to consult your motorcycle's service manual or a wiring diagram for accurate connections.
- Connect the wires for the left switch (turn signals, horn, high/low beam) to the corresponding circuits on your motorcycle.
- Connect the wires for the right switch (headlight, ignition, stop) to the corresponding circuits on your motorcycle.
- Ensure all connections are secure and properly insulated to prevent short circuits.
- Test Functionality: Reconnect the motorcycle's battery. Test all functions of both switches (turn signals, horn, headlights, ignition, engine stop) to ensure they operate correctly before riding.

Image: Detailed view of the left and right handlebar switches, highlighting the various control buttons and levers.
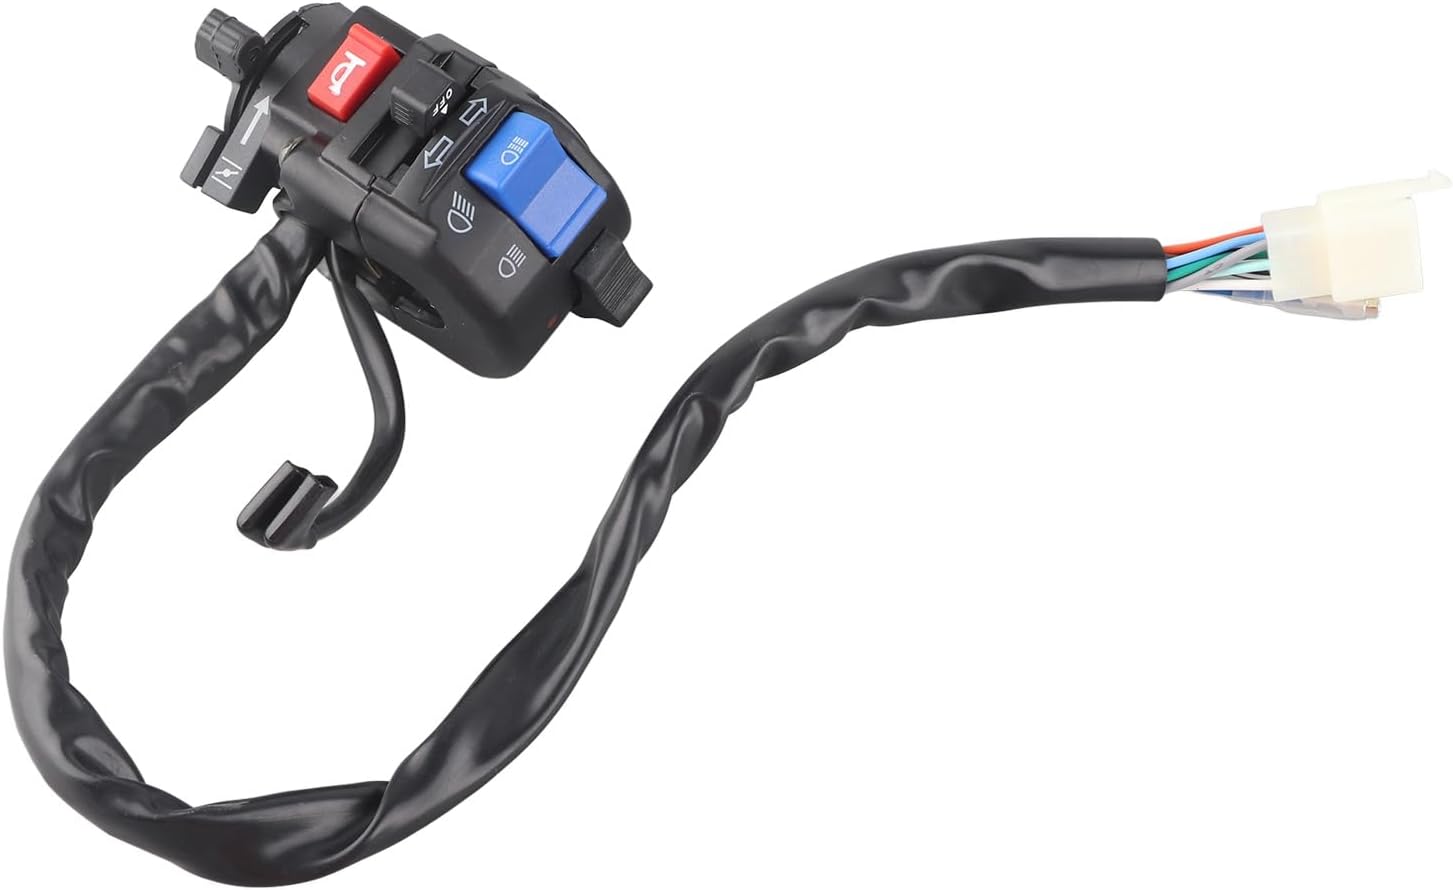
Image: The left handlebar switch with its attached wiring harness and multi-pin connector, ready for installation.
Operating Instructions
Familiarize yourself with the functions of each switch before operating your motorcycle.
Left Handlebar Switch Controls:
- Turn Signal Switch: Push the lever left or right to activate the corresponding turn signal. Push the lever in to cancel the signal.
- Horn Button: Press the button to activate the horn.
- High/Low Beam Switch: Toggle the switch to alternate between high beam and low beam headlights.

Image: A detailed view of the left handlebar switch, clearly showing the controls for turn signals, horn, and high/low beam headlights.
Right Handlebar Switch Controls:
- Headlight ON/OFF Switch: Toggle this switch to turn your motorcycle's headlights on or off.
- Ignition Button: Press this button to start the engine (after turning the ignition key).
- Engine Stop Switch: Use this switch to immediately cut power to the engine in an emergency or when parking.

Image: A detailed view of the right handlebar switch, clearly showing the controls for headlight, ignition, and engine stop.
Maintenance
The Yosoo Health Gear handlebar switches are designed for durability and require minimal maintenance.
- Cleaning: Periodically wipe the switches with a damp cloth to remove dirt and grime. Avoid using harsh chemicals or abrasive cleaners.
- Inspection: Regularly inspect the wiring for any signs of wear, fraying, or damage. Ensure all connections remain secure.
- Weather Protection: While weatherproof, prolonged exposure to extreme weather conditions can affect longevity. Consider using a motorcycle cover when parked outdoors for extended periods.
Troubleshooting
| Problem | Possible Cause | Solution |
|---|---|---|
| Switch not functioning | Loose or incorrect wiring connection. Blown fuse. Faulty switch. | Check all wiring connections for security and correct polarity. Inspect motorcycle's fuse box for blown fuses and replace if necessary. If wiring and fuses are good, the switch may be faulty and require replacement. |
| Intermittent function | Corroded connections. Loose internal components. | Clean electrical connections with contact cleaner. Ensure the switch is securely mounted. If the issue persists, consider replacing the switch. |
| Buttons feel stiff or sticky | Dirt or debris accumulation. | Clean the switch housing and buttons with a damp cloth. Avoid forcing buttons. |
If you encounter issues not listed here or if the suggested solutions do not resolve the problem, please consult a professional motorcycle mechanic.
Warranty and Support
For specific warranty information or technical support, please refer to the documentation provided at the time of purchase or contact Yosoo Health Gear customer service directly. Keep your purchase receipt as proof of purchase.


