Introduction
This user manual provides detailed instructions for the installation, operation, and maintenance of your JeaTone 7-inch Video Doorbell Intercom System. Please read this manual thoroughly before installation and use to ensure proper function and to prevent damage to the device. Keep this manual for future reference.

Image 1: JeaTone 7-inch Video Doorbell Intercom System. This image displays the indoor monitor on the right, featuring a large screen and control buttons, alongside the outdoor call panel on the left, which includes a call button and camera.
Safety Information
- Ensure all power is disconnected before installation or maintenance.
- Do not expose the indoor monitor to high humidity or direct water contact. The outdoor unit is IP65 weatherproof but should not be submerged.
- Use only the provided power adapter and cables.
- Avoid installing the outdoor unit in direct sunlight or where it may be obstructed.
- Keep the product away from strong magnetic fields.
Package Contents
Verify that all items are present in the package:
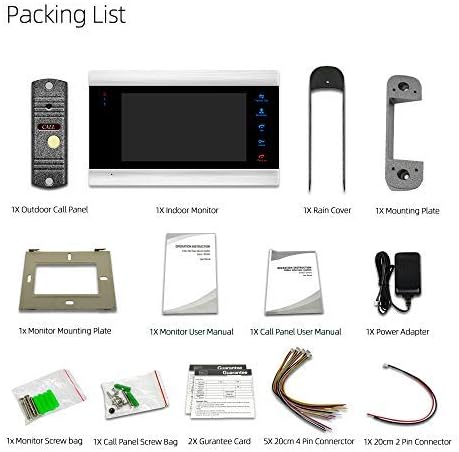
Image 2: Packing List. This image shows all components included in the package, neatly arranged. It includes the outdoor call panel, indoor monitor, rain cover, mounting plates, power adapter, various connectors, screw bags, guarantee cards, and user manuals.
- 1x Indoor Monitor (7-inch TFT Display)
- 1x Outdoor Call Panel (1200TVL Camera)
- 1x Monitor Mounting Plate
- 1x Call Panel Mounting Plate
- 1x Power Adapter (DC 12V)
- 1x Rain Cover for Outdoor Call Panel
- 5x 200mm 4-Pin Connectors
- 1x 200mm 2-Pin Connector
- 2x Screw Bags (for mounting)
- 2x Guarantee Cards
- 2x English User Manuals (one for monitor, one for call panel)
- 2x Qualified Certificates
Note: Extension cables are not included and must be purchased separately if needed.
Product Overview
The JeaTone Video Doorbell Intercom System consists of an indoor monitor and an outdoor call panel, designed for secure and convenient communication with visitors.
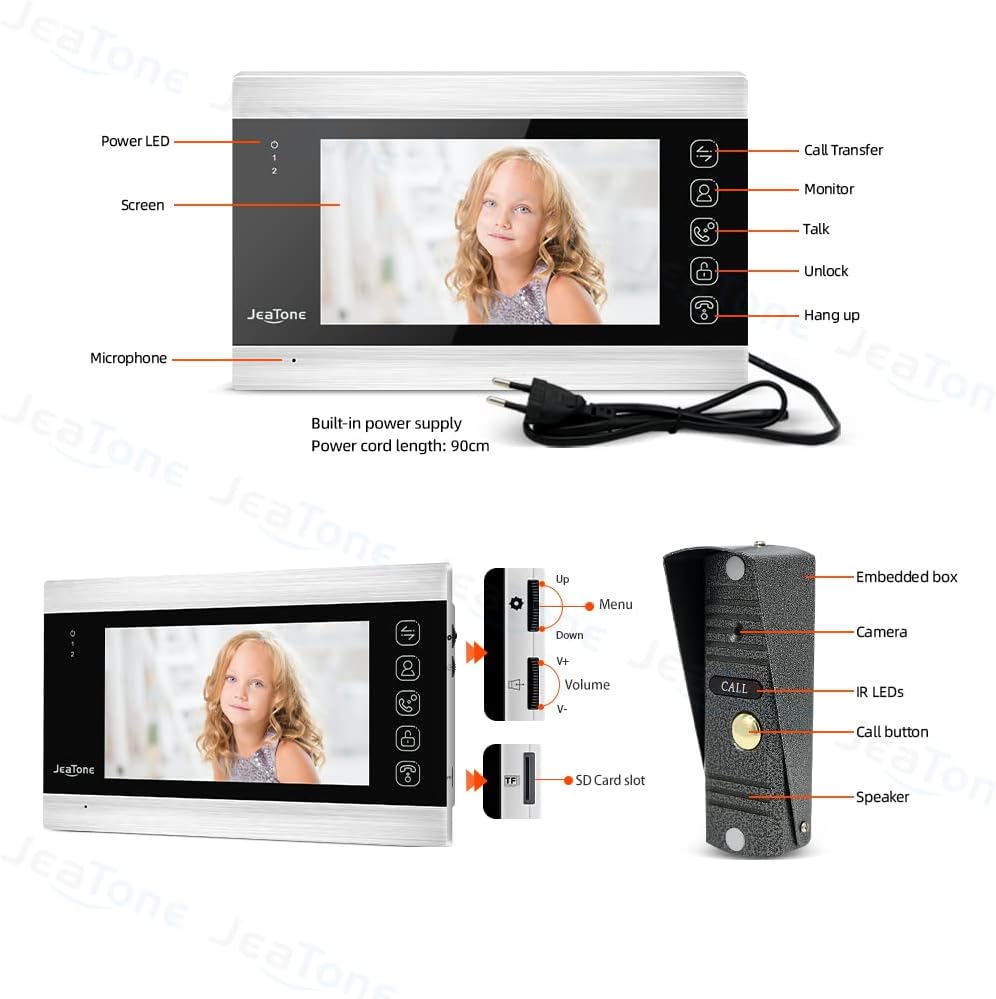
Image 3: Component Identification. This image provides a detailed view of the indoor monitor and outdoor call panel with their respective parts labeled. For the indoor monitor, labels include Power LED, Screen, Microphone, Call Transfer, Monitor, Talk, Unlock, Hang Up buttons, and a built-in power supply. For the outdoor call panel, labels include Embedded box, Camera, IR LEDs, Call button, and Speaker.
Indoor Monitor Features:
- 7-inch TFT High Resolution Color Screen (800*480)
- Touch Button Interface
- Room-to-Room Intercom Functionality
- Support for Door Answering, Monitoring, and Unlocking
- Adjustable Color, Brightness, and Volume
- Built-in Memory for 86 Pictures, supports external Max. 32GB SD Card
- Supports up to 2 Outdoor Call Panels, 4 Indoor Monitors, 2 Analog Cameras, and 2 Alarm Sensors
- OSD Menu Operate System
Outdoor Call Panel Features:
- 1/3" CMOS Camera Sensor, 1200TVL High Resolution
- 2.8mm Wide Angle Lens
- IP65 Weatherproof Rating
- IR Sensor for Automatic IR LED activation (Day/Night Vision)
- Durable Aluminum Alloy Panel
- Surface Mounted Installation
Setup and Installation
1. Outdoor Call Panel Installation
- Choose Location: Select a suitable location near your entrance, ensuring the camera has a clear view of visitors. The recommended height is approximately 1.5 meters (5 feet) from the ground.
- Mounting Plate: Secure the call panel mounting plate to the wall using the provided screws. Ensure it is level.
- Wiring: Connect the necessary wires (power, video, audio, unlock) from the outdoor unit to the indoor monitor. Refer to the wiring diagram in the separate Call Panel User Manual for specific connections.
- Attach Rain Cover: Install the rain cover over the mounting plate before attaching the call panel to provide additional weather protection.
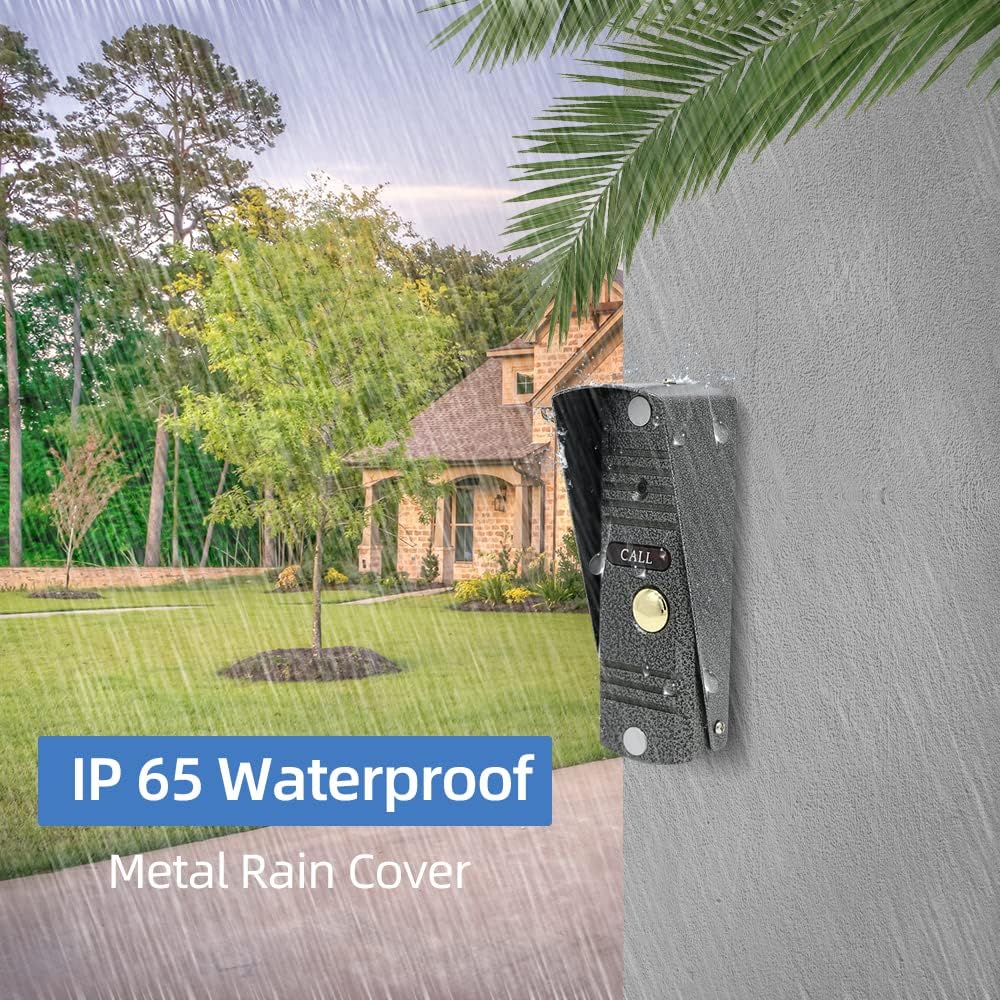
Image 4: IP65 Weatherproof with Metal Rain Cover. This image illustrates the outdoor call panel mounted on a wall, highlighting its IP65 weatherproof rating and the protective metal rain cover installed above it, ensuring durability against outdoor elements.
- Secure Call Panel: Attach the outdoor call panel to the mounting plate, ensuring all connections are secure and the unit is firmly in place.
2. Indoor Monitor Installation
- Choose Location: Select a convenient indoor location for the monitor, typically in a central area or near the main entrance.
- Mounting Plate: Secure the monitor mounting plate to the wall using the provided screws.
- Wiring: Connect the wires from the outdoor call panel to the corresponding ports on the indoor monitor. Use the provided 4-pin connectors. Ensure correct polarity.
- Power Connection: Connect the DC 12V power adapter to the indoor monitor and then plug it into a standard electrical outlet.
- Secure Monitor: Carefully mount the indoor monitor onto its mounting plate.
Operating Instructions
1. Answering a Call
- When a visitor presses the CALL button on the outdoor panel, the indoor monitor will ring and display the visitor's image.
- Press the Talk button on the indoor monitor to establish two-way audio communication.
- To end the conversation, press the Hang Up button.
2. Monitoring
- To view the outdoor camera feed at any time, press the Monitor button on the indoor unit.
- The monitor will display the live video feed from the outdoor call panel.
- Press the Monitor button again to exit monitoring mode.
3. Unlocking the Door
- During a call or while monitoring, press the Unlock button on the indoor monitor to remotely unlock an electronic lock connected to the system.
4. Intercom Function (Monitor to Monitor)
- If multiple indoor monitors are installed, you can communicate between them.
- Press the Call Transfer button to initiate a call to another indoor monitor. Follow the on-screen prompts to select the desired monitor.
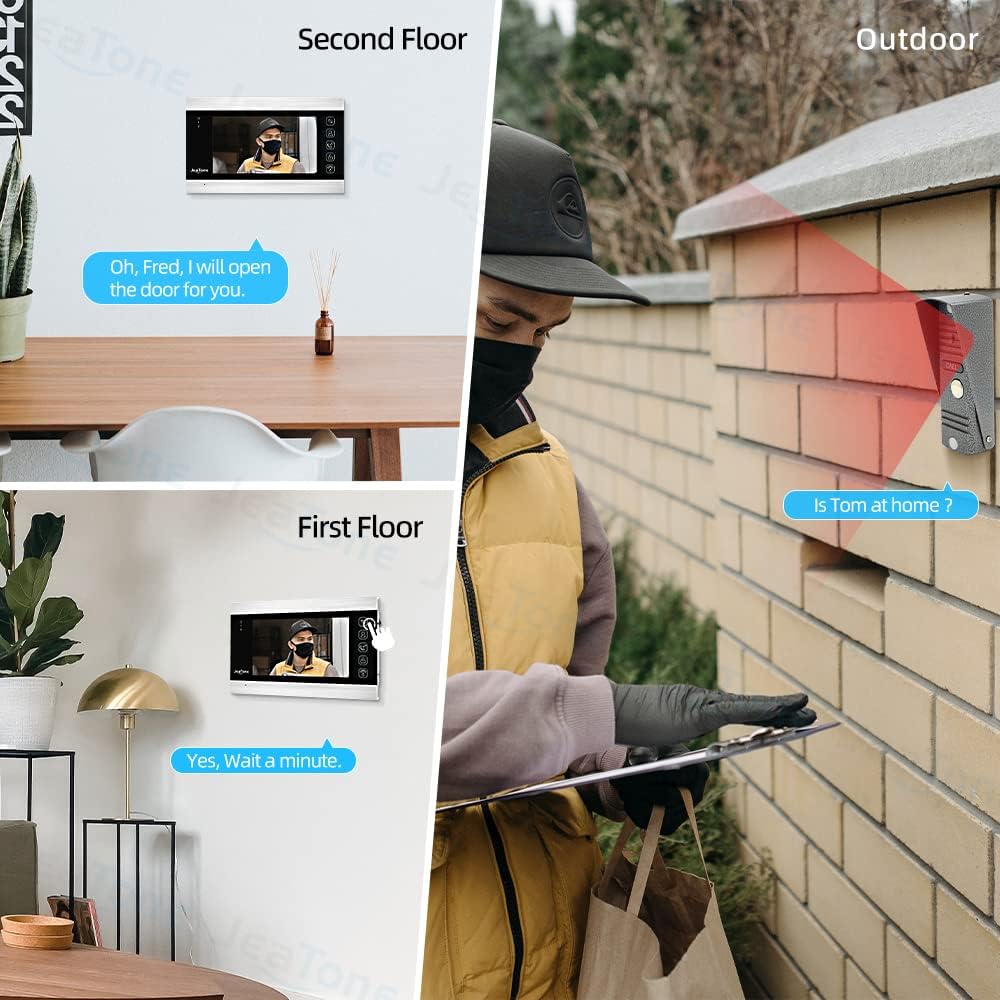
Image 5: Multi-Monitor Intercom. This image demonstrates the intercom functionality between two indoor monitors located on different floors, allowing occupants to communicate with each other and with visitors at the outdoor call panel.
5. Adjusting Settings
- Access the OSD (On-Screen Display) menu by pressing the Menu button (if available, or refer to specific monitor manual).
- Navigate through the menu using the Up/Down buttons.
- Adjust settings such as color, brightness, and volume to your preference.
- Select from 12 available ringtones.
6. Recording (Pictures and Video)
- The system has a built-in memory to save up to 86 pictures.
- To expand storage, insert a Micro SD card (up to 32GB, not included) into the SD card slot on the indoor monitor.
- The system can automatically record pictures (JPG format) or video (AVI format) when a visitor presses the call button or when motion is detected (if enabled).
7. Motion Detection
- The outdoor camera features motion detection capabilities. When motion is detected within the camera's field of view, the system can automatically capture images or record video.
- Refer to the OSD menu settings to enable and configure motion detection sensitivity.

Image 6: Motion Detection. This image illustrates the motion detection feature, showing the outdoor call panel detecting movement and the indoor monitor displaying a recording of the event, indicating enhanced home security.
Maintenance
- Cleaning: Use a soft, dry cloth to clean the indoor monitor screen and casing. For the outdoor unit, a damp cloth can be used to wipe away dirt. Avoid abrasive cleaners or solvents.
- Weather Protection: While the outdoor unit is IP65 weatherproof, regularly check the rain cover and ensure it is free from debris to maintain optimal protection.
- Cable Inspection: Periodically inspect all cables for any signs of wear or damage. Replace damaged cables immediately.
- Software Updates: Check the manufacturer's website for any available firmware updates to ensure optimal performance and security.
Troubleshooting
| Problem | Possible Cause | Solution |
|---|---|---|
| No image on indoor monitor. | Power not connected; loose video cable; faulty camera. | Check power adapter connection; ensure video cable is securely connected; contact support if camera is faulty. |
| No audio during call. | Loose audio cable; microphone/speaker issue; volume too low. | Check audio cable connections; adjust volume settings; contact support. |
| Door unlock function not working. | Electronic lock not connected correctly; faulty unlock relay. | Verify electronic lock wiring; test the lock independently; contact support. |
| Monitor not turning on. | No power; faulty power adapter. | Ensure power adapter is plugged in and receiving power; test with another compatible adapter if possible. |
| Poor image quality. | Dirty camera lens; poor lighting; damaged video cable. | Clean camera lens; ensure adequate lighting; check video cable for damage. |
Specifications
| Component | Feature | Specification |
|---|---|---|
| Indoor Monitor | Display | 7-inch TFT, 800*480 resolution |
| Control | Touch Button, OSD Menu | |
| Intercom | Room to Room, Monitor to Monitor | |
| Functions | Answering, Monitoring, Unlocking | |
| Adjustments | Color, Brightness, Volume, 12 Ringtones | |
| Internal Memory | Saves 86 Pictures (JPG) | |
| External Storage | Supports Max. 32GB SD Card (Video: AVI) | |
| System Capacity | 2 Call Panels + 4 Indoor Monitors + 2 Analog Cameras + 2 Alarm Sensors | |
| Power Input | External Power DC 12V | |
| Power Consumption | Standby: 3W; Working: 5W | |
| Outdoor Call Panel | Camera Sensor | 1/3" CMOS, 1200TVL-Line High Resolution |
| Lens | 2.8mm Wide Angle Lens | |
| Night Vision | IR Sensor, Automatic IR LEDs | |
| Weatherproof Rating | IP65 | |
| Material | Aluminum Alloy Panel | |
| Operation Temperature | -40°C to +50°C (-40°F to 122°F) | |
| Installation | Surface Mounted | |
| General | Model Number | 84706-84201 |
| General | Connectivity | Wired |
Warranty and Support
JeaTone products are designed for reliability and performance. This product comes with a standard manufacturer's warranty. Please refer to the included Guarantee Card for specific warranty terms and conditions.
For technical support, troubleshooting assistance, or warranty claims, please contact JeaTone customer service through the contact information provided on your Guarantee Card or the official JeaTone website.
You can visit the JeaTone Store on Amazon for more information and support resources.