YAESU FT-2980R
YAESU FT-2980R 144 MHz Single Band Mobile Transceiver User Manual
Model: FT-2980R | Brand: YAESU
Introduction
This manual provides comprehensive instructions for the operation and maintenance of your YAESU FT-2980R 144 MHz Single Band Mobile Transceiver. Designed for robust performance, the FT-2980R offers 80 Watts of power output and a range of features for reliable communication. Please read this manual thoroughly to ensure proper and safe use of your transceiver.
Key Features
- Massive Heatsink guarantees 80 Watts of RF Power with No Cooling Fan Needed.
- Four selectable power output levels: 80W, 30W, 10W, and 5W.
- Loud 3 Watts of Audio Output for noisy environments.
- Large 6 Digit Backlit LCD ensures excellent visibility.
- Excellent Receiver Performance.
- Alpha-Numeric Channel Display.
- 200 Memory Channels for serious users.
- CTCSS and DCS Encode/Decode Built-in.
- Versatile Scanning Capability.
- WX Channels with "Severe Weather" Alert.
- Smart Search Operation.
- DTMF Direct Access Microphone Included.
- Wide/Narrow Deviation Selection.
- RF-Squelch.
- Interactive Programming Menu.
- Supply Voltage Display.
- 4-level Display Dimmer.
- Dual Watch FT.
What's in the Box
Upon opening the package, please verify that all items are present and undamaged:
- YAESU FT-2980R Transceiver Unit
- DTMF Direct Access Microphone (MH-48)
- DC Power Cable
- Mobile Mounting Bracket
- Hardware Kit
- User Manual (this document)
Setup Guide
1. Transceiver Overview
Familiarize yourself with the front panel controls and connections of the FT-2980R. The large backlit LCD provides clear frequency and status information.
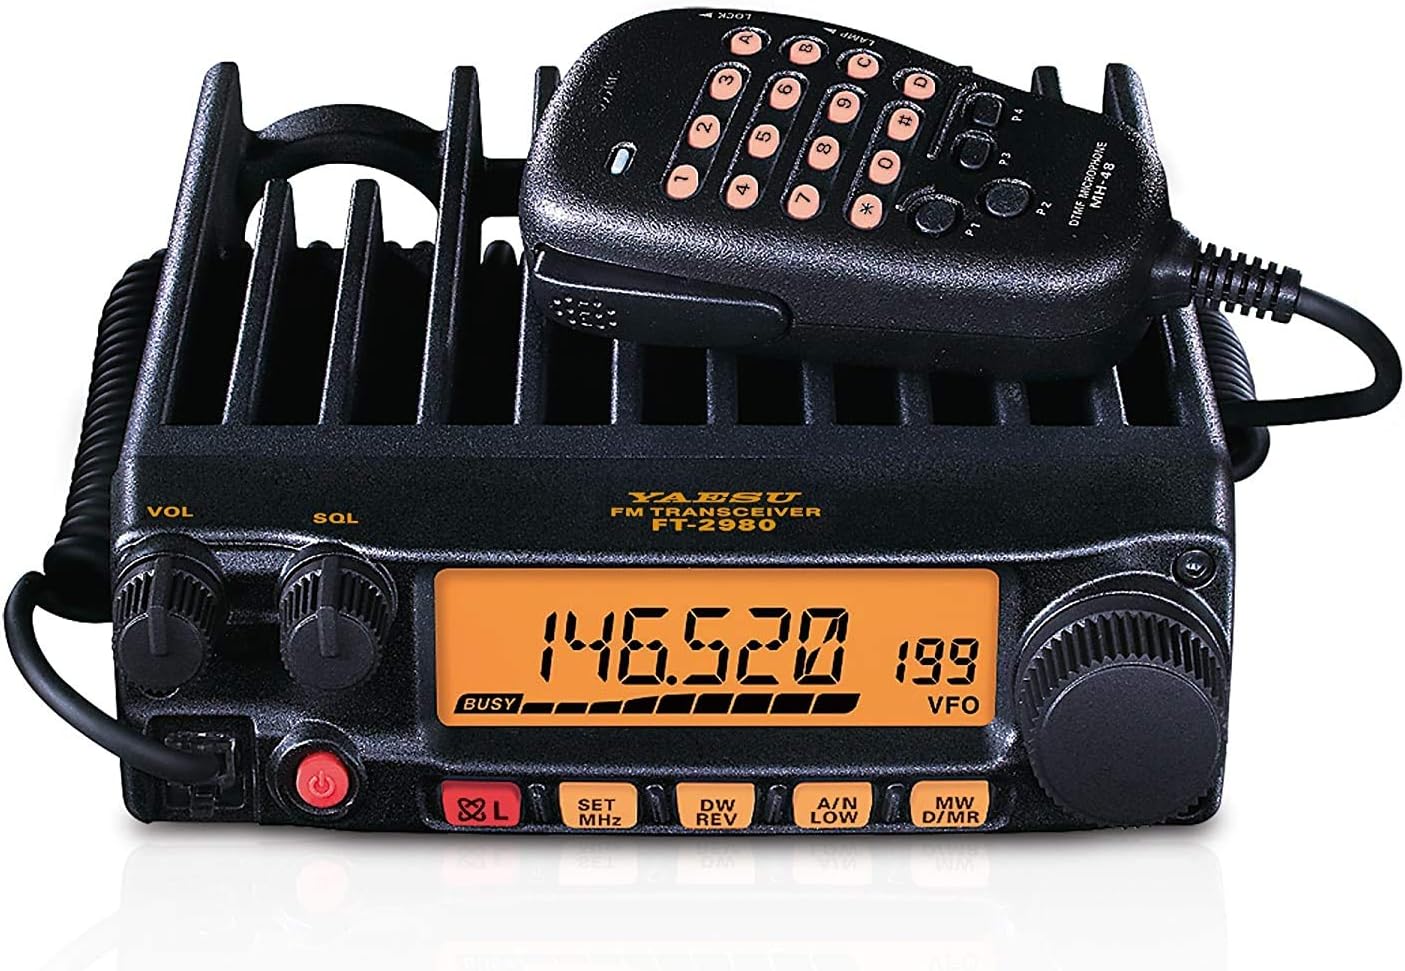
Figure 1: Front Panel and Microphone of FT-2980R
This image displays the front of the YAESU FT-2980R transceiver. Key elements visible include the large orange backlit LCD screen showing "146.520 199 VFO", the "VOL" (Volume) and "SQL" (Squelch) knobs on the left, and the main tuning dial on the right. Below the display are function buttons: "82L", "SET MHz", "DW REV", "A/N LOW", and "MW D/MR". The included DTMF microphone (MH-48) is shown connected, featuring a numeric keypad and function buttons P1-P4.
2. Power Connection
- Ensure your power supply is rated for 13.8V DC and can provide at least 15 Amps for full 80W output.
- Connect the supplied DC power cable to the transceiver's power input jack (typically on the rear panel).
- Connect the other end of the power cable to your DC power supply, observing correct polarity (red to positive, black to negative).
- Turn on the power supply.
3. Antenna Connection
- Connect a 144 MHz (2-meter band) antenna with a 50-ohm impedance to the SO-239 connector on the rear of the transceiver.
- Ensure the antenna is properly tuned for the 2-meter band to prevent damage to the transceiver.
4. Microphone Connection
- Plug the supplied DTMF microphone (MH-48) into the microphone jack on the front panel of the transceiver.
Operating Instructions
1. Power On/Off
- To turn on the transceiver, press and hold the red power button (located on the lower left of the front panel) for approximately one second.
- To turn off the transceiver, press and hold the same power button until the display turns off.
2. Adjusting Volume and Squelch
- The VOL knob (leftmost knob) controls the audio output level. Rotate clockwise to increase volume, counter-clockwise to decrease.
- The SQL knob (next to VOL) controls the squelch level. Rotate clockwise until the background noise disappears. This sets the threshold for incoming signals.
3. Frequency Tuning (VFO Mode)
- Ensure the transceiver is in VFO (Variable Frequency Oscillator) mode. If not, press the VFO button (if available, or cycle modes using a dedicated button or menu). The display will show "VFO".
- Rotate the main tuning dial (large knob on the right) to change the operating frequency.
- Press the SET MHz button to change the tuning step or to jump to specific MHz increments.
4. Selecting Power Output
The FT-2980R offers four power output settings: 80W, 30W, 10W, and 5W.
- Press the A/N LOW button repeatedly to cycle through the available power levels. The current power level will be indicated on the display (e.g., "LOW" for 5W, "MID" for 10W, "HIGH" for 30W, and no indicator for 80W).
5. Memory Channels
The transceiver has 200 memory channels for storing frequently used frequencies and settings.
- Storing a Memory:
- Tune to the desired frequency in VFO mode.
- Press the MW D/MR button momentarily. A memory channel number will flash.
- Rotate the main dial to select the desired memory channel number.
- Press the MW D/MR button again to store the frequency.
- Recalling a Memory:
- Press the MW D/MR button to enter Memory Recall mode.
- Rotate the main dial to select the desired memory channel.
- To return to VFO mode, press the VFO button.
- Alphanumeric Channel Display: The FT-2980R supports displaying channel names. Refer to the detailed programming menu section in the full manual for instructions on setting alphanumeric labels.
6. CTCSS and DCS Operation
CTCSS (Continuous Tone-Coded Squelch System) and DCS (Digital Code Squelch) are used to filter out unwanted signals and access repeaters.
- Access the menu system (typically by pressing the SET MHz button for a few seconds) to configure CTCSS/DCS encode and decode tones/codes.
- Refer to the full manual for specific menu navigation and tone/code selection.
7. Scanning Functions
The transceiver offers various scanning capabilities, including VFO scan, memory scan, and Smart Search.
- To initiate a scan, typically press and hold the DW REV button or access the scanning options via the menu.
- Smart Search: This feature automatically loads active frequencies into a special memory bank. It's useful for finding local activity in an unfamiliar area.
Maintenance
- Cleaning: Use a soft, dry cloth to clean the transceiver's exterior. For stubborn dirt, a slightly damp cloth with mild soap can be used, followed by a dry cloth. Avoid abrasive cleaners or solvents.
- Heat Sink: The FT-2980R features a massive heatsink for heat dissipation. Ensure the heatsink fins (on the top and rear of the unit) are not obstructed to allow for proper airflow, especially during high-power operation.
- Connections: Periodically check all cable connections (power, antenna, microphone) for secure fit and signs of wear.
Troubleshooting
| Problem | Possible Cause | Solution |
|---|---|---|
| No power | Loose power cable connection; Power supply off or faulty; Blown fuse. | Check power cable connections; Ensure power supply is on and functioning; Inspect and replace fuse if necessary. |
| No audio from speaker | Volume too low; Squelch set too high; External speaker disconnected. | Increase VOL knob; Decrease SQL knob; Check external speaker connection if used. |
| Cannot transmit or low power output | Antenna not connected or faulty; High SWR; Incorrect power setting. | Check antenna connection; Verify antenna SWR (Standing Wave Ratio); Select higher power output setting. |
| Cannot access repeater | Incorrect offset; Incorrect CTCSS/DCS tone/code. | Verify repeater offset and direction; Confirm correct CTCSS/DCS tone/code settings. |
Specifications
| Feature | Detail |
|---|---|
| Brand | YAESU |
| Model Number | FT-2980R |
| Frequency Range | 144 MHz (VHF Single Band) |
| Output Power | 80W / 30W / 10W / 5W (selectable) |
| Number of Channels | 200 Memory Channels |
| Audio Output | 3 Watts (Loud) |
| Display | Large 6-Digit Backlit LCD with 4-level Dimmer |
| Special Features | Voice Operated Transmission, Massive Heatsink, Alphanumeric Channel Display, CTCSS/DCS Encode/Decode, Versatile Scanning, WX Channels with Alert, Smart Search, DTMF Microphone, Wide/Narrow Deviation, RF-Squelch, Interactive Programming Menu, Supply Voltage Display, Dual Watch FT |
| Item Weight | 4.2 pounds |
| Product Dimensions | 7.3 x 6.3 x 2 inches |
| Water Resistance Level | Not Water Resistant |
Warranty and Support
The YAESU FT-2980R Mobile Transceiver comes with a 3-Year Manufacturer Warranty, ensuring peace of mind regarding your investment. For technical support, service, or warranty claims, please contact YAESU customer service directly or visit their official website for the most up-to-date contact information and support resources.
Always refer to the official YAESU website for the latest software updates, FAQs, and additional support documentation.