
1. Introduction
This manual provides comprehensive instructions for the installation, operation, and maintenance of your new AudioOrigin Moving Magnet Cartridge and Stylus. Designed for compatibility with various AIWA turntable models, this product aims to deliver high-quality audio reproduction. Please read this manual thoroughly before installation and use to ensure optimal performance and longevity of your equipment.
2. Safety Information
Handle the cartridge and stylus with care. The stylus tip is delicate and can be damaged by improper handling. Always use the stylus guard when the turntable is not in use or during installation. Keep out of reach of children.
3. Package Contents
Verify that all items listed below are present in your package:
- AudioOrigin Moving Magnet Cartridge
- Stylus (pre-installed on cartridge)
- Spare Stylus
- Stylus Guard
- Brass Mounting Bolts (2 pieces)

Figure 3.1: The AudioOrigin cartridge with its pre-installed stylus and the included brass mounting bolts. The stylus guard is typically clear and covers the stylus tip.

Figure 3.2: A close-up view of the replacement stylus, showing its delicate needle tip and housing. This spare stylus is included for future replacement.
4. Setup and Installation
This cartridge is compatible with AIWA turntable models AP2500, AP2200, APD50, LP3000, AP2060N, AP2400, and PX30. Follow these steps to install the cartridge onto your turntable's tonearm headshell.
- Preparation: Ensure your turntable is powered off and unplugged. If replacing an old cartridge, carefully remove it from the headshell.
- Mounting the Cartridge:
- Align the new AudioOrigin cartridge with the mounting holes on your turntable's headshell.
- Insert the provided brass mounting bolts through the headshell and into the cartridge. The brass bolts are designed for better isolation and mass.
- Gently tighten the bolts, ensuring the cartridge is securely fastened but not overtightened.
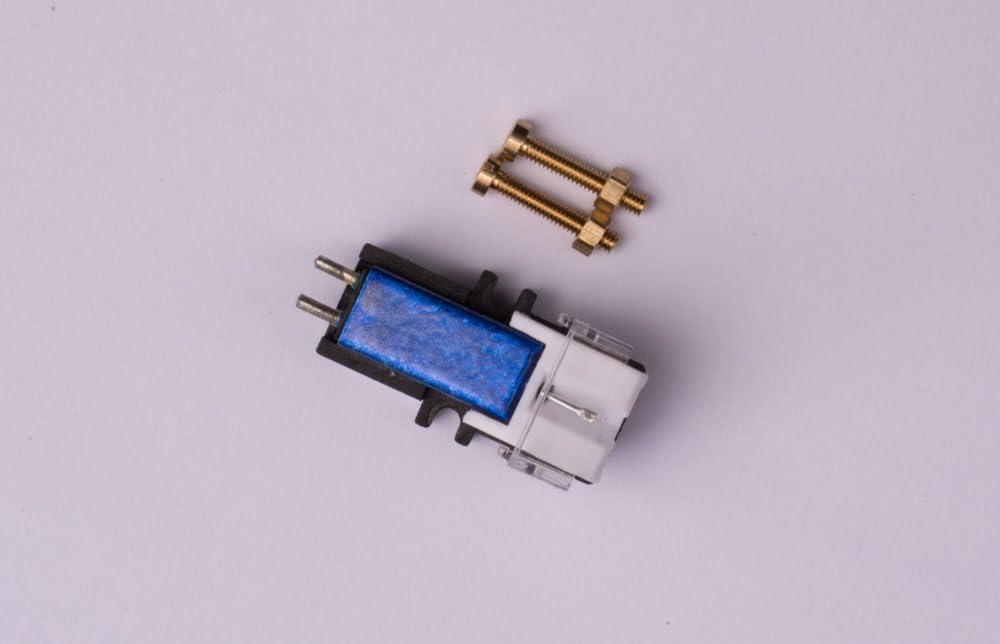
Figure 4.1: Top-down view illustrating the cartridge and the brass mounting bolts, showing how they align for installation onto a headshell.
- Connecting Wires: Carefully connect the four color-coded wires from the tonearm to the corresponding pins on the back of the cartridge.
- Red (R+): Right Channel Positive
- Green (R-): Right Channel Ground
- White (L+): Left Channel Positive
- Blue (L-): Left Channel Ground
Ensure connections are firm but avoid excessive force to prevent damage to the pins or wires.
- Stylus Guard: Remove the stylus guard before proceeding to the next step.
- Tracking Force Adjustment: Set the tracking force on your turntable's tonearm to the recommended range of 2.5 - 3.5 grams. Refer to your turntable's manual for specific instructions on adjusting tracking force and anti-skate.
- Alignment: For optimal sound quality and to prevent record wear, proper cartridge alignment (overhang and azimuth) is crucial. If you are unsure, consult your turntable's manual or a qualified technician.
5. Operation
Once installed and properly adjusted, your AudioOrigin cartridge is ready for use. Place a record on the platter, ensure the stylus guard is removed, and carefully lower the tonearm onto the record's lead-in groove. The cartridge is designed to provide excellent, warm sound quality.
6. Maintenance
6.1. Stylus Cleaning
Regularly clean the stylus tip to remove dust and debris, which can degrade sound quality and damage records. Use a soft stylus brush, brushing gently from back to front (in the direction of play). Never brush from side to side or front to back.
6.2. Cartridge Care
Avoid touching the cartridge body or stylus with your fingers. When not in use, always engage the stylus guard to protect the delicate stylus tip.
6.3. Stylus Replacement
The stylus is a consumable part and will wear out over time, typically after 500-1000 hours of play, depending on care and record condition. A worn stylus can damage your records. Replace the stylus when you notice a degradation in sound quality or visible wear. To replace, gently pull the old stylus assembly forward and down from the cartridge body, then push the new spare stylus (included) firmly into place until it clicks.
7. Troubleshooting
- No Sound or Weak Sound:
- Check all wire connections between the cartridge and tonearm for proper contact.
- Ensure the turntable is connected to the correct PHONO input on your amplifier/receiver.
- Verify the amplifier/receiver is powered on and set to the correct input.
- Distorted Sound or Skipping:
- Check the stylus for dirt or debris and clean it if necessary.
- Verify the tracking force is set correctly (2.5 - 3.5 grams).
- Ensure the turntable is level.
- Inspect the stylus for damage or wear. Replace if worn.
- Humming Noise:
- Ensure the turntable's ground wire is properly connected to your amplifier/receiver's ground terminal.
- Check for interference from other electronic devices.
8. Specifications
- Type: Moving Magnet Cartridge
- Frequency Response: 20-20,000 Hz
- Channel Separation (1kHz): > 15dB
- Recommended Downforce: 2.5 - 3.5 grams
- Item Weight: 1 pound (approximate, including packaging)
- Model Number: 4330368626
- Compatibility: AIWA AP2500, AP2200, APD50, LP3000, AP2060N, AP2400, PX30
9. Warranty and Support
For warranty information or technical support, please contact your retailer or the manufacturer, AudioOrigin. Keep your purchase receipt as proof of purchase. Specific warranty terms may vary by region and retailer.