Introduction
The Pioneer DJ INTERFACE 2 is a 2-channel audio interface designed to enable digital vinyl system (DVS) control with rekordbox. This device allows DJs to scratch and control digital music on their computer using any DJ setup, providing a robust and portable solution for various performance environments.
Key features include high-quality D/A converters supporting audio files up to 96kHz sampling rate for club-standard sound, a compact and robust aluminum casing with extended edges for terminal protection, and LED indicators for visual signal flow monitoring. The package includes essential cables to get started with rekordbox DVS immediately.

Image: Top view of the Pioneer DJ INTERFACE 2, showcasing its compact design and input/output indicators.
Setup
Proper setup of the INTERFACE 2 is crucial for optimal performance. Follow these steps to integrate the audio interface into your DJ setup:
- Connect Turntables/CDJs to Inputs: Connect your turntables or CDJs to the INPUTs (Deck 1 and Deck 2) on the INTERFACE 2 using RCA cables. Ensure the PHONO/LINE switch on the INTERFACE 2 matches the output type of your connected device (e.g., PHONO for turntables, LINE for CDJs).
- Connect Outputs to Mixer: Connect the OUTPUTs (Deck 1 and Deck 2) of the INTERFACE 2 to the LINE inputs of your DJ mixer using RCA cables.
- Connect to Computer: Connect the INTERFACE 2 to your computer via the USB port using the provided USB cable.
- Power Connection: Connect the power adapter to the DC IN port on the INTERFACE 2 and plug it into a power outlet.
- Grounding: For turntables, connect the ground wire from each turntable to the GND terminal on the INTERFACE 2 to reduce hum and noise.
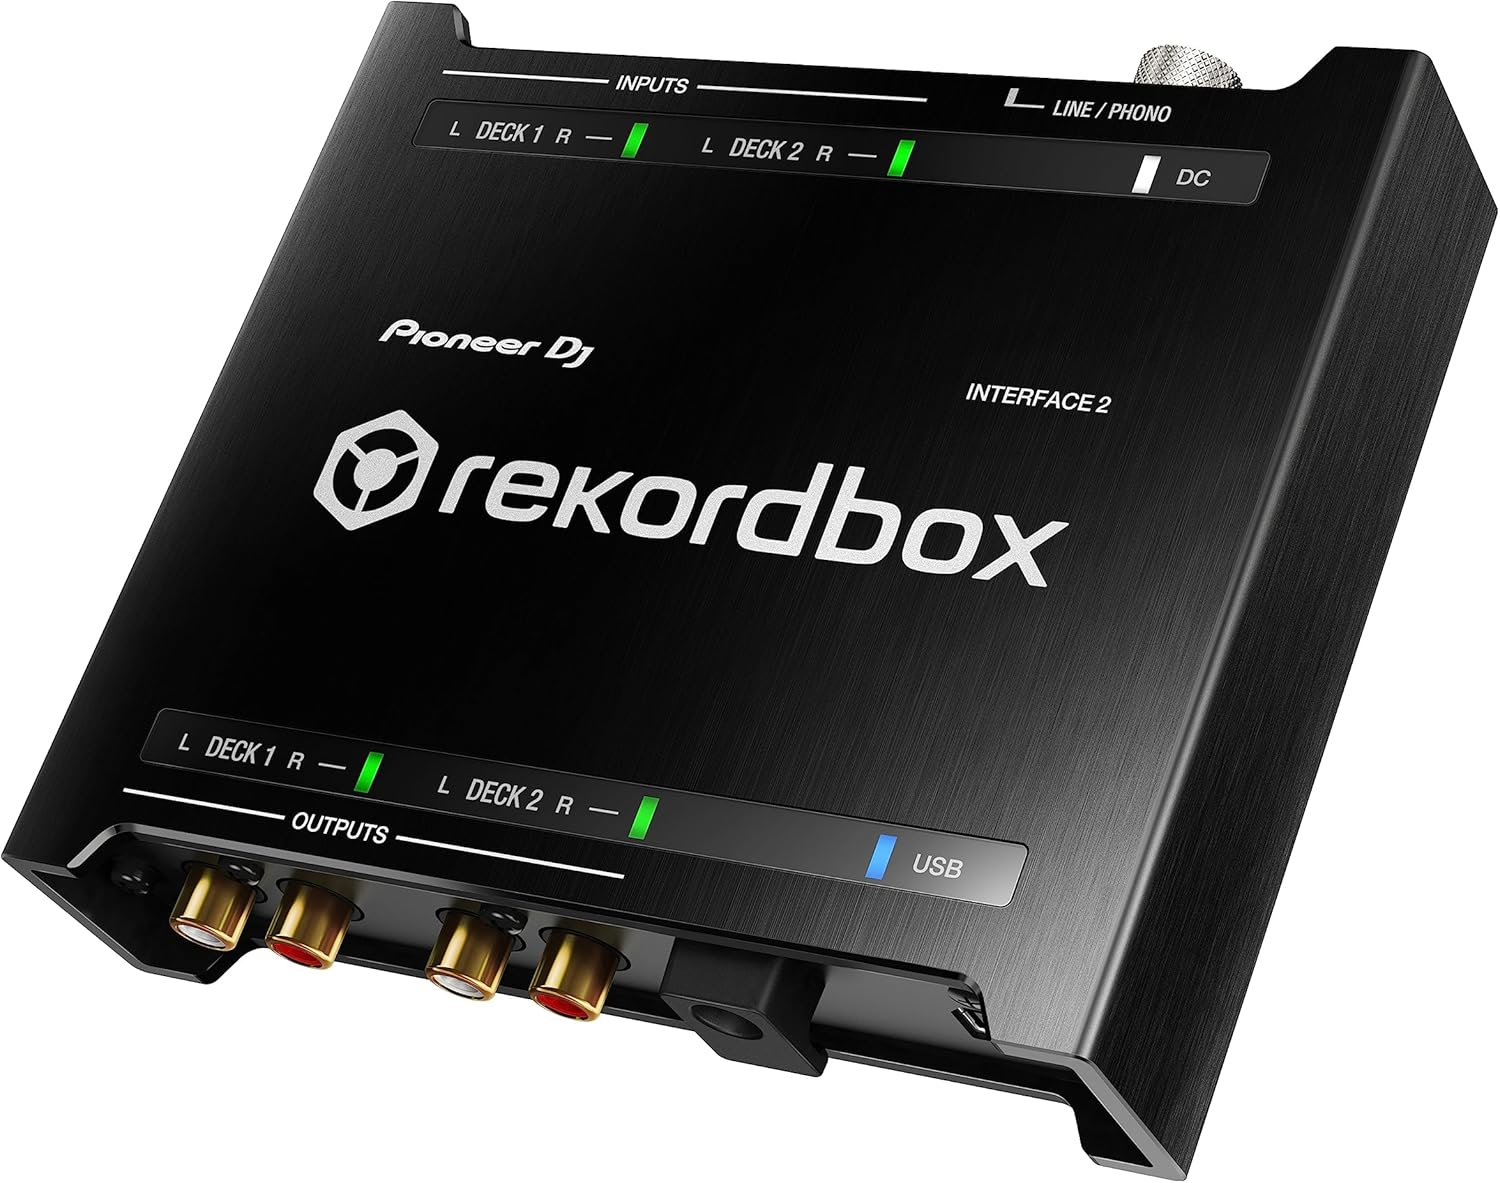
Image: Diagram illustrating the connections for the Pioneer DJ INTERFACE 2 with turntables, a mixer, and a laptop.

Image: Rear panel of the Pioneer DJ INTERFACE 2, showing the input/output ports, USB, DC IN, and GND terminal.
After physical connections, install the rekordbox software and drivers on your computer. Launch rekordbox and configure the audio settings to recognize the INTERFACE 2 for DVS control.
Operating
The INTERFACE 2 is designed for intuitive operation with rekordbox DVS. Here are key operational aspects:
Digital Vinyl System (DVS) Control
- Use the included control vinyl on your turntables to manipulate digital tracks within rekordbox.
- The multicolor LEDs on the INTERFACE 2 indicate the signal flow, providing visual feedback on your setup status and DVS signal quality.
- Adjust the input gain on the INTERFACE 2 to ensure optimal signal levels for DVS tracking.

Image: Close-up of the top panel of the Pioneer DJ INTERFACE 2, highlighting the multicolor LED indicators for signal flow.
rekordbox Performance Features
Leverage the full potential of rekordbox DJ performance features with the INTERFACE 2. This includes using hot cues, loops, and effects directly from the software, controlled by your physical turntables or CDJs.

Image: The Pioneer DJ INTERFACE 2 connected to a laptop running rekordbox software, demonstrating DVS control.
Official Product Introduction Video
Video: Official introduction to the Pioneer DJ INTERFACE 2, showcasing its features, setup, and use in a DJ environment.
Maintenance
To ensure the longevity and optimal performance of your Pioneer DJ INTERFACE 2, follow these maintenance guidelines:
- Cleaning: Regularly wipe the unit with a soft, dry cloth. Avoid using abrasive cleaners or solvents.
- Cable Management: Ensure all cables are securely connected and not under undue stress. Avoid sharp bends or kinks in cables.
- Storage: When not in use, store the INTERFACE 2 in a cool, dry place away from direct sunlight and extreme temperatures.
- Tonearm Contact Cleaning: If using turntables, periodically disconnect the cartridge and clean the tonearm contacts to ensure a clean signal for DVS.
Troubleshooting
If you encounter issues with your INTERFACE 2, consider the following troubleshooting steps:
Poor DVS Signal
- Check Connections: Ensure all RCA cables are correctly connected for LEFT and RIGHT channels between your turntables, INTERFACE 2, and mixer. Incorrect connections can lead to reversed audio or poor signal.
- Calibration Scope: In rekordbox, check the DVS calibration scope. A clean, circular pattern indicates a good signal. If the pattern is distorted or incomplete, it suggests a problem.
- Cartridge/Needle: A worn or dirty cartridge/needle can cause a poor timecode signal. Inspect and clean or replace if necessary.
- Tonearm Contacts: Clean the tonearm contacts on your turntable. Dust or corrosion can interfere with the signal.
- Grounding: Verify that your turntables are properly grounded to the INTERFACE 2 to eliminate hum.
No Power/Recognition
- Power Supply: Ensure the power adapter is securely connected to the INTERFACE 2 and a working power outlet.
- USB Connection: Try a different USB port on your computer or a different USB cable.
- Drivers/Software: Reinstall the latest drivers for the INTERFACE 2 and ensure rekordbox is updated to the latest version.
Specifications
| Feature | Detail |
|---|---|
| Brand | Pioneer DJ |
| Model | INTERFACE2 |
| Number of Channels | 2 |
| Connectivity Technology | USB |
| Compatible Devices | Personal Computer |
| Supported Software | rekordbox |
| Operating System | Windows |
| Audio Input | USB |
| Maximum Sample Rate | 96 KHz |
| Item Weight | 4.2 Pounds |
| UPC | 841300100805 |
| ASIN | B0756LVTY6 |
What's in the Box
The Pioneer DJ INTERFACE 2 package includes:
- 1 x INTERFACE2 2-channel audio interface
- Control vinyl (quantity not specified, but typically 2)
- USB cable
- Power cable
- 4 x audio cables (RCA)
Warranty and Support
The Pioneer DJ INTERFACE 2 comes with a 1-year limited warranty.
For further assistance, technical support, or warranty claims, please refer to the official Pioneer DJ website or contact their customer service directly. Keep your proof of purchase for warranty validation.