1. Introduction
This manual provides essential instructions for the safe and efficient use of your JVC EX-S55-T Wood Cone Series Compact Component System. This system features unique wood cone speakers, Bluetooth connectivity with NFC, Hi-Res audio playback via USB, and a compact design. Please read this manual thoroughly before operating the unit and retain it for future reference.

Image 1.1: The JVC EX-S55-T Compact Component System, including the main unit, two wood cone speakers, and a remote control.
2. Safety Information
To ensure safe operation and prevent damage, observe the following precautions:
- Power Source: Connect the unit only to the specified power supply voltage.
- Ventilation: Do not block ventilation openings. Ensure adequate space around the unit for proper airflow.
- Water and Moisture: Do not expose the unit to rain, moisture, or dripping/splashing liquids. Do not place objects filled with liquids on the unit.
- Heat: Keep the unit away from heat sources such as radiators, heat registers, stoves, or other heat-producing appliances.
- Cleaning: Unplug the unit from the wall outlet before cleaning. Use a soft, dry cloth. Do not use liquid cleaners or aerosol cleaners.
- Servicing: Do not attempt to service this product yourself. Refer all servicing to qualified service personnel.
- Children: Keep small parts and packaging materials out of reach of children to prevent choking hazards.
3. Package Contents
Verify that all items are present in the package:
- Main Unit (Receiver/CD Player)
- Wood Cone Speakers (2 units)
- Remote Control
- FM Simple Indoor Antenna
- AM Loop Antenna
- Power Cord
- Speaker Cables
- Instruction Manual (this document)
If any items are missing or damaged, please contact your retailer.
4. Setup
4.1 Placement
Place the main unit and speakers on a stable, flat surface. Ensure proper ventilation by leaving sufficient space around the unit. Avoid placing the system near heat sources or in direct sunlight. The compact, low-style design (11cm height) allows for versatile placement within your living space.

Image 4.1: The JVC EX-S55-T system integrated into a room environment, demonstrating its compact and stylish placement.
4.2 Connecting Speakers
- Connect the speaker cables to the speaker terminals on the rear of the main unit and the corresponding terminals on each speaker.
- Ensure correct polarity (+ to + and - to -) for optimal sound quality.
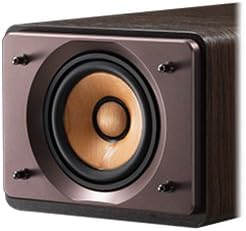
Image 4.2: A detailed view of the JVC wood cone speaker, highlighting its unique construction designed for superior sound reproduction.
4.3 Antenna Connection
- FM Antenna: Connect the supplied FM simple indoor antenna to the FM antenna terminal. Extend the antenna for better reception.
- AM Antenna: Connect the supplied AM loop antenna to the AM antenna terminals. Adjust its position for optimal reception.
4.4 Power Connection
- Connect the power cord to the AC IN terminal on the rear of the main unit.
- Plug the other end of the power cord into a wall outlet.
5. Operating Instructions
5.1 Power On/Off
Press the POWER button on the front panel or remote control to turn the unit on or off.
5.2 Source Selection
Press the FUNCTION button on the unit or the corresponding source buttons (CD, BLUETOOTH, USB, TUNER, AUX) on the remote control to select your desired audio source.
5.3 CD Playback
- Press the CD button to select the CD source.
- Press the OPEN/CLOSE button to open the CD tray.
- Place a CD with the label side up in the tray and press OPEN/CLOSE again to close it.
- Playback will start automatically. Use the PLAY/PAUSE, STOP, and SKIP buttons for control.
5.4 Bluetooth Connection
The system supports Bluetooth for wireless audio streaming and NFC for easy pairing.
- Press the BLUETOOTH button to select the Bluetooth source. The display will show "BLUETOOTH" and indicate pairing mode.
- For NFC-compatible devices: Touch your NFC-enabled smartphone or tablet to the N-Mark on the unit to automatically pair.
- For non-NFC devices: Enable Bluetooth on your device and select "JVC EX-S55-T" from the list of available devices.
- Once connected, you can stream audio wirelessly from your device.

Image 5.1: The system's display indicating Bluetooth mode, with the Bluetooth and NFC logos for easy wireless connectivity.
5.5 USB Playback
The system supports Hi-Res audio playback (FLAC/WAV 192kHz/24bit) from USB flash memory.
- Insert a USB flash drive into the USB port on the front panel.
- Press the USB button to select the USB source. The unit will read the contents of the USB drive.
- Use the navigation buttons on the remote or unit to select and play audio files.

Image 5.2: The USB port on the front panel of the JVC EX-S55-T, demonstrating a USB flash drive connected for audio playback.
5.6 Radio Operation
The system includes an FM/AM tuner with wide FM compatibility.
- Press the TUNER button to select the radio source.
- Press the BAND button to switch between FM and AM bands.
- Use the TUNING buttons to manually tune to a station or press and hold to auto-seek.
- To store a preset, tune to the desired station, then press and hold a preset number button until the display confirms storage.
5.7 USB Recording
You can record audio from CD, radio, or external input to a USB flash drive in MP3 format.
- Insert a USB flash drive into the USB port.
- Select the desired source (CD, TUNER, or AUX).
- Press the REC button on the remote control or unit to start recording.
- Press STOP to end recording.
5.8 Timer Functions
- Sleep Timer: Set the system to automatically turn off after a specified period.
- Recording/Playback Timer: Program the system to record or play at a specific time and day. Refer to the detailed instructions in the full manual for setting these timers.
6. Maintenance
Proper care ensures the longevity of your component system.
- Cleaning the Unit: Wipe the exterior surfaces with a soft, dry cloth. For stubborn stains, dampen the cloth slightly with water and mild detergent, then wipe dry. Do not use abrasive cleaners, alcohol, or benzene.
- Cleaning the CD Lens: Use a commercially available CD lens cleaner if playback issues occur due to a dirty lens.
- Speaker Care: Avoid touching the wood cone speaker diaphragms directly. Dust can be gently removed with a soft brush.
7. Troubleshooting
Before contacting service, check the following common issues:
| Problem | Possible Cause | Solution |
|---|---|---|
| No power | Power cord not connected; Power outlet faulty | Ensure power cord is securely plugged in; Try a different outlet |
| No sound | Volume too low; Speakers not connected; Incorrect source selected | Increase volume; Check speaker connections; Select correct audio source |
| Bluetooth pairing fails | Device not in pairing mode; Distance too far; Interference | Ensure unit is in Bluetooth pairing mode; Move device closer; Avoid obstacles; Try re-pairing |
| USB not recognized | USB drive not formatted correctly; Unsupported file format; Drive damaged | Ensure USB drive is FAT32 formatted; Check file formats (FLAC/WAV/MP3); Try a different USB drive |
| Poor radio reception | Antenna not connected or positioned correctly; Local interference | Connect and adjust FM/AM antennas; Relocate the unit away from other electronic devices |
8. Specifications
| Feature | Detail |
|---|---|
| Model Number | EX-S55-T |
| Brand | JVC |
| Connectivity | Bluetooth, USB |
| USB Ports | 1 |
| Compatible Devices | Smartphone, Tablet, Radio |
| Color | Brown |
| Speaker Type | Stereo (Wood Cone) |
| Product Dimensions (L x W x H) | 28.9 x 49.9 x 11 cm |
| Item Weight | 7.08 kg |
| Hi-Res Audio Support | FLAC/WAV 192kHz/24bit (via USB) |
| USB Recording Format | MP3 |
| Tuner | FM/AM (Wide FM compatible) |
| Bluetooth Frequency Band | 2.4GHz (2.4000GHz-2.4835GHz) |
| Release Year | 2018 |
9. Warranty and Support
JVC products are manufactured to the highest quality standards. For warranty information, please refer to the warranty card included with your product or visit the official JVC website. For technical support, product inquiries, or service requests, please contact JVC customer support through their official channels.
Online Support: Visit the official JVC website for FAQs, software updates, and contact information.
Customer Service: Refer to your regional JVC contact details for phone or email support.


