Important Safety Instructions
Please read all instructions carefully before using your Aucma Automatic Ice Cream Maker. Retain this manual for future reference.
- Always unplug the appliance from the outlet before assembling, disassembling, or cleaning.
- Do not immerse the motor base in water or other liquids. Wipe clean with a damp cloth.
- Avoid contact with moving parts. Keep hands, hair, clothing, and utensils away from the mixing paddle during operation to prevent injury and damage to the appliance.
- Do not operate any appliance with a damaged cord or plug, or after the appliance malfunctions or has been dropped or damaged in any manner.
- The use of attachments not recommended or sold by the manufacturer may cause fire, electric shock, or injury.
- Do not use outdoors. This appliance is for household use only.
- Close supervision is necessary when any appliance is used by or near children.
- Do not allow the cord to hang over the edge of a table or counter, or touch hot surfaces.
- Ensure the freezer bowl is completely dry before placing it in the freezer.
- Do not place the freezer bowl in a dishwasher. Hand wash only.
Product Overview
Familiarize yourself with the components of your Aucma Automatic Ice Cream Maker.
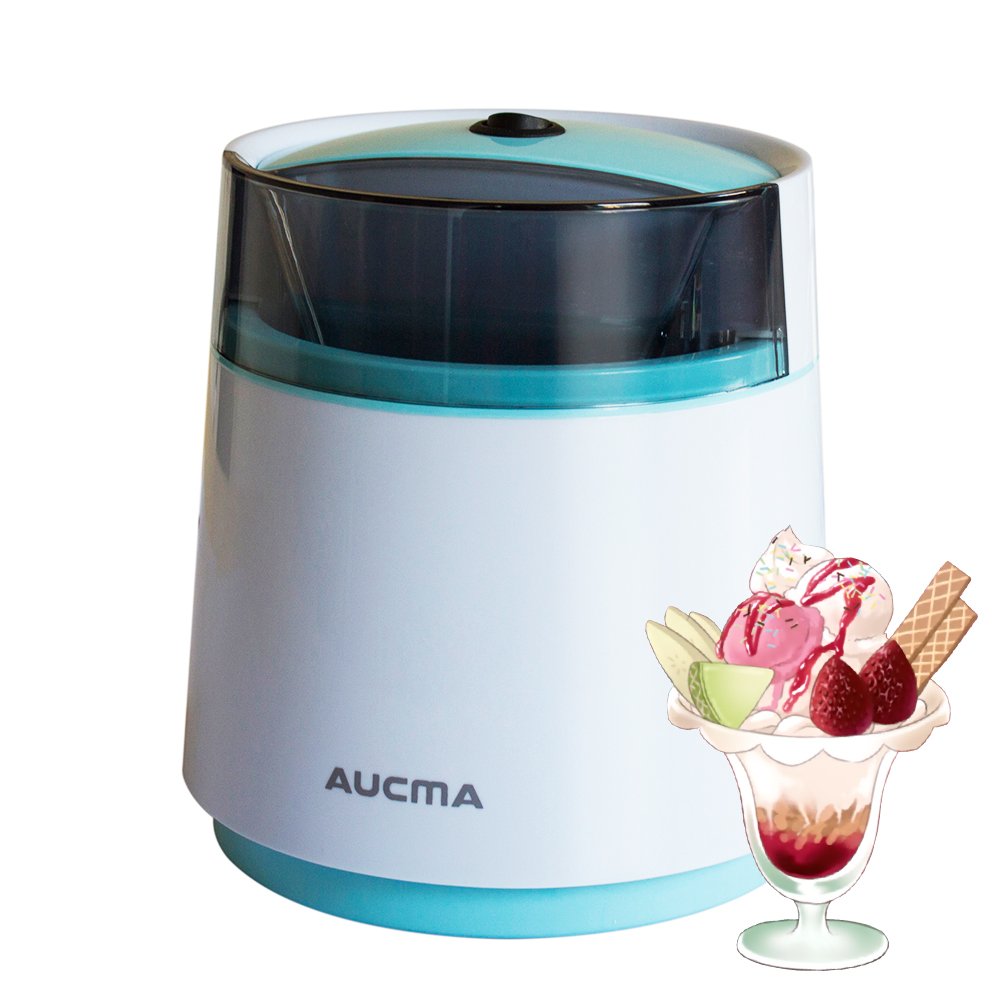
Figure 1: Assembled Aucma Automatic Ice Cream Maker. This image shows the complete unit, including the motor base, freezer bowl, lid, and pour spout.

Figure 2: Top view of the ice cream maker, highlighting the power switch and the large pour spout on the lid.

Figure 3: The interior of the 1-quart freezer bowl, which contains the cooling liquid for freezing your desserts.

Figure 4: The motor unit with the mixing paddle detached. The paddle attaches to the motor and churns the ingredients.
Components:
- Motor Base: Contains the motor that drives the mixing paddle.
- Freezer Bowl: A double-insulated bowl containing a freezing liquid. This bowl must be pre-frozen.
- Mixing Paddle: Attaches to the motor base and churns the ingredients.
- Lid with Pour Spout: Covers the freezer bowl and motor, featuring an opening for adding ingredients.
Setup
- Freeze the Bowl: Before first use, wash and thoroughly dry the freezer bowl. Place the empty freezer bowl in the back of your freezer where the temperature is coldest. For optimal results, freeze the bowl for at least 12 to 24 hours. The bowl should be completely frozen solid. You can shake it to check; if you don't hear liquid sloshing, it's ready.
- Prepare Your Mixture: Prepare your ice cream, frozen yogurt, or sorbet mixture according to your recipe. Ensure the mixture is thoroughly chilled in the refrigerator for at least 2-3 hours, or preferably overnight, before churning. A cold base is essential for proper freezing.
- Assemble the Unit:
- Place the motor base on a clean, dry, and flat surface.
- Insert the frozen freezer bowl into the motor base.
- Place the mixing paddle into the center of the freezer bowl, ensuring it sits correctly.
- Position the lid onto the motor base, aligning the tabs and twisting to lock it securely in place. Ensure the pour spout is accessible.
Operating Instructions
- Start the Machine: Plug the power cord into an electrical outlet. Turn the power switch to the "ON" position. The mixing paddle will begin to rotate.
- Add Ingredients: Immediately pour your chilled ice cream mixture through the large pour spout in the lid while the paddle is rotating. Do not fill the bowl beyond 1 quart capacity, as the mixture will expand during freezing.
- Churning Process: Allow the machine to churn for approximately 20-30 minutes. The churning time may vary depending on the recipe and desired consistency. The mixture will thicken and freeze as it churns.
- Adding Mix-ins: During the last 5 minutes of churning, you can add solid ingredients such as chocolate chips, nuts, or fruit pieces through the pour spout. For larger mix-ins, it may be easier to fold them in by hand after the churning process is complete.
- Check Consistency: The ice cream will have a soft-serve consistency when finished. If you prefer a firmer consistency, transfer the ice cream to an airtight container and place it in the freezer for an additional 30 minutes to 1 hour.
- Turn Off and Unplug: Once the desired consistency is reached, turn the power switch to "OFF" and unplug the appliance from the outlet.
- Serve: Use a plastic or wooden spoon to scoop the ice cream from the freezer bowl to avoid scratching the non-stick surface.
Care and Maintenance
Proper care ensures the longevity of your ice cream maker.
- Disassembly: Unplug the unit. Remove the lid, mixing paddle, and freezer bowl from the motor base.
- Cleaning the Freezer Bowl: Hand wash the freezer bowl with warm, soapy water. Do not use abrasive cleaners or scouring pads. Dry thoroughly before placing it back in the freezer for storage or next use. Do not wash in a dishwasher.
- Cleaning the Lid and Mixing Paddle: Hand wash the lid and mixing paddle with warm, soapy water. These parts are generally top-rack dishwasher safe, but hand washing is recommended for best results.
- Cleaning the Motor Base: Wipe the motor base with a damp cloth. Never immerse the motor base in water or any other liquid. Ensure it is completely dry before storing.
- Storage: Store the clean and dry ice cream maker in a cool, dry place. You may store the freezer bowl in the freezer so it's always ready for use.
Troubleshooting
| Problem | Possible Cause | Solution |
|---|---|---|
| Ice cream does not freeze or remains too soft. |
|
|
| Mixing paddle stops or struggles. |
|
|
| Loud noise during operation. |
|
|
Specifications
| Feature | Detail |
|---|---|
| Brand | Aucma |
| Model Number | B0753CX5FJ |
| Capacity | 1 Quart |
| Operation Mode | Automatic |
| Item Weight | 4 Pounds |
| Included Components | Bowl, Instruction, Mixing paddle |
| Product Care Instructions | Hand Wash |
| UPC | 614823796264 |
Warranty and Support
For warranty information or product support, please refer to the documentation included with your purchase or contact Aucma customer service. Keep your purchase receipt as proof of purchase.
For further assistance, please visit the official Aucma website or contact their customer support channels.