
Introduction
This manual provides detailed instructions for the safe and effective use of your NZQXJXZ Headband Magnifier Glasses with LED Light. Please read this manual thoroughly before operating the device and retain it for future reference. This magnifier is designed to assist with tasks requiring enhanced visual detail, such as crafts, electronics repair, reading, and other precision work.
Product Overview
Components
- Magnifier Frame with Integrated LED Light
- 5 Interchangeable Acrylic Lenses (1.0X, 1.5X, 2.0X, 2.5X, 3.5X)
- Glasses Arms (for spectacle-style wear)
- Elastic Headband (for secure head-mounted wear)
- Lens Storage Case
- Cleaning Cloth


Key Features
- High Definition Lenses: Five interchangeable acrylic lenses provide clear, distortion-free magnification for various tasks.
- Comfortable and Versatile Wear: Easily switch between traditional glasses arms and an elastic headband for a secure and comfortable fit during extended use.
- Adjustable LED Light: Features two high-quality LED lights with adjustable angle to illuminate your work area precisely.
- Reduced Eye Strain: Designed to minimize eye fatigue during detailed work, allowing for longer periods of use.
- Broad Application: Suitable for a wide range of activities including dentistry, electronics, jewelry making, sewing, crafts, beauty, painting, and general reading.
Setup
Battery Installation
- Locate the battery compartment on the top of the magnifier frame (refer to Figure 2).
- Gently slide open the battery compartment cover.
- Insert three (3) AAA batteries (not included) according to the polarity indicators (+/-) inside the compartment.
- Close the battery compartment cover securely.
Attaching Lenses
- Select the desired magnification lens from the provided storage case.
- Align the lens with the lens slot on the magnifier frame.
- Gently slide the lens into the slot until it clicks securely into place.
- To remove a lens, gently press the release tab (if present) or slide the lens out of the slot.

Wearing Options
The magnifier offers two wearing styles: traditional glasses arms or an elastic headband.
- Glasses Arms: The magnifier comes pre-assembled with glasses arms. Simply unfold them and wear the magnifier like a pair of spectacles.
- Elastic Headband: To use the headband, gently detach the glasses arms from the magnifier frame by pressing the release buttons or sliding them out. Attach the elastic headband by aligning its connectors with the slots on the frame and pushing until they click into place. Adjust the headband for a snug, comfortable fit around your head.

Operating Instructions
Adjusting Magnification
Select the appropriate lens based on the level of detail required for your task. The working distance (distance between the lens and the object) will vary with magnification:
- Higher magnification lenses (e.g., 3.5X) require a closer working distance (approximately 6 inches).
- Lower magnification lenses (e.g., 1.0X) allow for a greater working distance (approximately 12-18 inches).
Using the LED Light
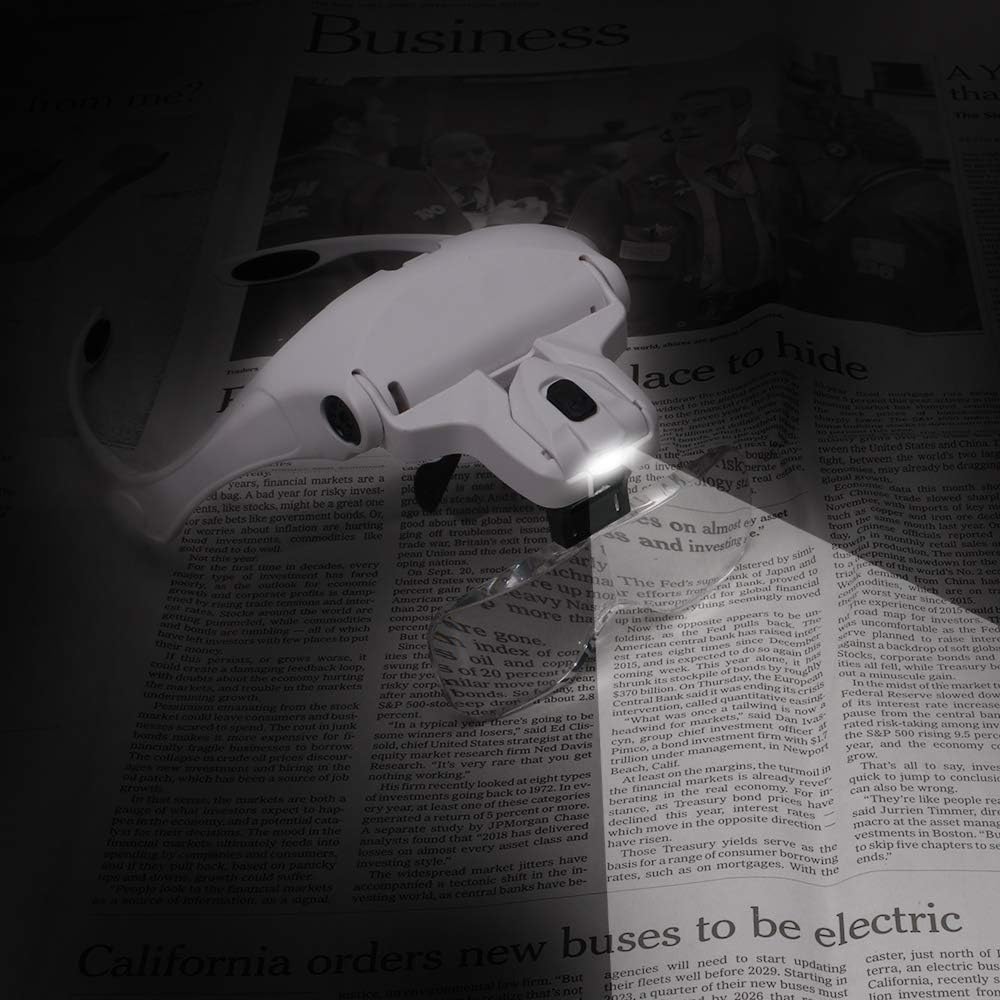
- Locate the power switch for the LED light on the magnifier frame (refer to Figure 1).
- Press the switch to turn the LED light ON or OFF.
- The LED light module can be adjusted up or down to direct illumination precisely onto your work area.
Adjusting Fit for Comfort
Ensure the magnifier fits comfortably and securely. The nose bridge can be gently bent to conform to your nose shape. If using the elastic headband, adjust its length for a firm but not overly tight fit. The forehead padding and non-slip nose pads are designed to enhance comfort during prolonged use.

Maintenance
Cleaning Lenses
To maintain optimal clarity, clean the lenses regularly. Use the provided soft cleaning cloth. Avoid using abrasive materials, paper towels, or harsh chemical cleaners, as these can scratch or damage the lens surface. For stubborn smudges, a small amount of lens cleaning solution designed for optical surfaces may be used with the cleaning cloth.
Storage
When not in use, store the interchangeable lenses in their designated storage case to protect them from dust and scratches. Store the magnifier in a clean, dry place away from direct sunlight and extreme temperatures.
Troubleshooting
- LED Light Does Not Turn On:
- Check if the batteries are installed correctly with the correct polarity.
- Ensure the batteries are not depleted. Replace with fresh AAA batteries if necessary.
- Verify the battery compartment cover is fully closed.
- Magnifier Feels Uncomfortable:
- Adjust the nose bridge by gently bending it to fit your facial contours.
- If using the elastic headband, adjust its length to prevent excessive pressure.
- Consider adding additional soft padding to the nose bridge or forehead area if discomfort persists, especially during long periods of use.
- Blurred Vision:
- Ensure the selected lens is clean and free of smudges or dust.
- Adjust your working distance to the object. Different magnification levels have different optimal focal lengths.
- Verify the lens is securely seated in the lens slot.
Specifications
| Feature | Specification |
|---|---|
| Brand | NZQXJXZ |
| Model | B0752B9YGV |
| Magnification Strength | 1.0X, 1.5X, 2.0X, 2.5X, 3.5X |
| Lens Material | Acrylic |
| Light Source | 2 LED Lights |
| Batteries Required | 3 x AAA (not included) |
| Color | White |
Product Video Guide
For a visual demonstration of how to use the headband magnifier, please refer to the video below:
Warranty and Support
Warranty information for this product is not included in this instruction manual. For details regarding warranty coverage, product support, or service inquiries, please contact the retailer or visit the official NZQXJXZ website. Please have your product model number (B0752B9YGV) available when seeking support.