1. Introduction
The Universal Plater - Chrome Edition is designed for applying 24K gold plating onto chrome-plated surfaces. This system facilitates the removal of existing chrome layers, activation of the underlying nickel, and subsequent application of gold. It features an increased power supply of 12 volts and 10 amperes, which aids in efficient chrome stripping. The unit includes a safety function that deactivates activator and plating ports when in chrome stripping mode, preventing accidental plating errors.
This kit provides a comprehensive three-step process to gold plate chrome items:
- Remove existing chrome.
- Activate the underlying nickel plate.
- Apply a layer of 24K gold plate.
2. Safety Information
Always prioritize safety when operating the Universal Plater. This kit involves electrical components and chemical solutions. Failure to follow safety guidelines can result in injury or damage to property.
- Wear appropriate personal protective equipment (PPE): This includes safety glasses, chemical-resistant gloves, and protective clothing to prevent skin and eye contact with solutions.
- Work in a well-ventilated area: Ensure adequate airflow to disperse any fumes from the chemical solutions.
- Keep solutions away from children and pets: Store all chemicals securely and out of reach.
- Avoid contact with skin and eyes: In case of contact, immediately flush the affected area with plenty of water and seek medical attention if irritation persists.
- Do not ingest solutions: If ingested, seek immediate medical attention.
- Handle electrical components with care: Ensure the power supply is off before making or breaking electrical connections. Do not operate with wet hands or in wet conditions.
- Dispose of chemicals properly: Follow local regulations for the disposal of chemical waste.
3. Package Contents
Verify that all components are present and undamaged upon opening the package:
- Universal Plater Console
- 16 oz. bottle of Chrome Stripping Solution
- 16 oz. bottle of Surface Activator Solution (Nickel Activator)
- 16 oz. bottle of Wood's Nickel Strike Solution
- 8 oz. of 24K Brush Gold Solution
- Applicator wands and accessories
- Power supply (12 volts, 10 amperes)
4. Setup
Follow these steps to set up your Universal Plater:
- Unpack Components: Carefully remove all items from the packaging.
- Position the Console: Place the Universal Plater Console on a stable, level, and clean work surface in a well-ventilated area.
- Connect Power Supply: Connect the power supply to the designated input port on the console. Plug the power supply into a standard electrical outlet.
- Connect Applicator Wands: Attach the applicator wands to the appropriate ports on the console. Ensure a secure connection.
- Prepare Solutions: Pour the required solutions (Chrome Stripping, Surface Activator, Wood's Nickel Strike, 24K Brush Gold) into separate, clean, non-conductive containers. Label each container clearly.
- Understand Modes: Familiarize yourself with the console's chrome stripping mode and plating mode. The console is designed to prevent accidental plating when in stripping mode.
5. Operating Instructions
The plating process involves several distinct steps. It is crucial to follow these steps in sequence for optimal results.
5.1. Chrome Removal
This step prepares the chrome-plated surface by removing the existing chrome layer, exposing the underlying nickel.
- Switch to Chrome Stripping Mode: Ensure the console is set to the chrome stripping mode. This activates the reverse polarity necessary for effective chrome removal.
- Prepare Applicator: Dip a clean applicator pad attached to a wand into the Chrome Stripping Solution.
- Apply Solution: Gently brush the solution over the chrome surface you intend to plate. Observe the chrome dissolving. Continue until the chrome layer is visibly removed, revealing the duller nickel surface underneath.
- Rinse: Thoroughly rinse the stripped area with distilled water to remove all traces of the stripping solution.

5.2. Surface Activation (Nickel Activator)
Activating the nickel surface ensures proper adhesion of subsequent plating layers.
- Switch to Plating Mode: Ensure the console is switched from stripping mode to plating mode.
- Prepare Applicator: Use a new, clean applicator pad and dip it into the Surface Activator Solution.
- Apply Solution: Brush the activator solution over the exposed nickel surface for a short period, typically 10-20 seconds, to prepare it for plating.
- Rinse: Rinse the activated area thoroughly with distilled water.
5.3. Wood's Nickel Strike (Optional, for difficult surfaces)
For some surfaces or to enhance adhesion, a nickel strike layer can be applied.
- Prepare Applicator: Use a new, clean applicator pad and dip it into the Wood's Nickel Strike Solution.
- Apply Solution: Brush the nickel strike solution over the activated surface for 30-60 seconds.
- Rinse: Rinse the area thoroughly with distilled water.
5.4. 24K Gold Plating
This is the final step where the gold layer is applied.
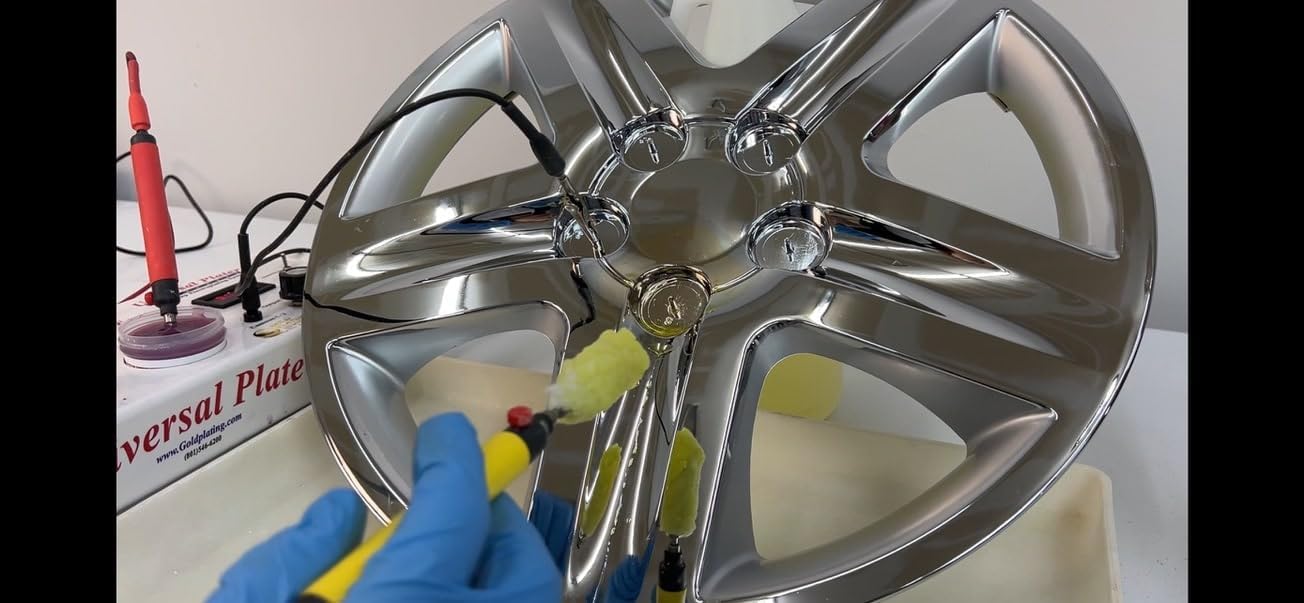
- Prepare Applicator: Use a new, clean applicator pad and dip it into the 24K Brush Gold Solution.
- Apply Gold: Begin brushing the gold solution evenly over the prepared surface. Maintain continuous contact and movement to ensure an even deposit.
- Observe Plating: Continue applying the gold solution until the desired thickness and appearance are achieved. The surface will gradually turn gold.
- Final Rinse: Once plating is complete, rinse the item thoroughly with distilled water and gently pat dry with a soft, lint-free cloth.


6. Maintenance
Proper maintenance ensures the longevity and optimal performance of your Universal Plater.
- Clean Applicator Wands: After each use, thoroughly rinse applicator wands and replace applicator pads. Do not cross-contaminate solutions.
- Clean Console: Wipe down the console with a damp cloth to remove any spills or residue. Ensure no liquids enter the electrical components.
- Store Solutions: Store all chemical solutions in their original, tightly sealed containers in a cool, dry place, away from direct sunlight and extreme temperatures.
- Inspect Connections: Periodically check all electrical connections for wear or damage.
7. Troubleshooting
If you encounter issues during operation, refer to the following common problems and solutions:
| Problem | Possible Cause | Solution |
|---|---|---|
| Poor or uneven gold plating | Incomplete chrome removal; insufficient surface activation; inconsistent application; low solution level. | Ensure chrome is fully removed. Re-activate the surface. Apply solution with steady, even strokes. Replenish solution if low. |
| Strip mode shuts down quickly | Overload or short circuit; faulty connection; internal issue with the console. | Check all connections. Ensure the applicator is not shorting. If the problem persists, contact customer support. |
| No power to console | Power supply unplugged; faulty power supply; console malfunction. | Check power cord and outlet. Test power supply if possible. Contact customer support if console is unresponsive. |
| Solutions appear contaminated | Cross-contamination between solutions; improper storage. | Always use separate, clean applicator pads for each solution. Store solutions in sealed, labeled containers. Replace contaminated solutions. |
8. Specifications
- Product Dimensions: 16.5 x 6.5 x 4.5 inches
- Item Weight: 12 pounds
- Power Supply: 12 volts, 10 amperes
- Manufacturer: Gold Plating Services
- Date First Available: August 22, 2017
9. Warranty Information
Specific warranty details for the Universal Plater Gold Plating Kit - Chrome Edition are not provided in this manual. For information regarding product warranty, please contact Gold Plating Services directly or refer to the documentation included with your purchase.
10. Customer Support
For technical assistance, troubleshooting not covered in this manual, or inquiries about replacement parts and solutions, please contact Gold Plating Services. Contact information can typically be found on the manufacturer's website or on your purchase receipt.