CarLights360 TIGUAN CLX-M1-340-1130L-AS
Volkswagen Tiguan 2009-2011 Driver Side Headlight Assembly User Manual
Model: TIGUAN (CLX-M1-340-1130L-AS) | Brand: CarLights360
1. Introduction
This manual provides essential information for the installation, operation, and maintenance of your new CarLights360 Driver Side Headlight Assembly for Volkswagen Tiguan 2009-2011 models. Please read this manual thoroughly before beginning any installation to ensure proper function and safety.
2. Product Overview and Features
The CarLights360 Headlight Assembly is a direct replacement aftermarket product designed to meet or exceed OEM specifications for your vehicle. It includes all necessary components for a complete installation.
- Exact Fit: Designed to precisely fit OEM#: 5N1 941 031 AC and Partslink#: VW2502143.
- Compliance: Meets or exceeds DOT & SAE compliance standards, ensuring safety and legal operation.
- Complete Assembly: Includes bulbs, lens, housing, and socket for a ready-to-install unit.
- Condition: Factory sealed and brand new in box.
- Waterproof: Features a waterproof design for durability and performance in various weather conditions.
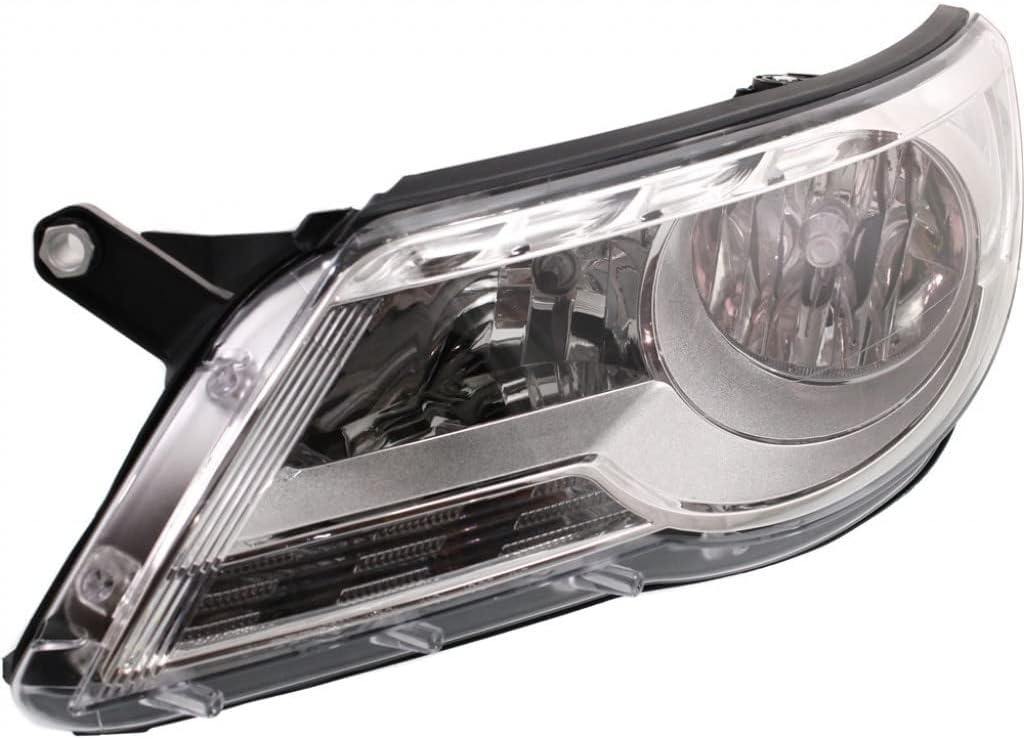
Image: Front view of the CarLights360 Driver Side Headlight Assembly, showcasing the clear lens and integrated bulb housing.

Image: Rear view of the headlight assembly, highlighting the robust black housing, mounting tabs, and electrical connection points.

Image: A composite image displaying three different angles of the headlight assembly, including front, rear, and a side view, emphasizing its design and components.
3. Compatibility
This headlight assembly is specifically designed for the following vehicle:
- Make: Volkswagen
- Model: Tiguan
- Years: 2009, 2010, 2011
- Position: Driver Side (Front Left)
- OEM Part Number: 5N1 941 031 AC
- Partslink Number: VW2502143

Image: An illustrative diagram showing a top-down view of a car, indicating "Driver Side" (Left Side/LH) and "Passenger Side" (Right Side/RH) to help identify the correct part.

Image: A simplified diagram showing a car's front profile with a red line extending from the headlight area to the detached headlight assembly, illustrating its intended mounting position.
4. Safety Information
Important Safety Notice: This product may contain chemicals known to the State of California to cause cancer and birth defects or other reproductive harm. For more information, visit www.P65Warnings.ca.gov.
Always exercise caution when working on vehicle electrical systems. Disconnect the vehicle's battery before beginning installation to prevent electrical shock or damage. Wear appropriate personal protective equipment, including safety glasses and gloves.
5. Installation Guide
Installation of a headlight assembly typically requires basic automotive knowledge and tools. If you are not comfortable performing this installation yourself, it is highly recommended to seek professional assistance from a certified mechanic.
General Installation Steps:
- Preparation: Park the vehicle on a level surface and engage the parking brake. Open the hood.
- Disconnect Power: Disconnect the negative terminal of the vehicle's battery to prevent electrical hazards.
- Access Headlight: Depending on your vehicle model, you may need to remove the front bumper, grille, or fender liner to access the headlight assembly mounting bolts. Consult your vehicle's service manual for specific instructions.
- Remove Old Assembly: Locate and remove all mounting bolts or clips securing the old headlight assembly. Carefully disconnect any electrical connectors and remove the old assembly from the vehicle.
- Inspect Wiring: Before installing the new assembly, inspect the vehicle's wiring harness for any signs of damage or corrosion. Clean if necessary.
- Install New Assembly: Carefully position the new CarLights360 headlight assembly into place. Ensure all mounting tabs align correctly.
- Secure Assembly: Reinstall all mounting bolts or clips to secure the new assembly. Do not overtighten.
- Connect Electrical: Reconnect all electrical connectors to the new headlight assembly. Ensure connections are secure.
- Reassemble Vehicle: Reinstall any removed components such as the bumper, grille, or fender liner.
- Reconnect Battery: Reconnect the negative terminal of the vehicle's battery.
- Test Functionality: Turn on the vehicle's headlights (low beam, high beam, turn signal, parking lights) to ensure all functions are working correctly.
- Aim Headlights: After installation, it is crucial to properly aim your headlights to ensure optimal visibility and to avoid blinding oncoming traffic. Consult your vehicle's service manual or a professional for headlight aiming procedures.
6. Operation and Testing
Once installed, the headlight assembly operates in conjunction with your vehicle's existing electrical system. To test its functionality:
- Turn the ignition to the "ON" position (engine off).
- Activate the vehicle's low beam headlights, then high beam headlights. Verify that both beams illuminate properly and are of adequate brightness.
- Activate the turn signal for the driver's side. Confirm the turn signal bulb flashes correctly.
- Activate the parking lights. Confirm the parking light bulb illuminates.
- If any function does not work, recheck all electrical connections and ensure bulbs are properly seated.
7. Maintenance
The CarLights360 Headlight Assembly is designed for long-lasting performance with minimal maintenance. To ensure its longevity:
- Cleaning: Periodically clean the outer lens with a soft cloth and mild automotive soap to remove dirt, dust, and road grime. Avoid abrasive cleaners or harsh chemicals that could damage the lens.
- Inspection: Regularly inspect the headlight assembly for any signs of damage, cracks, or moisture intrusion. Address any issues promptly.
- Bulb Replacement: While the assembly includes bulbs, if a bulb fails in the future, replace it with the correct type and wattage specified for your vehicle to maintain optimal light output and avoid damage to the assembly.
8. Troubleshooting
If you encounter issues with your headlight assembly, consider the following common troubleshooting steps:
| Problem | Possible Cause | Solution |
|---|---|---|
| Headlight does not illuminate | Blown fuse, faulty bulb, loose electrical connection, wiring issue. | Check vehicle's fuse box and replace any blown fuses. Inspect and replace bulb if necessary. Ensure all electrical connectors are securely attached. Consult a professional for wiring diagnosis. |
| Headlight is dim or flickers | Poor electrical connection, failing bulb, insufficient voltage. | Check and clean electrical connections. Replace bulb. Have vehicle's charging system and wiring inspected by a professional. |
| Moisture inside lens | Seal compromise, condensation. | Small amounts of condensation may dissipate. If persistent or significant, inspect for cracks or damage to the housing/seal. Contact seller if product defect is suspected. |
| Incorrect light pattern | Improper aiming, incorrect installation. | Perform headlight aiming procedure. Recheck installation to ensure assembly is seated correctly. |
If troubleshooting steps do not resolve the issue, please contact CarLights360 customer support or a qualified automotive technician.
9. Specifications
| Attribute | Detail |
|---|---|
| Brand | CarLights360 |
| Model | TIGUAN |
| Manufacturer Part Number | CLX-M1-340-1130L-AS |
| OEM Part Number | 5N1 941 031 AC |
| ABPA Partslink Number | VW2502143 |
| Vehicle Service Type | Headlights |
| Auto Part Position | Front Left (Driver Side) |
| Color | Driver Side |
| Special Feature | Waterproof |
| Safety Rating | DOT Certified |
| Item Weight | 10.15 pounds |
| Product Dimensions (L x W x H) | 25.65 x 12.53 x 10.62 inches |
| UPC | 611890528385 |
| First Available Date | August 9, 2017 |
10. Warranty and Support
Limited Warranty:
This CarLights360 product is backed by a limited warranty against manufacturing defects. For specific warranty terms and conditions, please refer to the product packaging or contact the seller directly. The buybox winner indicates a 30-day return policy.
Customer Support:
For any questions regarding installation, troubleshooting, or warranty claims, please contact the seller, KarParts360, through the platform where the product was purchased. Provide your order details and product information for faster assistance.
You can visit the CarLights360 brand store for more information and products: CarLights360 Store.
Ask a question about this manual
Ask about setup, troubleshooting, compatibility, parts, safety, or missing instructions. Manuals+ will review the question and use this page’s manual context to help answer it.