1. Introduction
This manual provides comprehensive instructions for the installation, operation, maintenance, and troubleshooting of your JideTech HD 1080P PTZ Outdoor POE Security IP Dome Camera, model Hi2162-PTZ3X. This camera is designed for outdoor surveillance, offering 1080p video resolution, 4X optical zoom, and Pan/Tilt/Zoom capabilities. Please read this manual thoroughly before using the product to ensure proper setup and functionality.
2. What's in the Box
Verify that all components are present in the package:
- 1 x JideTech HD 1080P PTZ Outdoor POE Security IP Dome Camera
- 1 x Screw Pack for mounting
- 1 x Power Supply (12V)
- 1 x Cat5 Cable
- 1 x User Manual

Figure 2.1: Contents of the JideTech PTZ Dome Camera package.
3. Key Features
- 2.5" Metal Pan-Tilt-Zoom IP Camera: Offers a Pan Range of 0°~355° (120°/s speed) and Tilt Range of 0°~90° (45°/s speed). Features 128 presets for customized viewing angles.
- 4X Optical Zoom: Remotely control 4x optical zoom from PC or phone for detailed surveillance.
- HD 1080p Video Resolution: Captures video at 1920(H)×1080(V) at 15 frames per second with a 2.8-12mm lens.
- H.264/H.265 Video Compression: Efficient video encoding for storage and streaming.
- IR Night Vision: Provides clear night vision up to 65 feet (20 meters).
- Intelligent Motion Alerts: Real-time email alerts and snapshots upon motion detection.
- Broad Compatibility: Supports IE and Chrome (with plugin), iSpy, Milestone, VLC, Blue Iris, Hikvision, XM, Amcrest NVRs, and RTSP protocol.
- Power over Ethernet (PoE): Simplifies installation by delivering power and data through a single Cat5/6 cable (requires a separate PoE injector or switch, not included).
Video 3.1: Overview of the JideTech HD 1080P PTZ Outdoor POE Security IP Dome Camera features.
4. Setup
4.1 Physical Installation
The camera is designed for ceiling or wall mounting. Follow these steps for secure installation:
- Step 1: Rotate the camera base to align with the arrow and remove it from the main body.
- Step 2: Place the base on your desired mounting surface (ceiling or wall) and mark the locations for drilling.
- Step 3: Drill holes at the marked positions and insert the expansion screws.
- Step 4: Insert the camera's tail line through the base, then secure the base to the expansion screws.
- Step 5: Align the three rounds on the bottom of the PTZ camera with the corresponding slots on the base, then turn left to lock it securely.

Figure 4.1: Physical installation steps for the dome camera.
4.2 Power and Network Connection
This camera supports Power over Ethernet (PoE) for simplified installation. A single Cat5/6 Ethernet cable can provide both power and data connectivity.
- Connect one end of a Cat5/6 Ethernet cable to the camera's Ethernet port.
- Connect the other end of the Ethernet cable to a PoE switch or a PoE injector (802.3af standard recommended). Ensure your PoE device provides sufficient power.
- Alternatively, if PoE is not used, connect the provided 12V power adapter to the camera's power input and plug it into a power outlet. Then connect the Ethernet cable to a standard router or network switch.
Upon initial power-up, the camera will perform a self-test, including pan and tilt movements.
4.3 Software Setup and Initial Access
To access and configure your camera, you will typically use a web browser or a dedicated mobile application.
- Discover Camera IP: Use the IP Search tool to confirm the camera's current IP address.
- Web Browser Access: Open a web browser (Internet Explorer is often recommended for full functionality due to ActiveX plugins; for Chrome/Firefox, an IE Tab plugin may be required). Enter the camera's IP address into the address bar. Log in using the default credentials (usually found in the manual or on the camera sticker). It is highly recommended to change the default password immediately for security.
- Mobile App Access: Download the recommended mobile application (e.g., 'Hisee SE' or other specified app in your manual) from the App Store or Google Play. Follow the in-app instructions to add your camera, typically by scanning a QR code or manually entering the camera's ID/IP address.
- Third-Party Software: The camera is compatible with various third-party software and NVRs such as iSpy, Milestone, VLC, Blue Iris, Hikvision, XM, and Amcrest. Refer to the documentation of your chosen software/NVR for integration instructions. The camera supports ONVIF and RTSP protocols.
5. Operating the Camera
5.1 Pan, Tilt, and Zoom (PTZ) Control
The camera offers extensive Pan, Tilt, and Zoom capabilities, controllable via the web interface or mobile application.
- Pan: Rotate the camera horizontally across a 355° range.
- Tilt: Adjust the camera vertically across a 90° range.
- Zoom: Utilize the 4X optical zoom to magnify distant objects without losing image clarity. The camera features auto-focus to maintain sharpness during zoom operations.
- Presets: Configure up to 128 preset positions for quick navigation to frequently monitored areas.
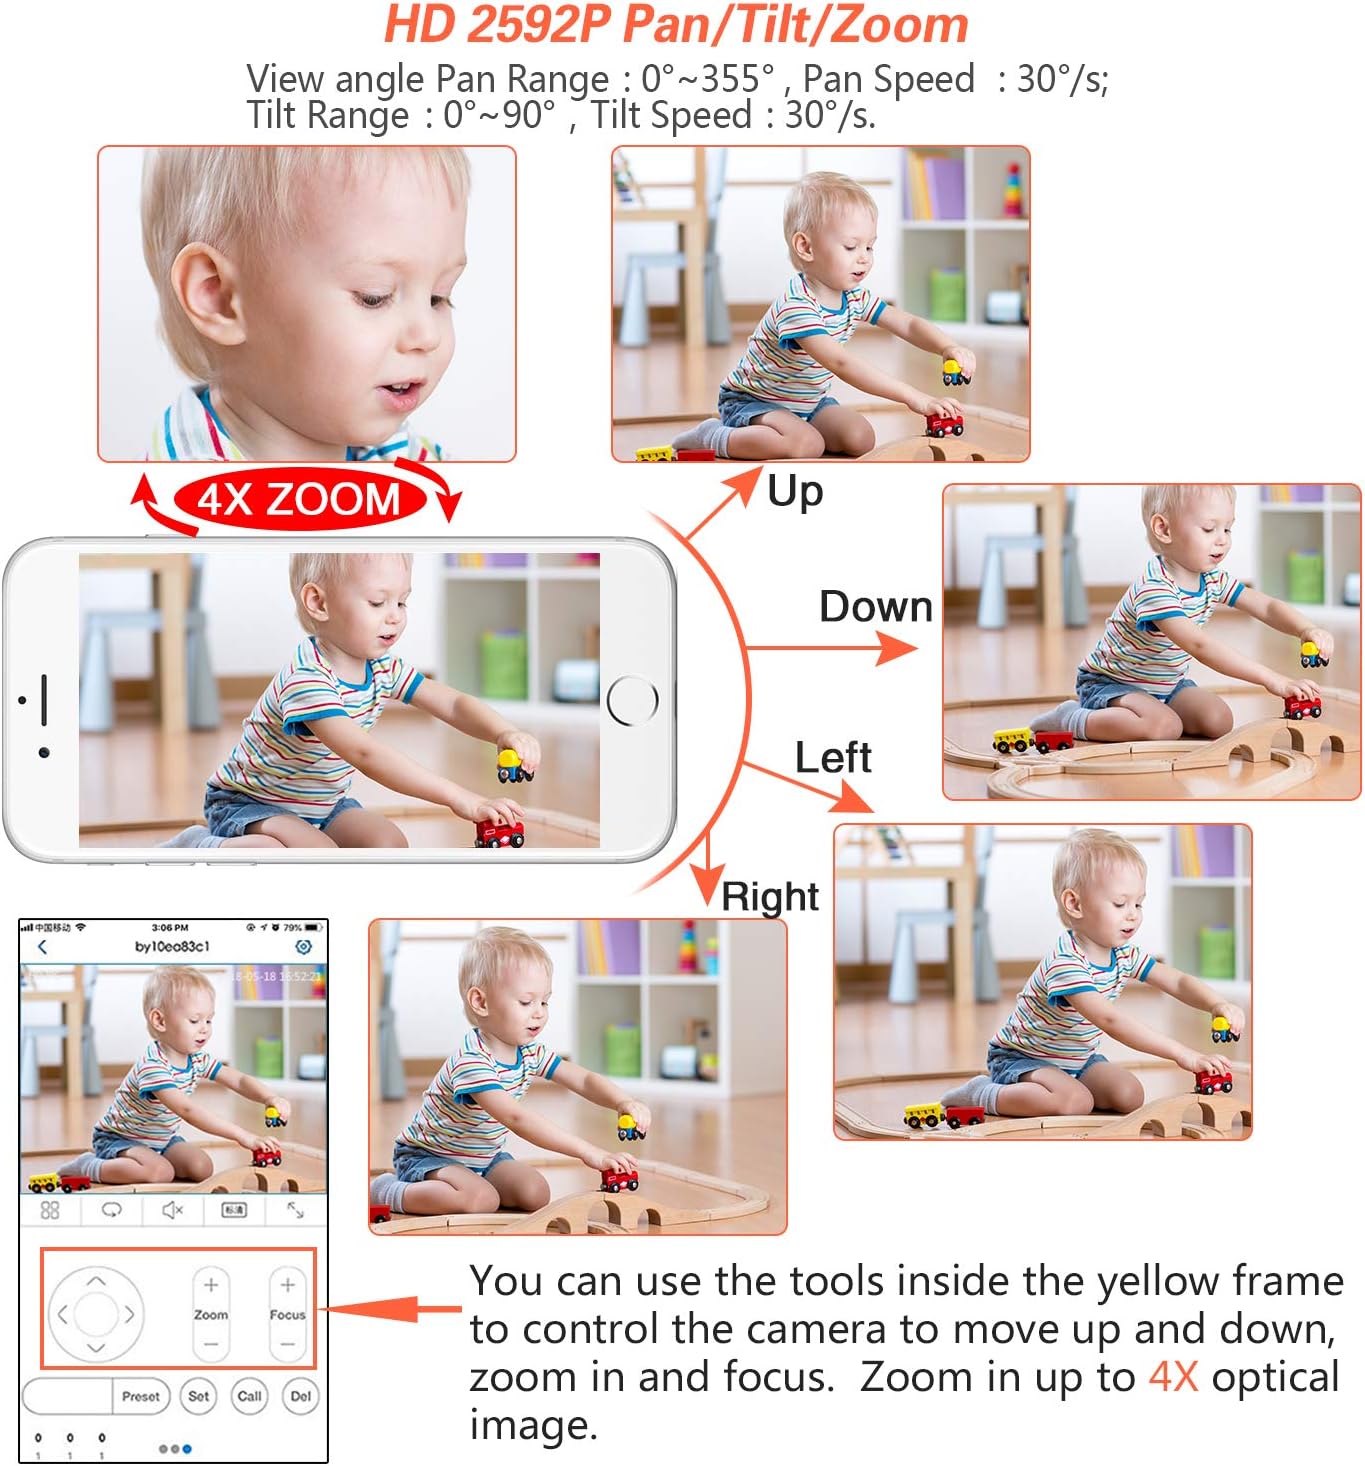
Figure 5.1: Controlling Pan, Tilt, and Zoom functions via a mobile device.
5.2 Motion Detection and Alerts
The camera can detect motion within its field of view and trigger alerts.
- Configuration: Access the camera's web interface or mobile app to configure motion detection zones and sensitivity.
- Alerts: Set up email alerts with snapshots or push notifications to your mobile device when motion is detected.

Figure 5.2: Motion detection and alert system.
5.3 Video Recording
This camera does not include an SD card slot for onboard storage. Video recording can be managed through compatible Network Video Recorders (NVRs) or PC/smartphone applications.
- NVR Integration: Connect the camera to a compatible NVR (e.g., Hikvision, XM, Amcrest) using its ONVIF or RTSP capabilities for continuous or event-based recording.
- Software Recording: Use third-party software like Blue Iris or iSpy on a dedicated computer to record video streams from the camera.
5.4 Night Vision
The camera is equipped with infrared (IR) LEDs to provide clear surveillance in low-light or complete darkness, with a range of up to 65 feet.
- The camera automatically switches between day (color) and night (black and white IR) modes based on ambient light conditions.
- Ensure there are no obstructions directly in front of the camera's dome that could cause IR reflection, which might degrade night vision image quality.

Figure 5.3: Day and Night Vision comparison.
6. Maintenance
Regular maintenance ensures optimal performance and longevity of your security camera.
- Cleaning: Periodically clean the camera's dome with a soft, damp cloth to remove dust, dirt, or water spots that may obstruct the view. Avoid abrasive cleaners.
- Cable Inspection: Check all cable connections (Ethernet, power) for wear, damage, or loose connections, especially in outdoor environments.
- Firmware Updates: Check the JideTech support website or contact customer service for available firmware updates. Updates can improve performance, add features, or fix bugs.
- Environmental Checks: Ensure the camera's mounting remains secure and that no new obstructions (e.g., growing foliage) block its field of view.
7. Troubleshooting
This section addresses common issues you might encounter with your JideTech PTZ Dome Camera.
| Problem | Possible Solution |
|---|---|
| Camera not powering on or connecting via PoE. |
|
| Cannot access camera via web browser. |
|
| Image is blurry or out of focus. |
|
| Poor night vision quality or IR reflection. |
|
| Mobile app not connecting or showing video. |
|
8. Specifications
| Feature | Detail |
|---|---|
| Model Number | Hi2162-PTZ3X |
| Video Resolution | 1080p (1920x1080) at 15 fps |
| Optical Zoom | 4x |
| Pan Range | 0°~355° |
| Tilt Range | 0°~90° |
| Night Vision Range | 65 feet (IR) |
| Connectivity | Wired Ethernet, PoE (802.3af) |
| Video Compression | H.264/H.265 |
| Waterproof Rating | IP66 |
| Power Source | PoE or 12V DC |
| Material | Aluminum |
| Dimensions | 4.33 x 4.33 x 3.91 inches |
| Weight | 1.2 Pounds |
| Compatible Devices | Windows PC, iOS/Android devices |
| Protocols Supported | RTSP, ONVIF |
9. Warranty and Support
- Warranty: JideTech provides a 1-year warranty service for this product.
- Technical Support: Lifetime technical support is available. If you require assistance with setup, operation, or encounter any issues, please contact JideTech customer service.
- Contacting Support: You can reach JideTech support via Amazon email or find contact information within the product manual. When contacting support, please include your order number to facilitate assistance.
- Note on Apps: Some cameras may use the 'Hisee SE' app. Please refer to your specific manual for the correct application.