Papablic Papablic01
Papablic Baby Bottle Sterilizer and Dryer Pro Instruction Manual
Model: Papablic01
Introduction
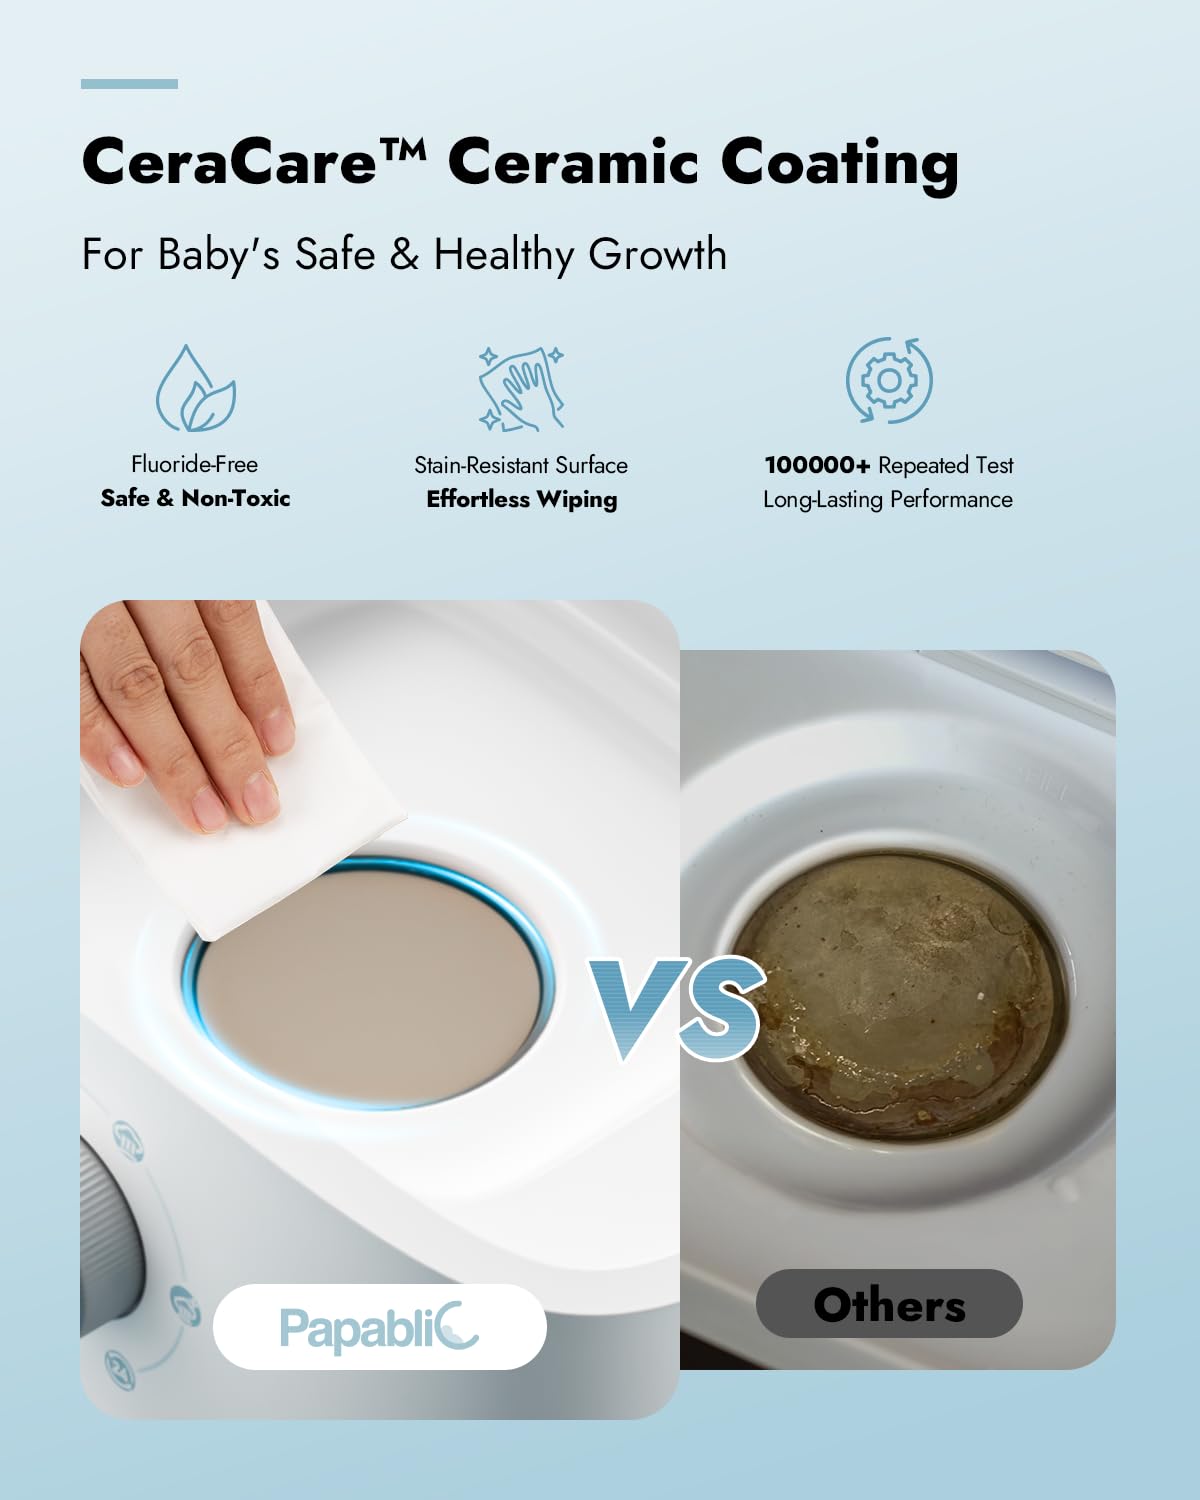
The Papablic Baby Bottle Sterilizer and Dryer Pro is designed to provide a safe and efficient way to sterilize and dry baby bottles, pump parts, pacifiers, and other feeding essentials. Utilizing steam for sterilization and hot air for drying, this appliance ensures hygiene and convenience for parents. Its ceramic-coated heating plate simplifies cleaning and maintenance.

Important Safety Instructions
- Read all instructions before using the appliance.
- Do not immerse the base unit, cord, or plug in water or other liquids.
- Always unplug the appliance from the outlet when not in use and before cleaning. Allow to cool before putting on or taking off parts.
- Do not operate any appliance with a damaged cord or plug, or after the appliance malfunctions or has been damaged in any manner.
- Use only distilled water for sterilization to prevent mineral buildup and ensure optimal performance.
- Keep out of reach of children. This appliance is not a toy.
- Do not place on or near a hot gas or electric burner, or in a heated oven.
- Extreme caution must be used when moving an appliance containing hot liquids.
- Do not use the appliance for anything other than its intended use.
- Ensure the lid is properly secured during operation to prevent steam escape.
Product Components
Familiarize yourself with the parts of your Papablic Sterilizer and Dryer Pro:
- Base Unit: Contains the heating plate and control knob.
- Lower Basket: For larger items like bottles.
- Upper Basket/Accessory Tray: For smaller items like pacifiers, nipples, and pump parts.
- Lid: Covers the baskets during operation.
- Control Knob: Used to select different operating modes.


Setup Instructions
Follow these steps to set up your sterilizer and dryer:
- Place the base unit on a flat, stable, heat-resistant surface.
- Pour 100ml of distilled water into the heating plate of the base unit. Ensure water does not exceed the MAX fill line.
- Place the lower basket onto the base unit. Arrange clean, empty bottles upside down in the lower basket.
- Place the upper basket/accessory tray on top of the lower basket. Place smaller items like nipples, pacifiers, and pump parts in the upper basket.
- Place the lid securely on top of the upper basket.
- Plug the power cord into a suitable electrical outlet.

Video 1: An instructional video demonstrating the setup and basic operation of the Papablic Bottle Sterilizer and Dryer, including adding water, loading items, and selecting cycles.
Operating Instructions
The Papablic Sterilizer and Dryer Pro features a simple one-dial control for various functions:
- Auto (Sterilize & Dry): This mode performs both sterilization and drying. The full cycle takes approximately 36 minutes (8 minutes for sterilization, 28 minutes for drying).
- Sterilize: This mode only sterilizes items using steam. The cycle takes approximately 8 minutes. Items will remain wet after this cycle.
- Dry: This mode only dries items using hot air. The cycle takes approximately 28 minutes.
- Extra: An extended drying cycle, typically around 50 minutes, for thorough drying.
- 24H Storage: After a sterilization or drying cycle, this mode keeps items sanitized for up to 24 hours by periodically running a short drying cycle.
To operate:
- Ensure the unit is set up as described in the "Setup Instructions" section.
- Turn the control knob to select your desired operating mode (e.g., Auto, Sterilize, Dry).
- Press the center button on the knob to start the selected cycle. The LED light will indicate operation.
- The appliance will automatically shut off once the cycle is complete.

Maintenance
Regular cleaning and maintenance will prolong the life of your sterilizer and ensure optimal performance.
Cleaning the Heating Plate:
The ceramic-coated heating plate is designed for easy cleaning. Mineral deposits (limescale) may accumulate on the heating plate, especially if tap water is used. It is recommended to clean the heating plate regularly, ideally after every few uses, or when visible deposits appear.
- Ensure the unit is unplugged and completely cooled down.
- Wipe the heating plate with a soft, damp cloth. For stubborn mineral deposits, use a solution of 80ml white vinegar and 20ml distilled water. Pour the solution onto the heating plate and let it sit for 20 minutes.
- After soaking, gently scrub the plate with a soft brush or sponge to remove deposits.
- Rinse the heating plate area with a damp cloth, ensuring no residue remains.
- Dry thoroughly before next use.
Cleaning Other Components:
- The baskets and lid can be washed with warm soapy water and rinsed thoroughly.
- Do not use abrasive cleaners or scouring pads, as they may damage the surfaces.
- Ensure all parts are completely dry before reassembling or storing the unit.
Troubleshooting
| Problem | Possible Cause | Solution |
|---|---|---|
| Items are not completely dry after a cycle. |
|
|
| White/brown mineral deposits on heating plate. | Hard water usage. | Clean the heating plate as described in the Maintenance section using distilled water and vinegar solution. Always use distilled water for operation. |
| Unit does not turn on. |
|
|
Specifications
- Model Number: Papablic01
- Product Dimensions: Approximately 7.5 x 10.4 x 16.1 inches (Width x Depth x Height)
- Item Weight: Approximately 4 pounds
- Material Type: Plastic
- Coating: 100% Non-toxic Ceramic Coating (CeraCare™)
- Capacity: Up to 10 narrow-neck bottles or 6 wide-neck bottles
- Sterilization Time: 8 minutes
- Drying Time: 28 minutes (standard)
- Total Auto Cycle Time: 36 minutes

Warranty and Support
For warranty information, product support, or to purchase replacement parts, please contact Papablic customer service. Refer to the product packaging or the official Papablic website for the most current contact details.
Website: Papablic Official Store
Ask a question about this manual
Ask about setup, troubleshooting, compatibility, parts, safety, or missing instructions. Manuals+ will review the question and use this page’s manual context to help answer it.