Product Overview
The LGIDTECH LS2 is a versatile 5-in-1 smart LED controller designed for various LED strip light types. It supports Single Color, RGB, RGBW, WW+CW, and RGB+CCT LED strip lights. This controller can be operated via a 2.4GHz remote control or a smartphone application when paired with a compatible gateway (sold separately).
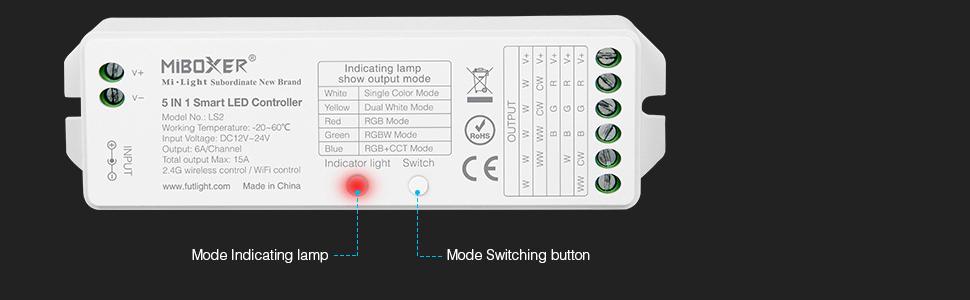
Image: LGIDTECH LS2 5-in-1 Smart LED Controller showing its model number, working voltage, temperature, output, RF frequency, transmitting power, and control distance.
Key Features:
- 5-in-1 Compatibility: Supports Single Color, RGB, RGBW, WW+CW, and RGB+CCT LED strip lights.
- Wide Voltage Range: Operates on DC 12V-24V.
- High Output: Maximum 6A per channel, with a total output of up to 15A.
- Wireless Control: 2.4GHz wireless control for remote operation.
- Smartphone App Control: Requires a WL-Box2 gateway hub (sold separately) for smartphone app control.
- Auto-Transmitting Function: Controllers can transmit signals to other controllers within 30m, extending the control distance.
- Auto-Synchronization Function: Multiple controllers can work synchronously when controlled by the same remote.
Setup Instructions
Follow these steps to set up your LGIDTECH LS2 controller and LED strip lights.
1. Wiring the LED Strip to the Controller
- Ensure the power supply is disconnected before making any connections.
- Connect the wires from your LED strip light to the corresponding output terminals on the LS2 controller. Use a slotted screwdriver to secure the wires. Ensure each wire is connected correctly according to the labels (V+, R, G, B, CW, WW).
- Connect the power supply to the input terminals of the LS2 controller. The controller supports two input methods: a male connector or bare wires. Ensure the input voltage (DC 12V or DC 24V) matches your LED strip's working voltage.

Image: The LS2 controller connected to an RGB+CCT LED strip light with 6 wires. The image shows the output terminals labeled for V+, R, G, B, CW, and WW connections.

Image: Close-up view of the LS2 controller's input terminals, showing options for male connector or bare wire input.
2. Setting the Output Mode
Before pairing, it is crucial to set the correct output mode on the LS2 controller to match your specific LED strip light type. This is done using the 'Switch' button on the controller.
- Connect the power supply to the controller.
- Press the 'Switch' button repeatedly to cycle through the output modes. The indicator light will change color to show the current mode:
- White Light: Single Color Mode
- Yellow Light: Dual White Mode (WW+CW)
- Red Light: RGB Mode
- Green Light: RGBW Mode
- Blue Light: RGB+CCT Mode
- Select the mode that corresponds to your LED strip type. For example, if you have an RGB+CCT strip, ensure the indicator light is blue.
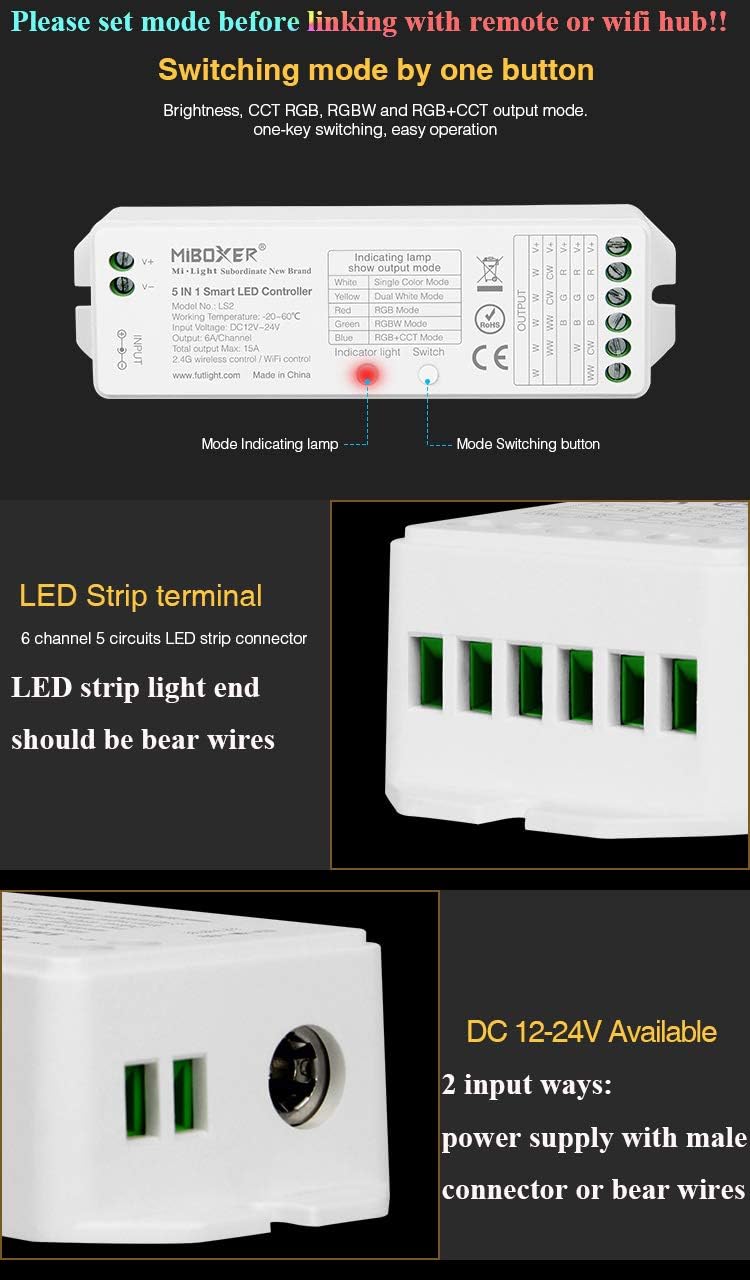
Image: The LS2 controller highlighting the mode indicating lamp and the mode switching button.
3. Remote Control Battery Installation (if applicable)
If using a remote control (e.g., FUT089), install 2 AAA batteries (not included) into the remote. Refer to the remote's specific instructions for battery placement.
4. Linking the Controller to a Remote or Wall Panel
To control your LED strip, the LS2 controller must be linked to a compatible remote control or wall panel (e.g., B4 panel). Ensure the controller's output mode is set correctly before linking.
- Turn off the power supply to the LS2 controller. Wait for at least 5 seconds.
- Turn on the power supply to the LS2 controller.
- Within 3 seconds of turning on the power, press the 'ON' button for the desired zone on your remote control or wall panel 3 times.
- The LED strip light will blink 3 times, indicating successful linking.
Video: This video demonstrates the wiring, remote battery installation, mode setting, and linking process for the LGIDTECH LS2 controller with an LED strip.
Operating Instructions
Once linked, you can control your LED strip lights using the remote or wall panel.
Basic Control (using a remote like FUT089):
- Power On/Off: Use the zone's 'ON' and 'OFF' buttons.
- Brightness Adjustment: Use the brightness up (S+) and down (S-) buttons.
- Color Selection: Use the color ring to select static colors.
- Color Temperature Adjustment (for WW+CW or RGB+CCT modes): Adjust the warm white to cool white balance.
- Saturation Adjustment: For RGB modes, adjust the saturation (0%-100% brightness white color mixed with R,G,B color).
- Dynamic Modes: Press the 'M' button to cycle through 9 preset dynamic modes.
- Dynamic Mode Speed: Use the 'S+' and 'S-' buttons to adjust the speed of dynamic modes.
- Night Light Brightness: Some remotes offer a one-step button to achieve night light brightness.

Image: The LS2 controller showing compatibility with various remote controls (FUT089, FUT092, FUT096, B8, B4/T4) and Wi-Fi hubs (WL-Box1, iBox1, iBox2).
Using the B4 Panel Remote Controller:
The B4 Panel Remote Controller offers a different interface for controlling your LS2 controller. Ensure it is linked to the LS2 controller as described in the setup section.
- Zone Control: Use the individual zone switches (1, 2, 3, 4) to select which zone to control. The 'All' switch controls all linked zones simultaneously.
- Color/Brightness Sliders: Use the touch-sensitive sliders to adjust color and brightness.
- White Button: Activates white light mode.
- Mode Button: Cycles through dynamic modes.
- Speed+/- Buttons: Adjusts the speed of dynamic modes.
Video: This video demonstrates how to control the LS2 strip controller using the B4 Panel Remote, including color changes, dynamic modes, and speed adjustments.
Troubleshooting
Unlinking the Controller from a Remote or Wall Panel:
If you need to unlink the controller from a remote or wall panel, follow these steps:
- Turn off the power supply to the LS2 controller. Wait for at least 5 seconds.
- Turn on the power supply to the LS2 controller.
- Within 3 seconds of turning on the power, press the 'ON' button for the desired zone on your remote control or wall panel 5 times.
- The LED strip light will blink 9 times, indicating successful unlinking.
Common Issues:
- Smartphone App Control Not Working: The LS2 controller cannot be controlled directly by a smartphone app. A WL-Box2 gateway hub (sold separately) is required for smartphone app functionality.
- Lights Not Responding After Power On: Ensure the correct output mode is set on the LS2 controller before attempting to link or operate. Press the 'Switch' button to cycle through modes until the indicator light matches your LED strip type.
- Remote Not Controlling Lights: Verify that the remote control has fresh batteries and that the controller is properly linked to the remote. Repeat the linking process if necessary.
- Incorrect Colors or Functionality: Double-check that the LED strip wires are connected to the correct output terminals on the LS2 controller and that the controller's output mode matches your LED strip type.
Specifications
| Specification | Value |
|---|---|
| Model Number | LS2 |
| Brand | LGIDTECH |
| Voltage | DC 12V/24V |
| Output | Max. 6A/Channel, Total output Max. 15A |
| Working Temperature | -20~60°C |
| RF Frequency | 2.4GHz |
| Control Distance | 30m (98ft) |
| Material Type | Plastic |
| Water Resistance Level | Not Water Resistant |
Warranty and Support
For warranty information or technical support, please refer to the product packaging or contact LGIDTECH customer service directly. You can also visit the official LGIDTECH Store on Amazon for additional resources and product information.