1. Introduction
The Q-BAIHE LJM PREAMP 9 is a single-ended, pure Class A transistor preamplifier module designed for high-fidelity audio applications. This preamplifier utilizes a discrete component design, characteristic of classic analog circuits, to deliver a warm, sweet, and full sound profile.
A single-ended amplifier circuit uses one transistor or tube to amplify the entire waveform of the signal, ensuring no cross-distortion. This design allows for the reproduction of very weak signals that might otherwise be overlooked. The PREAMP 9 employs original imported BC547 C NPN transistors in its pure single-ended amplifier circuit, paired with a constant current source load.
To address the single-ended circuit's sensitivity to power supply interference, the PREAMP 9 incorporates a sophisticated three-level filter system. This includes a MOTOROLA ONSEMI LM317T regulator, a large-capacity inductor-plus-capacitor (LC) filter, and a transistor RC filter, providing a very pure, battery-like DC power supply to the preamplifier stage.

Figure 1: Top-down view of the LJM PREAMP 9 preamplifier module, showing the main components, potentiometer, and input/output terminal blocks.
2. Setup and Installation
The LJM PREAMP 9 is designed as a module to be integrated into an existing amplifier system or custom audio project. Careful attention to power supply and signal connections is crucial for optimal performance.
2.1 Power Supply Connection
- The module requires an AC power input between AC20V and AC28V.
- Ensure the transformer power rating is greater than 5VA.
- Connect the AC power source to the "AC24" terminal block on the PCB. Refer to Figure 2 for the location.
- Important: Verify correct voltage and polarity before powering on to prevent damage to the module.

Figure 2: Top view of the LJM PREAMP 9, showing the "power in" (AC24) terminal block for AC power connection.
2.2 Audio Input and Output Connections
- Audio Input: Connect your audio source (e.g., DAC, CD player) to the "IN" and "GND" terminals on the input terminal block.
- Audio Output: Connect the preamplifier's output to your power amplifier's input using the "OUT" and "GND" terminals on the output terminal block.
- Ensure all signal grounds are properly connected to avoid hum or noise.
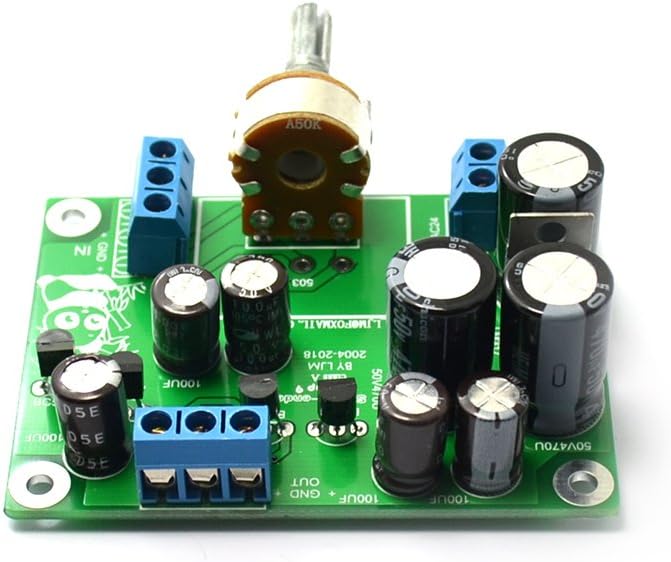
Figure 3: Angled view of the LJM PREAMP 9, illustrating the input (IN, GND) and output (OUT, GND) terminal blocks.
2.3 Physical Installation
- The PCB size is approximately 56 x 71 MM.
- This module can be installed within a general pre-class amplifier enclosure or directly integrated into the control panel of a power amplifier.
- Use appropriate standoffs and screws to secure the PCB, ensuring no short circuits occur with the enclosure or other components.
- The potentiometer is integrated onto the PCB for volume control. If an external potentiometer is desired, the onboard one may need to be bypassed or removed by an experienced technician.

Figure 4: Side-angled view of the LJM PREAMP 9 module, providing a perspective on component height and overall layout for installation planning.
3. Operating Instructions
Once properly installed and connected, operating the LJM PREAMP 9 is straightforward.
- Power On: Apply AC power to the module. There is no separate power switch on the module itself; power is controlled by the main system it is integrated into.
- Volume Adjustment: Use the integrated potentiometer (if utilized) to adjust the output volume level. Rotate clockwise to increase volume and counter-clockwise to decrease.
- Source Playback: Begin playback from your audio source. The preamplifier will process the signal before sending it to your power amplifier.
Allow a brief warm-up period for optimal sound quality, especially with Class A circuits.
4. Maintenance
The LJM PREAMP 9 is a robust electronic module designed for long-term performance. Minimal maintenance is required.
- Cleaning: Keep the module free from dust and debris. Use a soft, dry cloth or a brush to gently clean the PCB. Avoid using liquid cleaners directly on the components.
- Environment: Ensure the module is installed in a well-ventilated area to prevent overheating. Avoid exposure to extreme temperatures, humidity, or direct sunlight.
- Connections: Periodically check all power and signal connections to ensure they are secure. Loose connections can lead to intermittent sound or noise.
- Component Inspection: Visually inspect the capacitors and other components for any signs of damage or bulging. If any issues are observed, consult a qualified technician.
5. Troubleshooting
If you encounter issues with your LJM PREAMP 9, refer to the following troubleshooting guide:
| Problem | Possible Cause | Solution |
|---|---|---|
| No sound output |
|
|
| Distorted or noisy sound |
|
|
| Module not powering on |
|
|
6. Specifications
Key technical specifications for the LJM PREAMP 9 module:
| Feature | Specification |
|---|---|
| Model | LJM-PREAMP-9 |
| Preamplifier Type | Single-Ended Pure Class A Transistor |
| Power Supply Requirement | AC20V to AC28V (Transformer Power > 5VA) |
| Total Harmonic Distortion + Noise (THD+N) | <0.05% |
| Signal-to-Noise Ratio (SNR) | >100 dB |
| Frequency Response | 20Hz - 20kHz (-0.05dB) |
| FFT Test Platform | AP SYS TWO (Output voltage signal: 1.06V) |
| PCB Dimensions | Approximately 56 x 71 MM |
| Weight | 110 g |
| Manufacturer | Q-BAIHE |


