1. Introduction
Welcome to the Krüger&Matz TT-501 Belt-Drive Audio Turntable user manual. This guide provides essential information for the safe and optimal use of your new turntable. Please read this manual thoroughly before operating the device and retain it for future reference.
2. Important Safety Instructions
- Power Source: Ensure the power supply voltage matches the requirements specified on the turntable.
- Water and Moisture: Do not expose the unit to rain, moisture, or excessive humidity.
- Ventilation: Place the turntable in a well-ventilated area. Do not block ventilation openings.
- Heat Sources: Keep the unit away from heat sources such as radiators, heat registers, stoves, or other apparatus that produce heat.
- Cleaning: Unplug the unit from the wall outlet before cleaning. Use a soft, dry cloth only.
- Servicing: Do not attempt to service this product yourself. Refer all servicing to qualified service personnel.
3. Package Contents
Carefully unpack your Krüger&Matz TT-501 turntable and check that all items are present and in good condition. The package should contain:
- Krüger&Matz TT-501 Turntable Unit
- Dust Cover
- Platter
- Drive Belt
- Slipmat
- AC Power Adapter
- USB Cable
- RCA Audio Cable
- User Manual (this document)

Figure 3.1: The Krüger&Matz TT-501 turntable packaging box, illustrating the product and its branding. This image shows the external appearance of the product's retail packaging.
4. Product Overview
The Krüger&Matz TT-501 is a belt-drive audio turntable designed for high-quality vinyl playback. It features a built-in Bluetooth receiver for wireless audio streaming and a USB output for digitizing your vinyl collection. The unit is equipped with a precision tonearm and a durable stylus for accurate sound reproduction.
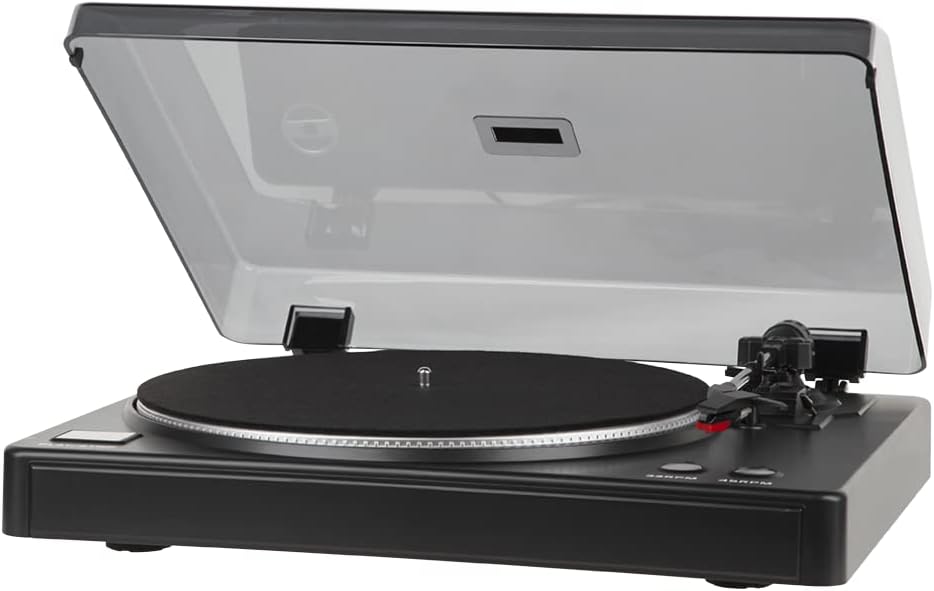
Figure 4.1: The Krüger&Matz TT-501 turntable with its dust cover open, showcasing the platter, tonearm, and control buttons. This image provides a full view of the turntable's main components.
5. Setup
5.1. Unpacking and Placement
- Carefully remove all components from the packaging.
- Place the turntable on a stable, level surface away from direct sunlight, heat sources, and strong vibrations.
- Ensure adequate space around the unit for ventilation and dust cover operation.
5.2. Assembly
- Platter and Belt: Gently place the platter onto the spindle. Locate the drive belt and carefully stretch it around the motor pulley and the inner rim of the platter.
- Slipmat: Place the felt slipmat on top of the platter.
- Dust Cover: Insert the hinges of the dust cover into the slots at the rear of the turntable base.
- Cartridge/Stylus: The turntable comes with a pre-installed cartridge and stylus. Ensure the stylus guard is removed before use.
5.3. Connections
Before making any connections, ensure the turntable and all connected audio equipment are powered off.
- Audio Output (LINE OUT R/L): Connect the RCA audio cables from the 'LINE OUT R' (red) and 'LINE OUT L' (white) jacks on the turntable to the corresponding audio input jacks on your amplifier, receiver, or powered speakers.
- Ground (GND): If your amplifier has a ground terminal, connect a ground wire from the turntable's 'GND' terminal to the amplifier's ground terminal to reduce hum.
- USB to PC: Connect the USB cable from the 'USB TO PC' port on the turntable to an available USB port on your computer for digitizing vinyl.
- AUX IN: This input allows you to connect an external audio source to the turntable's internal amplifier.
- Power: Connect the AC power adapter to the 'AC INPUT' jack on the turntable, then plug the adapter into a wall outlet.
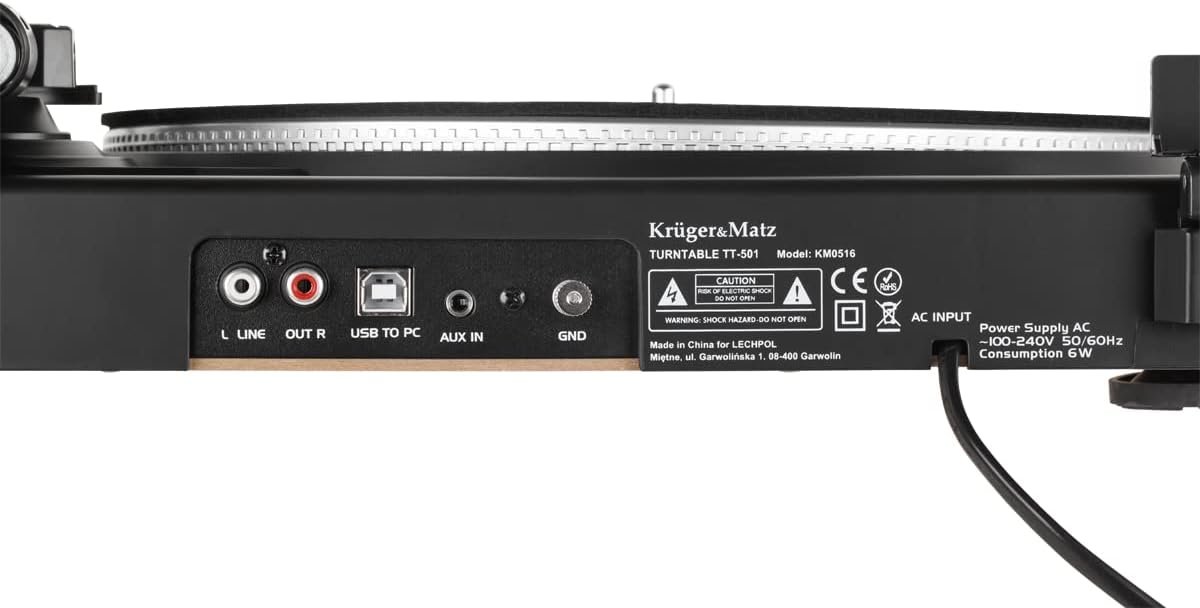
Figure 5.1: The rear panel of the Krüger&Matz TT-501 turntable, displaying the 'LINE OUT R/L', 'USB TO PC', 'AUX IN', 'GND', and 'AC INPUT' ports. This image clarifies the various connectivity options available on the device.
6. Operating Instructions
6.1. Basic Playback
- Power On: Ensure all connections are secure, then plug in the power adapter.
- Place Record: Place a vinyl record on the platter, centered on the spindle.
- Select Speed: Press the '33RPM' or '45RPM' button to select the appropriate playback speed for your record. The platter will begin to rotate.
- Remove Stylus Guard: Carefully remove the clear plastic stylus guard from the cartridge.
- Lower Tonearm: Gently lift the tonearm from its rest and position it over the desired track on the record. Use the cueing lever to slowly lower the tonearm onto the record.
- Adjust Volume: Adjust the volume on your connected amplifier or powered speakers.
- Stop Playback: When the record finishes, or you wish to stop, use the cueing lever to lift the tonearm, then return it to its rest. Press the speed button again to stop the platter rotation.

Figure 6.1: A close-up view of the Krüger&Matz TT-501 turntable's platter, tonearm, and the '33RPM' and '45RPM' speed selection buttons. This image highlights the primary controls for vinyl playback.
6.2. Bluetooth Connectivity
The TT-501 features a built-in Bluetooth receiver, allowing you to stream audio wirelessly from a compatible device (e.g., smartphone, tablet) to the turntable's output. This means the turntable acts as a receiver, playing audio from your Bluetooth device through its RCA outputs.
- Activate Bluetooth: Power on the turntable. The Bluetooth indicator light will begin to flash, indicating it is in pairing mode.
- Pair Device: On your Bluetooth-enabled device, search for available Bluetooth devices and select "Krüger&Matz TT-501" (or similar name).
- Confirmation: Once paired, the Bluetooth indicator light on the turntable will become solid.
- Play Audio: Start playing audio on your connected device. The sound will be output through the turntable's RCA LINE OUT ports to your connected amplifier/speakers.
6.3. USB Recording (Digitizing Vinyl)
The USB TO PC output allows you to connect the turntable to a computer and record your vinyl collection using appropriate audio recording software (not included). Common software options include Audacity (free) or similar programs.
- Connect USB: Connect the USB cable from the turntable's 'USB TO PC' port to your computer.
- Install Software: Install your preferred audio recording software on your computer.
- Configure Software: In your recording software's settings, select the turntable as the audio input device (it may appear as 'USB Audio CODEC' or similar).
- Start Recording: Begin playback of your vinyl record on the turntable and simultaneously start recording in your software.
- Save File: Once recording is complete, stop playback and recording, then save your digitized audio file in your desired format (e.g., MP3, WAV).
7. Maintenance
7.1. Cleaning
- Dust Cover: Wipe the dust cover with a soft, dry, anti-static cloth. Avoid harsh chemicals.
- Turntable Body: Use a soft, slightly damp cloth to clean the turntable's surface. Do not use abrasive cleaners.
- Stylus: Use a specialized stylus cleaning brush (sold separately) to gently brush the stylus from back to front. Never brush from side to side.
- Records: Keep your records clean using a record brush and cleaning solution to prevent dust and debris from damaging the stylus and affecting sound quality.
7.2. Stylus Replacement
The stylus is a delicate component that wears out over time. A worn stylus can damage your records and degrade sound quality. Replace the stylus after approximately 300-500 hours of playback, or if you notice a significant drop in sound quality or distortion.
- Gently pull the old stylus assembly downwards and forwards to detach it from the cartridge body.
- Align the new stylus assembly with the cartridge body and push it upwards and backwards until it clicks into place.
- Be extremely careful not to bend the cantilever or touch the stylus tip during this process.
7.3. Belt Replacement
The drive belt may need replacement if it becomes stretched or brittle, leading to inconsistent platter speed. Refer to the manufacturer's instructions for specific belt replacement procedures, typically involving removing the platter and carefully fitting a new belt around the motor pulley and platter sub-platter.
8. Troubleshooting
If you encounter issues with your turntable, consult the table below for common problems and solutions.
| Problem | Possible Cause | Solution |
|---|---|---|
| No power | Power adapter not connected; outlet not working. | Ensure power adapter is securely connected to turntable and a working wall outlet. |
| No sound or low volume | RCA cables not connected; amplifier/speakers off or volume low; stylus guard still on; worn stylus. | Check RCA connections; power on amplifier/speakers and increase volume; remove stylus guard; replace stylus if worn. |
| Distorted sound | Dirty record; dirty or worn stylus; incorrect tracking force (if adjustable); external interference. | Clean record; clean or replace stylus; ensure proper tonearm setup; move turntable away from other electronics. |
| Platter not spinning or inconsistent speed | Drive belt dislodged or broken; incorrect speed selected. | Check and re-seat the drive belt; replace belt if broken; select correct speed (33RPM/45RPM). |
| Humming noise | Ground wire not connected; proximity to other electronics. | Connect ground wire to amplifier; move turntable away from other electronic devices. |
| Bluetooth pairing issues | Turntable not in pairing mode; device too far; interference. | Ensure turntable Bluetooth indicator is flashing; bring device closer; restart both devices. |
9. Specifications
Below are the technical specifications for the Krüger&Matz TT-501 Belt-Drive Audio Turntable:
| Feature | Specification |
|---|---|
| Brand | Krüger&Matz |
| Model Name | TT 501 |
| Maximum Rotation Speed | 45 rpm |
| Special Feature | Integrated Bluetooth Receiver |
| Material | Vinyl (referring to record material, unit construction is typically plastic/metal) |
| Item Weight | 2.54 Kilograms |
| Style | Modern |
| Color | Black |
| Compatible Devices | Speaker, Hi-Fi system |
| Power Consumption | 6W |
| AC Input | 100-240V 50/60Hz |
10. Warranty and Support
Krüger&Matz products are designed and manufactured to the highest quality standards. This product is covered by a limited warranty from the date of purchase. For detailed warranty terms, conditions, and to access customer support, please refer to the warranty card included with your product or visit the official Krüger&Matz website. Do not attempt to repair the unit yourself, as this may void your warranty.