
AISEN Carburetor Fuel Line Kit
AISEN Carburetor and Fuel Line Kit Instruction Manual
Model: Carburetor Fuel Line Kit
1. Safety Information
WARNING: Always wear appropriate personal protective equipment (PPE) including safety glasses and gloves when working with fuel systems and power tools. Ensure the engine is cool and disconnected from its spark plug before beginning any installation or maintenance.
Fuel is highly flammable. Work in a well-ventilated area away from open flames or sparks. Dispose of old fuel and parts responsibly according to local regulations.
2. Package Contents
Verify that all components are present and undamaged before proceeding with installation.
- 1 x Carburetor Assembly
- 1 x Fuel Line Kit (includes fuel lines, fuel filter, primer bulb)
- 2 x Gaskets
3. Compatibility
This AISEN Carburetor and Fuel Line Kit is designed as a replacement part for various Homelite chainsaw models. Please cross-reference your chainsaw's model number with the list below to ensure proper fitment.
Compatible Homelite Chainsaw Models:
- 20 Chain Saw (UT-10782-A, UT-10817, UT-10847, UT-10881)
- 20 w/cc Chain Saw (UT-10786-A, UT-10818, UT-10853, UT-10883)
- 23 Chain Saw (UT-10781-A)
- 23 w/cc Chain Saw (UT-10785-A, UT-10815, UT-10842, UT-10870)
- D3300 Chain Saw (UT-10779, UT-10779-A, UT-10821, UT-10855, UT-10880)
- D3300C Chain Saw (UT-10784, UT-10784-A, UT-10828, UT-10857, UT-10882)
- D3800 Chain Saw (UT-10780, UT-10780-A)
- D3800C Chain Saw (UT-10783, UT-10783-A)
- N3014 Chain Saw (UT-10799-R, UT-10932)
- N3014 w/cc Chain Saw (UT-10799-R1, UT-10933)
- N3316 Chain Saw (UT-10800-R, UT-10935)
- PS33 Chain Saw (UT-10788, UT-10819, UT-10854)
- Z3300 Chain Saw (UT-10782)
- Z3300C Chain Saw (UT-10786, UT-10809)
- Z3800 Chain Saw (UT-10781)
- Z3800C Chain Saw (UT-10785)
- 33cc 16" Chain Saw (UT-10947, UT-10947-A)
- B2216CC Chain Saw (UT-10941)
- Ranger 33cc 16" Chain Saw (UT-10926)
Note: Some models may require minor modifications, such as adapting the throttle arm from the original carburetor. Refer to online resources or a qualified technician if unsure.
4. Installation Instructions
This section provides general guidance for installing the carburetor and fuel line kit. Specific steps may vary slightly depending on your chainsaw model. Always refer to your chainsaw's original service manual for detailed instructions.
4.1 Preparation
- Ensure the chainsaw engine is off and cool.
- Disconnect the spark plug wire to prevent accidental starting.
- Drain any remaining fuel from the fuel tank.
- Clean the area around the carburetor to prevent debris from entering the engine.
4.2 Removing the Old Carburetor and Fuel Lines
- Carefully remove the air filter cover and air filter.
- Disconnect the throttle linkage and choke rod from the old carburetor.
- Note the routing of the fuel lines. Disconnect the fuel lines from the carburetor and fuel tank. Be prepared for minor fuel spills.
- Unbolt the old carburetor from the engine manifold. Remove any old gaskets.
- Remove the old fuel filter from the fuel tank and extract the old fuel lines.
4.3 Installing the New Carburetor and Fuel Lines
- Install the new fuel lines into the fuel tank, ensuring the fuel filter is attached to the end of the line that will sit at the bottom of the tank.
- Connect the fuel lines to the new carburetor according to the original routing. Typically, one line goes to the primer bulb and the other directly to the carburetor's fuel inlet.
- Place new gaskets between the engine manifold and the new carburetor.
- Mount the new carburetor onto the engine manifold and secure it with the bolts. Do not overtighten.
- Reconnect the throttle linkage and choke rod to the new carburetor. Ensure they operate smoothly without binding.
- Install the new primer bulb if applicable and connect its lines.
- Reinstall the air filter and air filter cover.
- Reconnect the spark plug wire.
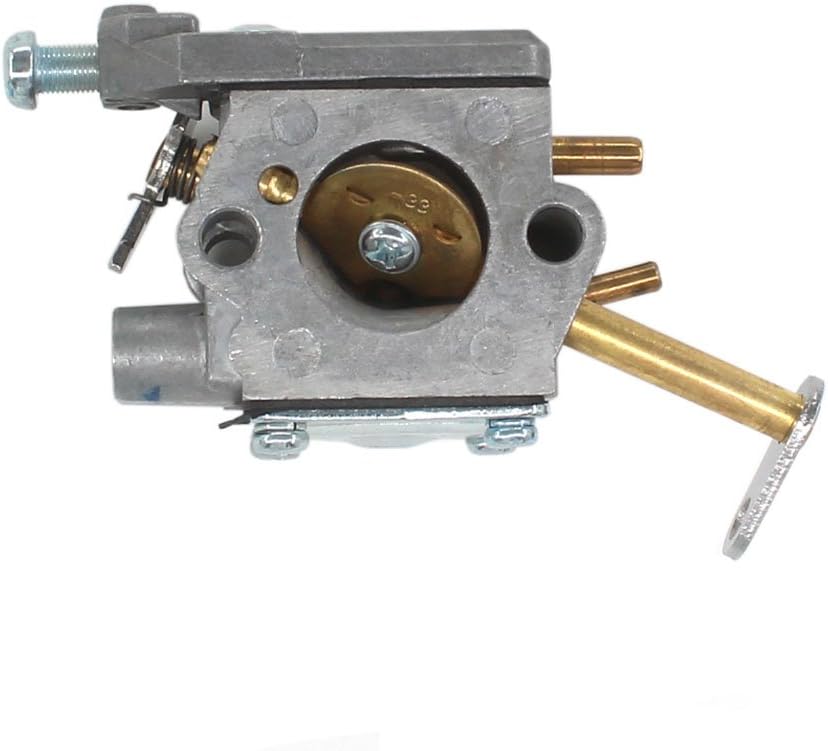
Figure 1: Front view of the AISEN Carburetor, showing the throttle plate and fuel inlet. This is the main component for fuel-air mixture control.

Figure 2: Angled view of the AISEN Carburetor, highlighting the fuel line connections and mounting points. Proper connection of fuel lines is critical for operation.
5. Initial Start-Up and Adjustment
After installation, perform the following steps for initial start-up and basic adjustment.
- Fill the fuel tank with the correct fuel/oil mixture specified by your chainsaw manufacturer.
- Prime the carburetor by pressing the primer bulb several times until fuel is visible in the bulb.
- Follow your chainsaw's specific starting procedure (e.g., choke, pull cord).
- Once the engine starts, allow it to warm up for a few minutes.
- Idle Adjustment: If the engine idles too high or too low, locate the idle speed screw (often marked 'LA' or 'T') on the carburetor and adjust it slowly until a stable idle is achieved.
- High/Low Speed Adjustment (if applicable): Some carburetors have high (H) and low (L) speed adjustment screws. These are typically factory-set. If adjustment is necessary, turn them in small increments (e.g., 1/8 turn) and test the engine's performance. Incorrect adjustment can damage the engine. It is recommended to have these adjusted by a qualified technician if you are unfamiliar with the process.

Figure 3: Top and side view of the AISEN Carburetor, showing the cover plate and various adjustment screws (if present). These screws control fuel mixture and idle speed.
6. Maintenance
Regular maintenance ensures optimal performance and longevity of your chainsaw and its components.
- Fuel Filter: Inspect and replace the fuel filter periodically (e.g., annually or every 50 hours of use) to prevent contaminants from reaching the carburetor.
- Air Filter: Clean or replace the air filter regularly to ensure proper air intake and prevent carburetor issues.
- Fuel Lines: Inspect fuel lines for cracks, hardening, or leaks. Replace them if any damage is observed.
- Carburetor Cleaning: If performance issues arise, the carburetor may need cleaning. This typically involves disassembling, cleaning with carburetor cleaner, and reassembling with new gaskets. This task is best performed by experienced individuals or a service professional.

Figure 4: Rear view of the AISEN Carburetor, showing the mounting flange and additional ports. Ensure all connections are secure during installation and maintenance.
7. Troubleshooting
If you encounter issues after installing the kit, consider the following common problems and solutions:
| Problem | Possible Cause | Solution |
|---|---|---|
| Engine won't start | No fuel, clogged fuel filter, incorrect choke setting, spark plug issue, air leak. | Check fuel level, replace fuel filter, ensure proper choke use, check spark plug, inspect gaskets for leaks. |
| Engine runs rough/stalls | Incorrect carburetor adjustment, dirty air filter, old/stale fuel, fuel line issue. | Adjust idle/mixture screws, clean/replace air filter, use fresh fuel, inspect fuel lines. |
| Fuel leaks | Loose fuel line connections, cracked fuel lines, faulty gaskets. | Tighten connections, replace damaged fuel lines, replace gaskets. |
| Throttle arm does not fit | Compatibility issue with specific chainsaw model. | Transfer the throttle arm from the original carburetor if possible, or consult a professional. |
If problems persist after attempting these solutions, it is recommended to consult a qualified small engine technician.
8. Specifications
- Product Type: Carburetor and Fuel Line Kit
- Brand: AISEN
- Weight: Approximately 6.4 ounces (181 grams)
- Package Dimensions: Approximately 3.94 x 2.52 x 1.93 inches (10 x 6.4 x 4.9 cm)
- Replaces Part Numbers: A09159, 000998271, A09159A, 984922001, 984891001, Zama C1Q-H42, C1Q-601, Ryobi RY74003D, 300981002
9. Warranty and Support
For warranty information or technical support regarding your AISEN Carburetor and Fuel Line Kit, please contact the seller or manufacturer directly. Keep your purchase receipt as proof of purchase.
Seller: AISEN
Return Policy: Typically 30 days for refund/replacement. Refer to your purchase platform's return policy for details.
Ask a question about this manual
Ask about setup, troubleshooting, compatibility, parts, safety, or missing instructions. Manuals+ will review the question and use this page’s manual context to help answer it.