1. Introduction
This manual provides essential information for the safe operation, setup, and maintenance of your sea jump RC Drone XS809. Please read this manual thoroughly before operating the drone to ensure proper function and to prevent damage or injury. This FPV quadcopter is recommended for experienced users aged 14 and above.
2. Safety Precautions
- Flight Environment: Fly in open areas, away from people, animals, buildings, and power lines. Avoid flying in strong winds or adverse weather conditions.
- Battery Safety: Use only the specified battery and charger. Do not overcharge or puncture batteries. Discontinue use if batteries show signs of damage or swelling.
- Propeller Safety: Keep hands, face, and loose clothing away from rotating propellers. Always ensure propellers are securely attached before flight.
- Line of Sight: Always maintain visual line of sight with the drone during flight.
- Respect Privacy: Be mindful of privacy laws when using the camera function.
- Water Exposure: Avoid exposing the drone to water or moisture.
3. Package Contents
Verify that all items are present in your package:
- Quadcopter
- Remote Controller
- Charger cable
- 8 x Propellers (4 installed, 4 spares)
- 4 x Propeller Guards
- User Manual (this document)
- Screwdriver
4. Product Overview
The sea jump RC Drone XS809 is a foldable quadcopter equipped with a 720P HD camera, 6-axis gyro, and various intelligent flight modes. Its compact design allows for easy transport.

Image: The sea jump RC Drone XS809 in its unfolded flight configuration, showcasing its propellers and camera.
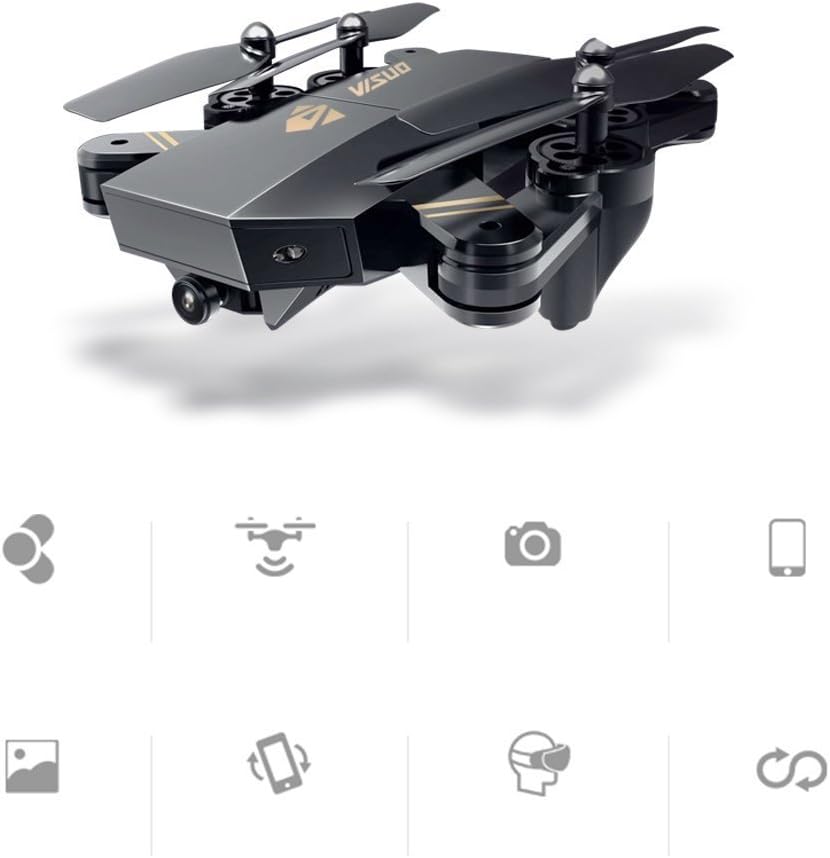
Image: The sea jump RC Drone XS809 in its folded, compact state, ready for transport.
Remote Controller Layout
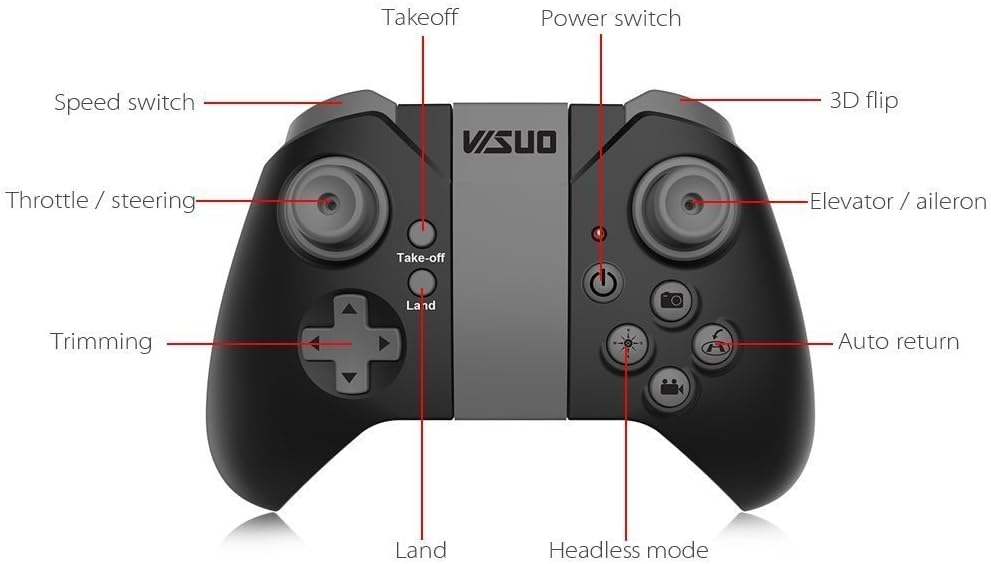
Image: Diagram of the remote controller for the sea jump RC Drone XS809, labeling buttons for Takeoff, Land, Speed switch, Throttle/Steering, Trimming, Power switch, 3D flip, Elevator/Aileron, Auto return, and Headless mode.
- Throttle / Steering: Controls altitude and yaw.
- Elevator / Aileron: Controls forward/backward and left/right movement.
- Take-off / Land Button: One-key automatic takeoff and landing.
- Speed Switch: Adjusts flight speed (multiple modes).
- Headless Mode: Simplifies flight orientation.
- Auto Return: Initiates one-key return to the takeoff point.
- 3D Flip: Executes aerial stunts.
5. Setup
5.1 Charging the Drone Battery
- Connect the drone's 3.7V 900mAh Li-Po battery to the charger cable.
- Plug the charger cable into a USB power source (e.g., computer USB port, USB wall adapter).
- The charging indicator light will show the charging status. Charging typically takes about 60 minutes.
- Once fully charged, disconnect the battery from the charger.
5.2 Installing Drone Battery
- Ensure the drone is powered off.
- Open the battery compartment on the drone.
- Insert the fully charged battery into the compartment, ensuring correct polarity.
- Close the battery compartment securely.
5.3 Installing Remote Controller Batteries
- Open the battery compartment on the back of the remote controller.
- Insert AA batteries (not included), observing the correct positive (+) and negative (-) terminals.
- Close the battery compartment.
5.4 Attaching Propeller Guards
For beginner pilots or indoor flight, it is recommended to attach the propeller guards for added protection.
- Identify the front and rear propeller guards.
- Carefully snap each guard onto the corresponding motor arm of the drone. Ensure they are firmly in place.
6. Operating Instructions
6.1 Power On and Pairing
- Place the drone on a flat, level surface.
- Power on the drone. The LED lights will flash.
- Power on the remote controller.
- Push the left joystick (throttle) all the way up, then all the way down. The drone's LED lights will become solid, indicating successful pairing.
6.2 One Key Takeoff and Landing

Image: Diagram illustrating the one-key takeoff and landing function, showing the drone ascending and descending automatically with a single button press.
- Takeoff: After pairing, press the One Key Takeoff button on the remote. The drone will automatically ascend and hover at a stable altitude.
- Landing: During flight, press the One Key Landing button. The drone will slowly descend and land automatically.
6.3 Basic Flight Controls
- Ascend/Descend: Push the left joystick (throttle) up to ascend, down to descend.
- Forward/Backward: Push the right joystick (elevator) up to fly forward, down to fly backward.
- Left/Right Sideways Flight: Push the right joystick (aileron) left to fly left, right to fly right.
- Turn Left/Right (Yaw): Push the left joystick (steering) left to turn left, right to turn right.
6.4 Headless Mode
In Headless Mode, the drone's orientation is relative to the pilot, making it easier to control without needing to know the drone's front direction.

Image: Illustration of the one-key return function, showing the drone automatically flying back towards its takeoff point on a map.
- Press the Headless Mode button on the remote controller to activate.
- Press again to deactivate.
6.5 One Key Automatic Return
When activated, the drone will automatically fly back towards its takeoff position. This function relies on the drone's built-in positioning system.
- Press the Auto Return button on the remote controller.
- The drone will fly back. Press any control stick to cancel the return.
6.6 Altitude Hold
The drone maintains its current altitude automatically, allowing for stable hovering and easier photo/video capture.
- This feature is typically active by default after takeoff.
- Release the throttle stick, and the drone will hold its height.
6.7 360-degree Rolling Over
- Fly the drone to a sufficient height (at least 3 meters).
- Press the 3D Flip button on the remote controller.
- Immediately push the right joystick in the desired direction (forward, backward, left, or right) to perform a flip.
6.8 Speed Mode
Adjust the drone's flight speed to suit your skill level or flight conditions.
- Press the Speed Switch button on the remote to cycle through different speed settings (e.g., low, medium, high).
7. App Installation and FPV Features
Enhance your flight experience by connecting your smartphone to the drone via Wi-Fi.
7.1 App Download and Connection
- Download the "SMAO FPV" app from your mobile phone's app store (iOS or Android).
- Power on the drone.
- On your smartphone, go to Wi-Fi settings and connect to the drone's Wi-Fi network (usually named something like "WIFI-UFO" or similar).
- Open the "SMAO FPV" app. You should see the live camera feed from the drone.
7.2 FPV (First Person View) and VR Mode

Image: A smartphone displaying the drone's camera feed, with hands holding the phone, illustrating mobile app gravity control.
The app allows you to view the drone's camera feed in real-time on your phone. For an immersive experience, place your phone into a compatible VR box or wear VR glasses (not included).
7.3 Customize Route Mode (Trajectory Flight)

Image: A smartphone screen showing a drawn flight path, with the drone following the trajectory in the air, demonstrating the trajectory flight feature.
Within the "SMAO FPV" app, you can draw a desired flight path on your screen. The drone will then automatically follow this trajectory.
7.4 Gravity Sensing Mode
Control the drone's flight by tilting your smartphone. This mode offers an intuitive way to maneuver the drone.

Image: Close-up of the drone's camera, highlighting its 120-degree wide-angle lens and 720P HD resolution.
8. Maintenance
- Cleaning: Use a soft, dry cloth to clean the drone body and camera lens. Avoid using harsh chemicals.
- Propeller Inspection: Regularly check propellers for cracks, bends, or damage. Replace damaged propellers immediately using the provided spares and screwdriver.
- Battery Storage: Store batteries in a cool, dry place, away from direct sunlight and extreme temperatures. Do not store fully charged or fully depleted for extended periods.
- Motor Care: Keep motors free from dust and debris. Avoid prolonged flight in sandy or dusty environments.
9. Troubleshooting
| Problem | Possible Cause | Solution |
|---|---|---|
| Drone does not power on | Battery not charged or incorrectly installed. | Ensure battery is fully charged and correctly inserted. |
| Remote controller not responding | Remote batteries low or not installed. Not paired. | Replace AA batteries. Re-pair drone and remote. |
| Drone drifts during flight | Not calibrated on a flat surface. Wind interference. | Ensure drone is placed on a flat surface for power-on. Perform trimming adjustments. Fly in calm conditions. |
| Poor camera feed/No FPV | Weak Wi-Fi signal. App not connected. | Ensure strong Wi-Fi connection to drone. Reconnect app. Reduce distance between phone and drone. |
| Short flight time | Battery not fully charged. Old battery. | Fully charge battery. Consider replacing old batteries. |
10. Specifications
| Feature | Specification |
|---|---|
| Brand | sea jump |
| Model Name | XS809 |
| Control Frequency | 2.4GHz |
| Channels | 4 Channels |
| Gyroscope | 6-Axis |
| Camera | 2MP, 720P HD, 120-degree wide angle |
| Control Distance (Controller) | Approx. 80 meters |
| Control Distance (Phone) | Approx. 50 meters |
| Drone Battery | 3.7V 900mAh Li-Po battery |
| Charging Time | Approx. 60 minutes |
| Working Time | Approx. 10-15 minutes |
| Remote Controller Battery | AA battery (not included) |
| Folding Size | 7 x 5 x 2.4 inches |
| Expanded Size | 12.8 x 12.8 x 2.4 inches |
| Item Weight | 113g (3.99 ounces) |
| Material | Plastic |
| Connectivity Technology | Wi-Fi |
| Video Capture Format | MP4 |
11. Warranty and Support
This product is covered by a standard manufacturer's warranty against defects in materials and workmanship. Please refer to your purchase documentation for specific warranty terms and duration.
For technical support, troubleshooting assistance, or warranty claims, please contact your retailer or the manufacturer directly. Keep your proof of purchase for warranty validation.