Introduction
The MaximalPower Universal Smart Battery Charger Mark II is designed to efficiently recharge various household batteries, including AA, AAA, C, D, and 9V types, as well as offering a convenient USB charging port for other devices. This manual provides essential information for safe and optimal use of your charger.
The Mark II charger features 4 independent charging slots, allowing simultaneous charging of different battery sizes and chemistries (Ni-Cd, Ni-MH, Alkaline/RAM, and Lithium-ion). Its built-in protection circuit safeguards against overcharging, over-discharging, overheating, and current fluctuations, ensuring maximized battery life and safety. A smart LCD display provides clear readings of battery mode and charging status, and can detect defective or non-rechargeable batteries.
Product Overview
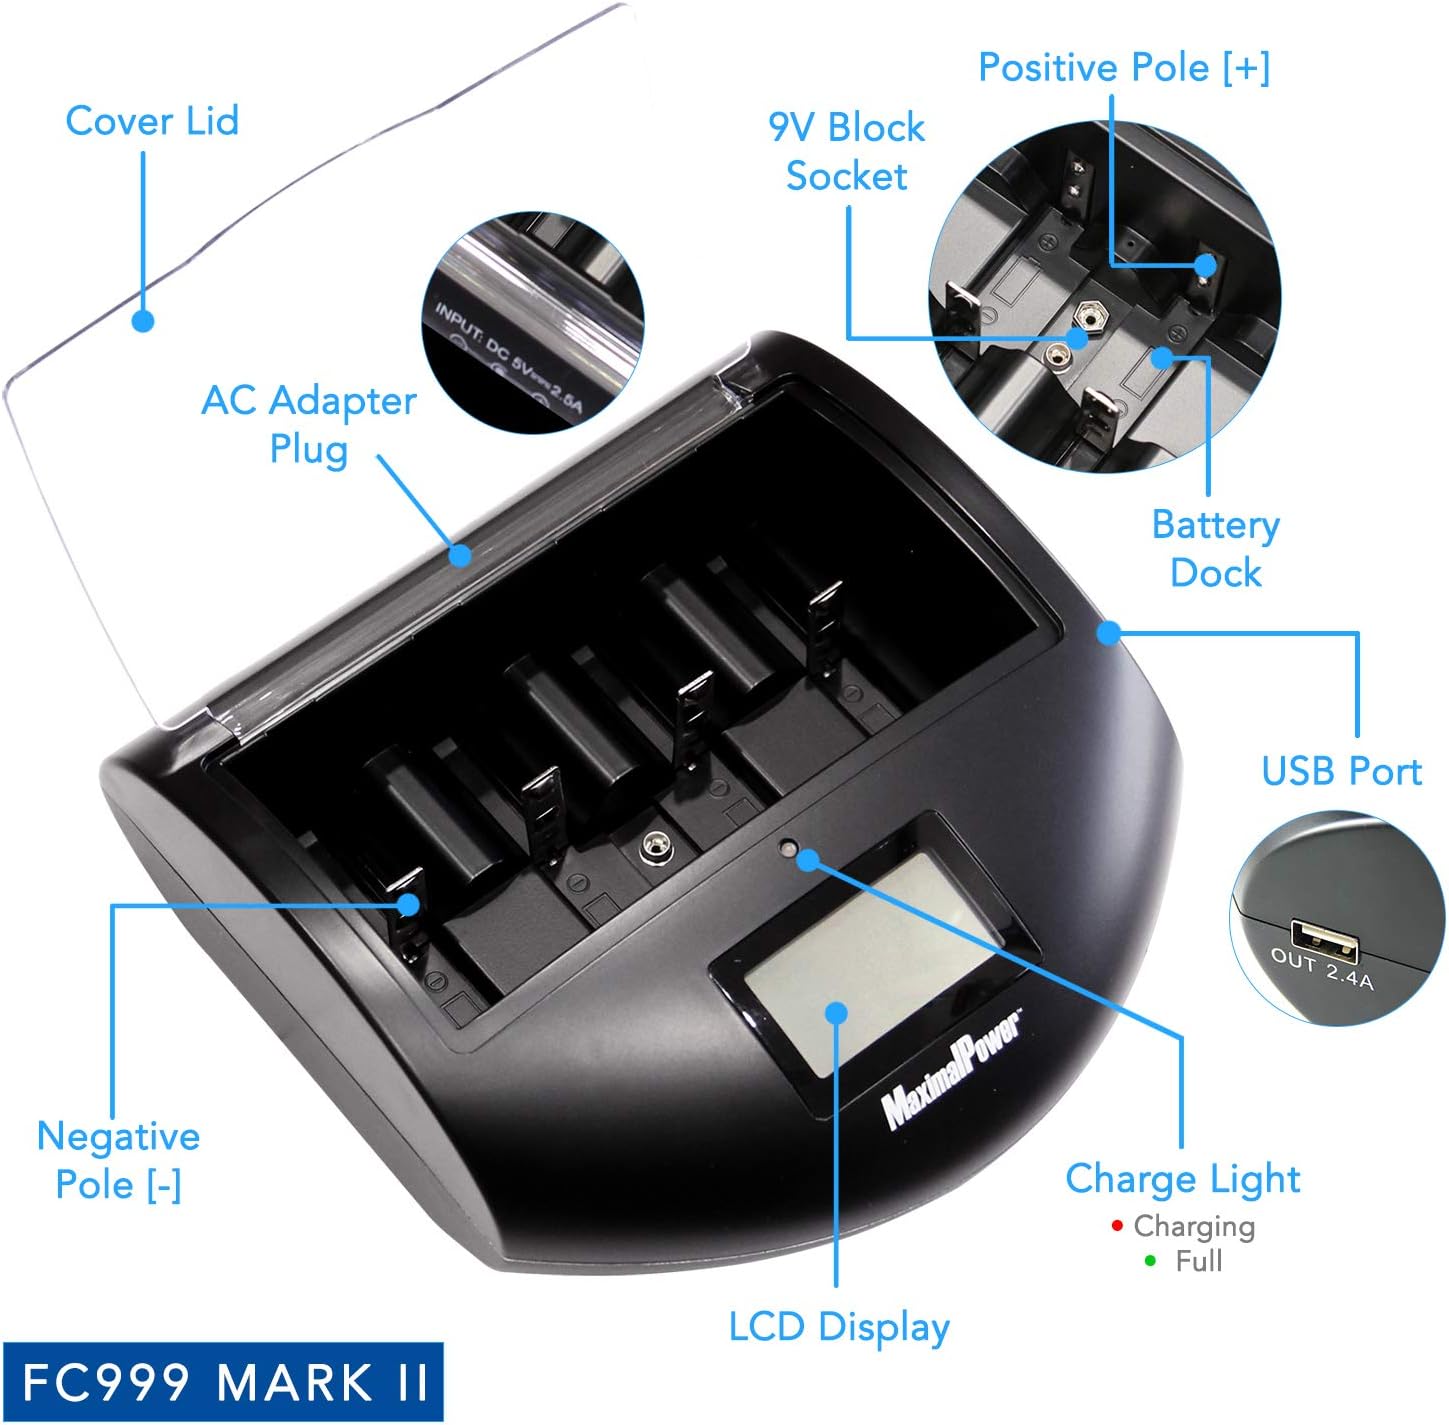
Figure 1: MaximalPower FC999 Mark II Universal Battery Charger with key components labeled, including the cover lid, AC adapter plug, 9V block socket, positive and negative poles, battery dock, USB port, charge light, and LCD display.

Figure 2: MaximalPower FC999 Mark II Universal Battery Charger emphasizing its safety features: environment-friendly design, overcharge protection, over-discharge protection, overcurrent protection, short circuit protection, and overheat protection. Also shows the USB output port and DC input port.
Key Features:
- Universal Compatibility: Charges AA, AAA, C, D, and 9V batteries.
- Independent Charging Slots: Four slots allow simultaneous charging of different battery types.
- USB Charging Port: Bonus USB port for charging smartphones, tablets, and other USB-compatible devices.
- Smart Display: LCD display shows battery mode and charging status.
- Advanced Protection: Prevents overcharging, over-discharging, overheating, and current fluctuations.
- Battery Type Detection: Automatically detects battery chemistry (Ni-Cd, Ni-MH, Alkaline/RAM, Li-ion).
Setup
- Unpack: Carefully remove the charger unit, AC power adapter, and user manual from the packaging.
- Connect Power: Plug the AC power adapter into a standard wall outlet. Connect the other end of the adapter to the DC input port on the back of the charger. The red LED indicator on the charger will illuminate, signifying that power is connected.
- Prepare Batteries: Ensure batteries are clean and free from damage before insertion.
Video 1: Demonstrates connecting the power adapter to the universal battery charger and inserting various battery sizes (D, C, AA, AAA, 9V). The video shows the red indicator lights illuminating for each battery slot and the LCD screen displaying "CHG" for charging status. This video is provided by a Seller and is relevant to the product's setup and initial operation.
Operating Instructions
- Insert Batteries:
- For AA, AAA, C, and D batteries: Place the battery into an available charging slot, ensuring the positive (+) and negative (-) terminals align correctly with the charger's contacts. The sliding spring-loaded negative poles will adjust to the battery size.
- For 9V batteries: Insert the 9V battery into the dedicated 9V block socket, ensuring correct polarity.
- Monitor Charging:
- The LCD display will show "CHG" (Charging) and a battery bar animation for each active slot.
- Red LED indicators below each slot will light up when a battery is charging.
- For 9V batteries, a red LED indicator above the 9V slot will light up when charging.
- Charging Completion:
- When a battery is fully charged, the corresponding red LED indicator will turn off, and the LCD display will show "OK" or the battery bar will stop animating.
- For 9V batteries, the red LED indicator will turn off when fully charged.
- USB Charging: Connect your USB-compatible device to the USB output port on the side of the charger. The charger will provide power to your device while simultaneously charging batteries.
Video 2: This video demonstrates the clear LED and LCD screen indicators of the battery charger. It shows how the red lights indicate charging and turn green upon completion for AA, AAA, C, and D batteries, and how the LCD displays charging status. This video is provided by a Seller and is relevant to understanding the charger's operational feedback.
Maintenance
- Cleaning: Disconnect the charger from power before cleaning. Use a soft, dry cloth to wipe the exterior. Do not use liquid cleaners or solvents.
- Storage: Store the charger in a cool, dry place away from direct sunlight and extreme temperatures when not in use.
- Battery Care: Always remove batteries from the charger once fully charged to prevent unnecessary wear.
Troubleshooting
| Problem | Possible Cause | Solution |
|---|---|---|
| Charger not powering on. | No power connection or faulty adapter. | Ensure the AC adapter is securely plugged into both the wall outlet and the charger. Check the power outlet. |
| Battery not charging (no LED, no "CHG" on LCD). | Incorrect battery insertion, defective battery, or incompatible battery type. | Re-insert the battery, ensuring correct polarity and firm contact. The charger detects defective or non-rechargeable batteries. Ensure the battery type is supported. |
| LCD display shows "OK" but battery feels low. | Battery degradation or false reading (rare). | Test the battery with a separate battery tester if available. Some older or heavily used batteries may not hold a full charge. |
Specifications
- Model: FC999 Mark II
- Input Voltage: 5 Volts
- Output Voltage: 5 Volts
- Item Weight: 1.28 pounds
- Package Dimensions: 8.9 x 7.32 x 2.99 inches
- Compatible Battery Types: AA, AAA, C, D, 9V (Li-on, Ni-MH, Ni-Cd, Alkaline/RAM)
- USB Output: Yes
- Manufacturer: MaximalPower
- Date First Available: July 19, 2017
Warranty and Support
MaximalPower provides a 1-Year Warranty and Customer Service Support on all of its brand products. For any questions or concerns, please contact MaximalPower customer service.
The package includes 1x Charger Unit, 1x AC Power Adapter, and 1x User’s Manual. Batteries and other accessories are not included.


