
Introduction
This manual provides detailed instructions for the proper setup, operation, and maintenance of your Viper 7857V 2-Way LED Remote Control Transmitter. This device is designed to replace or supplement your existing vehicle remote, offering enhanced control and feedback for compatible Viper security and remote start systems. Please read this manual thoroughly before use to ensure optimal performance and longevity of your remote.
Product Overview
The Viper 7857V is a compact and ergonomic 2-way LED remote control, designed for comfortable handling and ease of use. It features five distinct buttons for various functions and provides visual feedback through LED indicators. The remote is rechargeable via a standard MicroUSB cable, eliminating the need for frequent battery replacements.
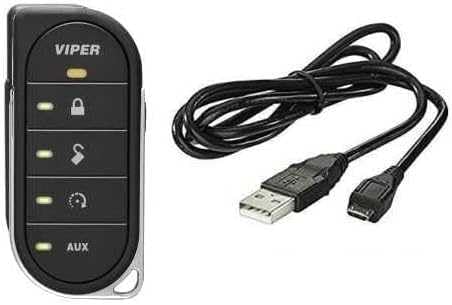
The image displays the Viper 7857V 2-Way LED Remote Control Transmitter alongside its MicroUSB charging cable. The remote is black with silver trim, featuring five buttons labeled 'Viper', a lock icon, an unlock icon, a remote start/auxiliary icon, and 'AUX'. Each button has an associated LED indicator. The charging cable is black with a standard USB-A connector on one end and a MicroUSB connector on the other.
Remote Features:
- Viper Button: Typically used for arming/disarming the system or other primary functions.
- Lock Button: Locks vehicle doors and arms the security system.
- Unlock Button: Unlocks vehicle doors and disarms the security system.
- Remote Start / Trunk Release Button: Initiates remote engine start or opens the trunk, depending on system configuration.
- AUX Button: Activates auxiliary functions, such as power windows or other accessories, if configured.
- LED Indicators: Provide visual confirmation of commands sent and received, as well as system status.
- MicroUSB Charging Port: Located on the side for convenient recharging.
Setup
1. Initial Charging:
Before first use, fully charge your Viper 7857V remote. Connect the provided MicroUSB charging cable to the remote's charging port and the other end to a standard USB power source (e.g., computer USB port, USB wall adapter - not included). The LED indicator will show charging status and turn off or change color when fully charged.
2. Programming the Remote:
The Viper 7857V remote must be programmed to your specific Viper security or remote start system. This process typically involves placing your vehicle's system into programming mode and then performing a sequence of button presses on the remote. The exact steps vary depending on your vehicle and the specific Viper system installed. It is highly recommended to consult your vehicle's Viper system installation manual or seek assistance from a professional installer for accurate programming.
General Programming Tip: Some programming sequences require pressing a function button for a specific duration (e.g., 8 seconds) until an LED light illuminates and a long beep is heard. Ensure you hold the button for the full required duration to successfully enter the next programming step.
Operating Instructions
Once programmed, your Viper 7857V remote allows you to control your vehicle's security and remote start features. The 2-way communication provides feedback directly on the remote, confirming successful commands.
Basic Functions:
- Lock: Press the Lock button once to lock your vehicle's doors and arm the security system. The remote's LED will confirm the command.
- Unlock: Press the Unlock button once to unlock your vehicle's doors and disarm the security system. The remote's LED will confirm the command.
- Remote Start: To remote start your vehicle, typically press and hold the Remote Start / Trunk Release button for approximately 3 seconds. The vehicle will start, and the remote will provide confirmation.
- Auxiliary Functions: Press the AUX button to activate any custom auxiliary features programmed into your system.
For advanced functions and specific button combinations, refer to the comprehensive manual for your installed Viper system.
Maintenance
Charging the Remote:
The Viper 7857V remote uses a rechargeable Lithium-Ion Polymer battery. When the battery level is low, the remote's LED indicators may flash differently or the remote may cease to function. To charge, connect the MicroUSB cable to the remote and a USB power source. A full charge typically takes a few hours. Avoid exposing the remote to extreme temperatures or moisture.
Cleaning:
Wipe the remote with a soft, dry cloth. Do not use harsh chemicals or abrasive cleaners.
Troubleshooting
- Remote Not Responding:
- Ensure the remote is charged.
- Check if you are within range of the vehicle.
- Verify that the vehicle's main system is powered and functioning correctly.
- Programming Issues:
- Double-check the programming steps for your specific Viper system.
- Ensure all button presses are firm and held for the correct duration as specified in your system's manual.
- If issues persist, professional installation or reprogramming may be required.
- Charging Problems:
- Try a different MicroUSB cable or USB power source.
- Ensure the charging port on the remote is clean and free of debris.
Specifications
- Model Name: 7857V
- Manufacturer: DEI
- Connectivity Technology: Radio Frequency
- Controller Type: Button Control
- Button Quantity: 5
- Battery Type: Lithium-Ion Polymer (1 Nonstandard Battery included)
- Color: Black
- Special Feature: Ergonomic design
- Compatible Devices: Vehicles (with compatible Viper systems)
- Maximum Number of Supported Devices: 1 (per remote)
Warranty Information
This Viper 7857V remote control transmitter is typically covered by a manufacturer's warranty against defects in materials and workmanship. The duration and terms of the warranty may vary. Please retain your proof of purchase for warranty claims. For specific warranty details, refer to the documentation provided with your original Viper system or contact the manufacturer directly.
Support
For technical assistance, programming support, or troubleshooting beyond the scope of this manual, please contact your authorized Viper dealer or the manufacturer's customer support. You may also find additional resources, FAQs, and system-specific manuals on the official Viper website.


