1. Introduction
This instruction manual provides important information for the safe and effective use of your PARKSIDE® Multifunction Tool Accessory set, model PMFWZ 3 C3. This accessory set is designed for use with compatible multifunction power tools for various applications such as cutting, sawing, scraping, and sanding different materials.
Please read this manual thoroughly before first use and keep it for future reference. Always refer to your multifunction tool's instruction manual for specific operating procedures and safety guidelines.
2. Important Safety Instructions
When using power tool accessories, always observe the following safety precautions to prevent injury and damage:
- Always read and understand the instruction manual of your multifunction tool before attaching or using any accessories.
- Disconnect the power tool from the power source before changing accessories.
- Wear appropriate personal protective equipment (PPE), including safety glasses, hearing protection, and gloves.
- Ensure the accessory is securely attached to the tool before operation.
- Inspect accessories for damage or wear before each use. Do not use damaged accessories.
- Keep hands and body parts clear of the cutting or sanding area during operation.
- Secure the workpiece firmly to prevent movement during operation.
- Use the correct accessory for the material and application.
- Do not apply excessive force; let the tool and accessory do the work.
3. Package Contents
The PARKSIDE® PMFWZ 3 C3 Multifunction Tool Accessory set typically includes a variety of blades and sanding pads designed for diverse applications. The exact contents may vary slightly depending on the specific package.
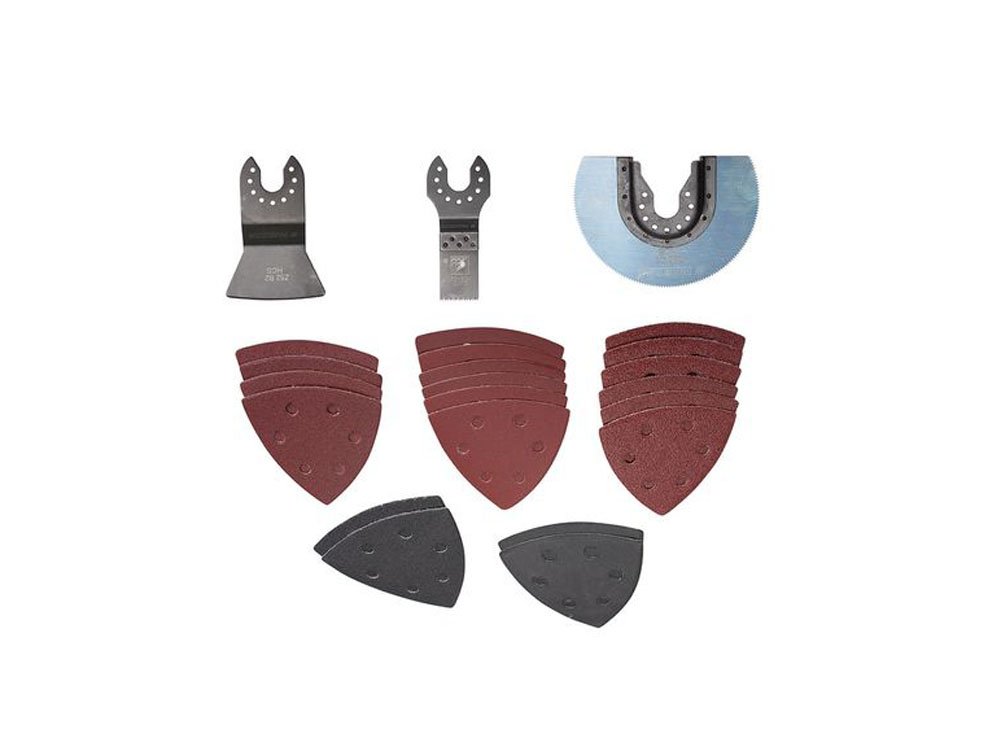
Image 1: Overview of the PARKSIDE® PMFWZ 3 C3 Multifunction Tool Accessory set, including different types of saw blades and triangular sanding pads.
Common components include:
- Various plunge cut saw blades (e.g., for wood, metal)
- Segment saw blades (e.g., for wood, plastic, non-ferrous metal)
- Scraper blades
- Triangular sanding pads
- Assorted grit sandpaper for triangular sanding pads
4. Setup and Installation
Always ensure your multifunction tool is switched off and unplugged from the power supply before attaching or removing any accessories.
4.1 Attaching Saw Blades and Scrapers
- Ensure the multifunction tool is off and unplugged.
- Locate the accessory mounting system on your multifunction tool. This typically involves a quick-release lever or a screw/bolt mechanism.
- Align the accessory's mounting hole with the tool's spindle or mounting pin. Ensure the accessory is seated correctly and flush against the tool's head.
- Secure the accessory using the tool's locking mechanism (e.g., close the quick-release lever, tighten the screw/bolt).
- Gently tug on the accessory to ensure it is firmly attached and does not wobble.

Image 2: A closer look at three distinct blades from the accessory set, highlighting their mounting interfaces.
4.2 Attaching Sanding Pads and Sandpaper
- Ensure the multifunction tool is off and unplugged.
- Attach the triangular sanding pad to the tool's mounting system as described in section 4.1.
- The sanding pads typically feature a hook-and-loop (Velcro) surface. Align the corresponding hook-and-loop side of the sandpaper with the sanding pad.
- Press the sandpaper firmly onto the sanding pad to ensure it adheres securely.
- Replace sandpaper when it becomes worn or clogged for optimal sanding performance.
5. Operating Instructions
Always follow the operating instructions provided with your specific multifunction tool. The following are general guidelines for using the PMFWZ 3 C3 accessories:
5.1 General Operation Tips
- Maintain a firm grip on the tool with both hands if recommended by your tool's manual.
- Allow the tool to reach full operating speed before engaging the workpiece.
- Apply steady, even pressure. Do not force the accessory through the material.
- Keep the work area clean and well-lit.
5.2 Using Saw Blades (Plunge Cut and Segment)
These blades are suitable for cutting wood, plastic, drywall, and soft metals (depending on blade type). Segment blades are ideal for flush cuts or cutting along edges.
- Plunge Cuts: Position the blade at the desired starting point and slowly plunge it into the material.
- Straight Cuts: Guide the blade along a marked line, maintaining consistent pressure.
- Flush Cuts: For cutting pipes or protruding elements close to a surface, use a segment blade or a specialized flush-cut blade.
5.3 Using Sanding Pads
The triangular sanding pads are excellent for sanding in corners, on edges, and on flat surfaces. Select the appropriate grit sandpaper for your task (coarse for material removal, fine for finishing).
- Move the tool in a consistent pattern over the surface, applying light to moderate pressure.
- Avoid pressing too hard, as this can reduce sanding effectiveness and damage the sandpaper or workpiece.
- For best results, sand with the grain of the wood.
- Regularly check the sandpaper for clogging or wear and replace as needed.
6. Maintenance and Care
Proper maintenance extends the life of your accessories and ensures optimal performance.
- Cleaning: After each use, clean accessories to remove dust, debris, or residue. Use a brush or compressed air. Do not use harsh chemicals.
- Inspection: Regularly inspect blades for dullness, cracks, or missing teeth. Check sanding pads for wear or damage to the hook-and-loop surface.
- Storage: Store accessories in a dry, clean place, away from direct sunlight and moisture. Keep them in their original packaging or a suitable storage container to prevent damage and corrosion.
- Disposal: Dispose of worn or damaged accessories responsibly according to local regulations.
7. Troubleshooting
If you encounter issues while using the accessories, refer to the following table for common problems and solutions:
| Problem | Possible Cause | Solution |
|---|---|---|
| Poor cutting/sanding performance | Dull or worn accessory; Incorrect accessory for material; Excessive pressure; Clogged sandpaper | Replace accessory; Use correct accessory; Reduce pressure; Replace sandpaper |
| Accessory vibrates excessively | Accessory not securely attached; Damaged accessory; Tool malfunction | Re-attach securely; Replace accessory; Refer to tool manual or contact service |
| Overheating of accessory/tool | Excessive pressure; Prolonged use; Incorrect accessory | Reduce pressure; Allow tool/accessory to cool; Use appropriate accessory |
8. Technical Specifications
- Manufacturer: Kompernass GmbH
- Part Number: 276370
- Style: Industrial
- Number of Parts: 1 (referring to the set as one item)
- Batteries Included: No
- Batteries Required: No
- ASIN: B073VL9TMQ
- First Available on Amazon.de: December 22, 2017
9. Warranty and Support
For information regarding warranty terms and conditions, please refer to the documentation provided with your original purchase or contact Kompernass GmbH directly. For technical support or inquiries, please reach out to the manufacturer's customer service department.


