JLENOVEG 8541986078
JLENOVEG Digital Fridge Freezer Thermometer
Model 8541986078 - Instruction Manual
1. Introduction
Thank you for choosing the JLENOVEG Digital Fridge Freezer Thermometer. This device is designed to provide accurate temperature readings for your refrigerator and freezer, featuring a magnetic mount, stand, LED alarm, and Max/Min memory function. Please read this manual carefully before use to ensure proper operation and longevity of your thermometer.
2. Product Overview
The JLENOVEG Digital Thermometer offers precise temperature monitoring with a range of -50°C to 70°C (-58°F to 158°F) for the external probe and -10°C to 50°C (14°F to 122°F) for the internal sensor. Key features include:
- Digital Display: Clear LCD screen for easy temperature reading.
- Max/Min Memory: Records the highest and lowest temperatures detected.
- LED Alarm: Alerts you when temperatures exceed or fall below preset safe ranges.
- Versatile Mounting: Equipped with a strong rear magnet for metal surfaces and a fold-out stand for countertop placement.
- External Probe: A long sensor wire for monitoring temperatures inside refrigerators or freezers while the main unit remains outside.

Figure 2.1: Front view of the thermometer with display and controls.

Figure 2.2: Back view of the thermometer with magnetic mounts and stand.
3. Setup
3.1 Battery Installation
- Locate the battery compartment on the back of the thermometer.
- Slide the battery cover open.
- Insert one LR44 battery, ensuring the correct polarity (+/-).
- Close the battery cover securely.

Figure 3.1: Battery compartment and C/F switch location.
3.2 Sensor Probe Connection
The external sensor probe is used to measure temperatures in a separate location, such as inside a refrigerator or freezer, while the main unit remains outside.
- Locate the sensor port on the side of the thermometer.
- Insert the plug of the sensor wire firmly into the port.
- Route the sensor wire into the desired area (e.g., fridge or freezer). The thin wire is designed to allow refrigerator doors to close without compromising the seal.
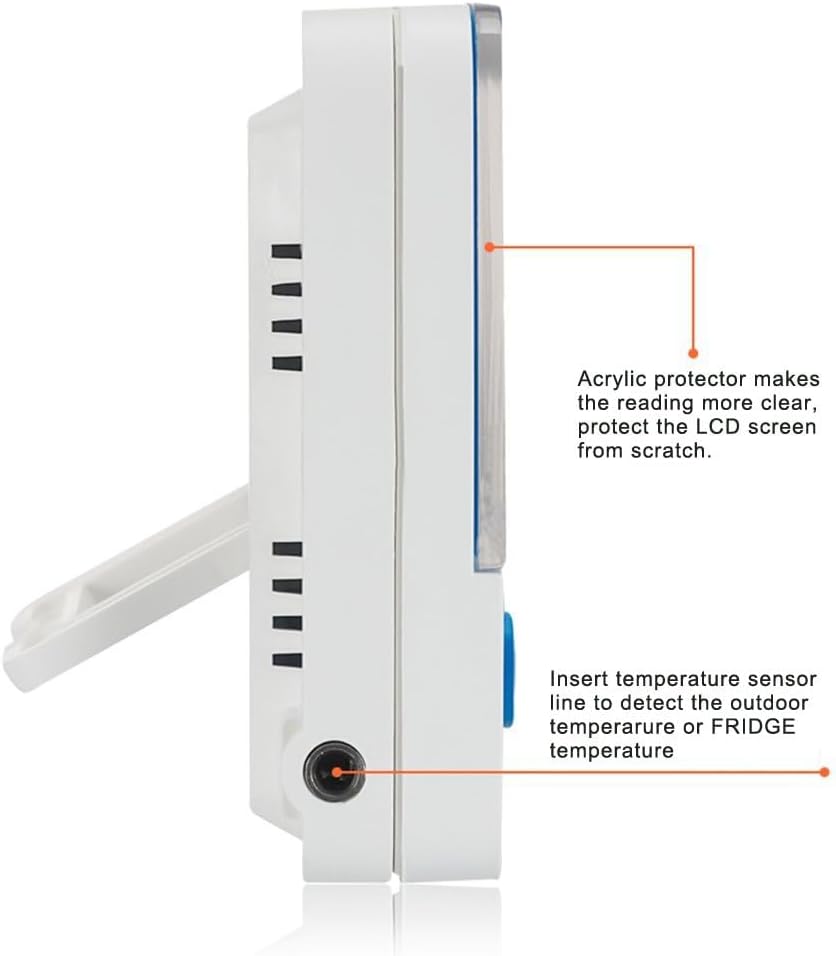
Figure 3.2: Sensor probe connection port.
3.3 Placement
- Magnetic Mount: Attach the thermometer to any metal surface, such as a refrigerator door, using the magnets on the back.
- Fold-out Stand: Extend the stand on the back to place the thermometer on a countertop or shelf.

Figure 3.3: Thermometer mounted on a refrigerator.
4. Operating Instructions
4.1 Power On/Off
The thermometer automatically powers on when the battery is installed. There is no dedicated power button. To turn off, remove the battery.
4.2 Switching Temperature Units (°C/°F)
To switch between Celsius (°C) and Fahrenheit (°F), locate the small switch on the back of the unit, usually near the battery compartment. Slide the switch to your desired unit.
4.3 Displaying Indoor/Outdoor (Probe) Temperature
Press the "IN/OUT" button to toggle between the internal sensor temperature (IN) and the external probe temperature (OUT).
- "IN" indicates the temperature measured by the internal sensor of the main unit.
- "OUT" indicates the temperature measured by the external probe.
4.4 Max/Min Memory Function
The thermometer automatically records the highest (MAX) and lowest (MIN) temperatures detected since the last reset.
- Press the "MIN/MAX" button once to display the maximum temperature recorded.
- Press the "MIN/MAX" button again to display the minimum temperature recorded.
- To clear the recorded Max/Min values, press and hold the "MIN/MAX" button for approximately 3 seconds while the Max or Min temperature is displayed. The display will reset to current temperature.
4.5 Setting the High/Low Temperature Alarm
The thermometer features an LED alarm that activates when the temperature goes outside a preset range. The default safe range is –1°C to +4°C (30.2°F to 39.2°F).
- Press the "AL" button once to view the current alarm settings.
- To adjust the alarm settings, press and hold the "AL" button for approximately 3 seconds until the alarm temperature starts flashing.
- Use the "MIN/MAX" button to adjust the high alarm temperature.
- Press "AL" again to switch to the low alarm temperature setting.
- Use the "MIN/MAX" button to adjust the low alarm temperature.
- Press "AL" one more time to confirm and save the alarm settings.
- The LED alarm indicator will flash when the temperature exceeds the set high limit or falls below the set low limit.
5. Maintenance
- Cleaning: Wipe the thermometer with a soft, damp cloth. Do not use abrasive cleaners or immerse the unit in water.
- Battery Replacement: Replace the LR44 battery when the display becomes dim or the unit stops functioning.
- Storage: Store the thermometer in a dry place at room temperature when not in use for extended periods.
6. Troubleshooting
| Problem | Possible Cause | Solution |
|---|---|---|
| No display or dim display | Dead or incorrectly installed battery. | Replace the LR44 battery, ensuring correct polarity. |
| Inaccurate temperature reading | Sensor probe not properly connected or damaged. | Ensure the sensor probe is firmly plugged in. If still inaccurate, the probe may be damaged. |
| Alarm not sounding | Alarm settings incorrect or alarm function disabled. | Review and adjust alarm settings as per section 4.5. Ensure the temperature is outside the set range. |
| "OUT" reading not appearing | External probe not connected or faulty. | Ensure the external probe is securely connected. Press the IN/OUT button. |
7. Specifications
- Model: 8541986078
- Brand: JLENOVEG
- Temperature Range (External Probe): -50°C to 70°C (-58°F to 158°F)
- Temperature Range (Internal Sensor): -10°C to 50°C (14°F to 122°F)
- Display Type: Digital LCD
- Power Source: 1 x LR44 Battery (included)
- Material: Acrylic
- Special Features: Max/Min Memory, LED High/Low Alarm, Magnetic Mount, Fold-out Stand
- Response Time: Approximately 5 seconds
- Product Dimensions: Approximately 2 inches (Length)
- Item Weight: 1.76 ounces
8. Support
For any questions or assistance with your JLENOVEG Digital Fridge Freezer Thermometer, please refer to the seller's contact information on your purchase platform. We are committed to providing support for our products.
Ask a question about this manual
Ask about setup, troubleshooting, compatibility, parts, safety, or missing instructions. Manuals+ will review the question and use this page’s manual context to help answer it.