1. Introduction
This manual provides essential information for the safe and effective operation, setup, and maintenance of your BMC RESmart GII Auto CPAP System E-20A-H with Humidifier. Please read this manual thoroughly before using the device and retain it for future reference. This device is intended for the treatment of Obstructive Sleep Apnea (OSA).
2. Safety Information
Important Safety Warnings:
- Always disconnect the device from the power supply before cleaning or performing any maintenance.
- Do not immerse the device in water or any other liquid.
- Use only accessories and parts recommended by BMC.
- Keep the device away from direct sunlight, heat sources, and sharp objects.
- Consult your physician or healthcare provider if you experience any unusual symptoms or discomfort during use.
- This device is not intended for life support.
3. Product Overview
The BMC RESmart GII Auto CPAP System E-20A-H is an intelligent device designed for the treatment of Obstructive Sleep Apnea. It features an integrated humidifier for enhanced comfort.
Key Components:
- Main Unit: Houses the motor, control electronics, and display.
- Humidifier: Integrated unit with dual water chambers for efficient humidification.
- 3.5-inch LCD Display: Provides real-time information and access to settings.
- Control Knob: For navigating menus and adjusting settings.
- Air Outlet: Connects to the CPAP tubing.
- Power Inlet: For connecting the power adapter.
- SD Card Slot: For compliance data storage and retrieval (iCode II).
- SpO2 Kit Port (Optional): For real-time blood oxygen saturation and pulse rate monitoring.
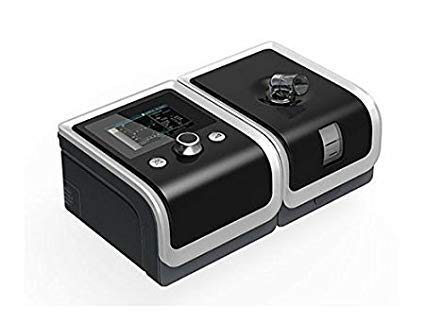
An image showing the BMC RESmart GII Auto CPAP device, featuring its main unit, control knob, and integrated humidifier. The device is black with a clear humidifier chamber visible.
4. Setup
4.1 Unpacking
- Carefully remove all components from the packaging.
- Inspect the device and accessories for any signs of damage. Do not use if damaged.
4.2 Connecting Power
- Connect the power adapter to the power inlet on the back of the device.
- Plug the power cord into a suitable electrical outlet.
4.3 Filling the Humidifier
- Open the humidifier chamber by sliding or lifting the cover.
- Fill the water chamber with distilled water up to the maximum fill line. Do not overfill.
- Close the humidifier chamber securely.
4.4 Connecting Tubing and Mask
- Connect one end of the CPAP tubing to the air outlet on the device.
- Connect the other end of the tubing to your prescribed CPAP mask.
- Fit the mask comfortably and securely according to its own instructions.
5. Operating Instructions
5.1 Starting Therapy
- Ensure the device is properly set up and connected.
- Put on your mask.
- Press the Start/Stop button (usually the control knob) to begin therapy. The device will automatically start delivering air.
5.2 Adjusting Settings
Use the control knob to navigate the menu on the 3.5-inch LCD display. Press the knob to select an option and rotate to adjust values.
- Pressure Range: 4-20 cm H2O (Auto CPAP adjusts automatically within this range).
- Ramp Time: Adjusts the time (0-60 minutes) for the pressure to gradually increase to the prescribed level.
- Humidification Level: Select from Off or levels 1-5 to control the humidity output.
- Reslex: Pressure relief feature (Off/1/2/3) for exhalation comfort.
- Auto On/Off: Can be enabled or disabled (Off by default).
5.3 Stopping Therapy
Press the Start/Stop button again to end therapy. The device will power down.
5.4 iCode II Data Retrieval
Compliance data is encoded by a QR code displayed on the device's screen. Use a compatible application to scan the QR code for quick data retrieval and monitoring.
6. Maintenance
Regular cleaning and maintenance are crucial for the optimal performance and longevity of your device.
6.1 Daily Cleaning
- Humidifier Water Chamber: Empty any remaining water and rinse with distilled water. Allow to air dry.
- Mask: Wipe down the mask cushion with a damp cloth or specialized CPAP wipes.
6.2 Weekly Cleaning
- Humidifier Water Chamber: Wash with mild soap and warm water. Rinse thoroughly and allow to air dry completely.
- CPAP Tubing: Wash with mild soap and warm water. Rinse thoroughly and hang to air dry.
- Air Filter: Inspect the reusable air filter (if applicable). If dirty, rinse under running water and allow to air dry. Replace disposable filters as recommended.
6.3 General Care
- Wipe the exterior of the device with a damp cloth. Do not use abrasive cleaners or immerse the device.
- Replace air filters regularly as per manufacturer recommendations or if visibly dirty.
7. Troubleshooting
If you encounter issues, refer to the following common problems and solutions:
| Problem | Possible Cause | Solution |
|---|---|---|
| No power | Power cord disconnected; Power outage | Check power connections; Restore power supply |
| Air leak from mask | Mask not fitted correctly; Mask worn out | Adjust mask straps; Replace mask cushion or mask |
| Dry mouth/throat | Humidifier off or set too low; Water chamber empty | Increase humidification level; Refill water chamber |
| Device is noisy | Air filter dirty or blocked; Device on an uneven surface | Clean or replace air filter; Place device on a stable, flat surface |
| Pressure feels too high/low | Incorrect pressure setting; Ramp feature active | Consult your physician for pressure adjustments; Wait for ramp to complete |
If the problem persists, contact your healthcare provider or the manufacturer's customer support.
8. Specifications
| Feature | Specification |
|---|---|
| Model | E-20A-H |
| Mode | CPAP / Auto |
| Pressure Range | 4-20 cm H2O |
| Pressure Increment | 0.5 cm H2O |
| Ramp Time | 0-60 minutes |
| Reslex | Off/1/2/3 |
| Sound Level | <30 dBA |
| Humidification Levels | Off / 1-5 |
| Display | 3.5-inch LCD |
| Dimensions (LxWxH) | 170x196x118mm (device) / 290x196x134mm (with H60 humidifier) |
| Weight | <1.5kg (device) / <2.5kg (with H60 humidifier) |
| Power Supply | Input Range 100-240V AC, 50/60 Hz, 2.0 A max |
| Data Storage | SD Card (iCode II) |
| Country of Origin | China |
9. Warranty and Support
For warranty information, please refer to the documentation provided with your purchase or contact your retailer. For technical support, service, or questions regarding your BMC RESmart GII Auto CPAP System, please contact the seller or the manufacturer directly.