1. Introduction
Thank you for choosing the KETOTEK Digital Temperature Controller KT1000. This device is designed for precise temperature control in various environments, offering both heating and cooling functions with a waterproof sensor. Please read this manual thoroughly before installation and operation to ensure proper use and to prevent damage.
The KT1000 is suitable for applications such as home brewing, refrigeration, pet breeding, reptile habitats, aquariums, incubation, fermentation, and seedling heat mats.

Image 1.1: Various application scenarios for the KETOTEK KT1000 temperature controller, including reptiles, greenhouses, refrigerators, pet keeping, cheese making, bacon making, fermentation, and incubation.
2. Product Overview and Features
The KETOTEK KT1000 is a digital temperature controller equipped with a 2-meter waterproof NTC sensor. It features two relays, allowing simultaneous connection of heating and cooling devices. The controller operates in an on/off control mode, automatically switching between heating and cooling to maintain a desired temperature range.
Key Features:
- 2m Waterproof Probe: Suitable for use in moist and aquatic environments.
- Dual Relay Output: Connect both a heater and a cooler simultaneously (10A/110-220VAC for each).
- Automatic Heating/Cooling Switch: Maintains temperature within set parameters.
- High Accuracy: Temperature control accuracy of ±1°F.
- Wide Temperature Range: -58°F to 212°F (-50°C to 99°C).
- Multi-functional: Supports temperature calibration, compressor delay protection, and alarm functions for temperature exceeding limits or sensor errors.
- Parameter Memory: All settings are saved after restart.
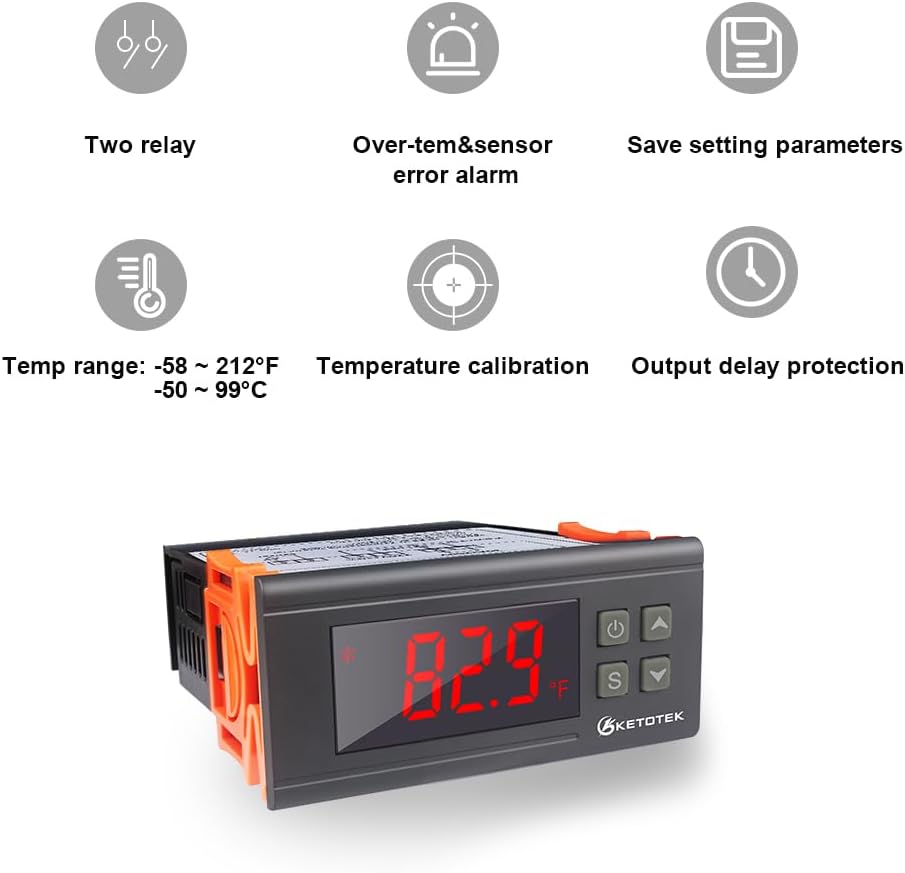
Image 2.1: Visual representation of key features including two relays, over-temperature and sensor error alarms, parameter saving, wide temperature range, temperature calibration, and output delay protection.

Image 2.2: The KETOTEK KT1000 controller shown with its 2-meter waterproof temperature sensor, highlighting its suitability for wet environments.
3. Specifications
| Parameter | Value |
|---|---|
| Model Number | KT1000 |
| Power Supply | 110VAC, 50Hz/60Hz |
| Power Consumption | ≤3W |
| Temperature Control Range | -58°F to 212°F (-50°C to 99°C) |
| Temperature Measurement Accuracy | ±1°F |
| Sensor Type | NTC (10K/B3435 Waterproof) |
| Sensor Cable Length | 2 meters (200cm) |
| Output | 2 Relays (Cooling: 10A/110-220VAC, Heating: 10A/110-220VAC) |
| Product Dimensions (D x W x H) | 85D x 34W x 85H millimeters |
| Item Weight | 228 Grams |
| Material | Acrylonitrile Butadiene Styrene (ABS) |
| Display Type | LCD |
| Control Type | Button Control |

Image 3.1: Diagram showing the physical dimensions of the KETOTEK KT1000 controller and the 200cm length of its sensor cable.
4. Safety Information
Please observe the following safety precautions to prevent injury or damage to the device:
- Ensure the power supply voltage matches the controller's requirements (110VAC).
- All wiring should be performed by a qualified electrician or knowledgeable individual.
- Disconnect power before making any wiring connections or performing maintenance.
- Do not exceed the maximum current rating of 10A for each relay output.
- Install the controller in a dry, well-ventilated area, away from direct sunlight or extreme temperatures, unless the sensor is specifically designed for such environments.
- Ensure proper grounding for all connected devices.
- Keep the device away from children.
5. Setup and Wiring
The KETOTEK KT1000 requires wiring to a power source and to your heating and cooling loads. It does not have direct voltage output; you must connect an additional power supply for the loads.
Wiring Diagram Overview:
The controller has 8 terminals for connections:
- Terminals 1 & 2: Power Supply Input (110VAC)
- Terminals 3 & 4: NTC Sensor Input
- Terminals 5 & 6: Heating Output Relay (NO - Normally Open)
- Terminals 7 & 8: Cooling Output Relay (NO - Normally Open)
There are typically two main connection methods depending on whether the loads share the same power supply as the controller or have independent power supplies.

Image 5.1: Detailed wiring diagrams for the KETOTEK KT1000, illustrating connections for independent load power supply, shared load power supply, and AC power supply with three wires (Line, Neutral, Earth).
Connection 1: Independent Power Supply for Loads
In this configuration, the controller and the heating/cooling loads each have their own power supply. This provides isolation and can be useful for higher power loads or specific electrical setups.
Connection 2: Same Power Supply for Loads
This is a common setup where the controller and both heating and cooling loads are powered from a single 110V AC source. Ensure the total current draw of your loads does not exceed the controller's relay ratings (10A per relay).
Connection 3: Wire with Three Wires (AC Power Supply)
This diagram illustrates a standard AC power supply connection including Line (L), Neutral (N), and Earth (E) for safety and proper grounding.
Important: Always ensure power is disconnected before performing any wiring. Incorrect wiring can cause damage to the device or pose a safety hazard.
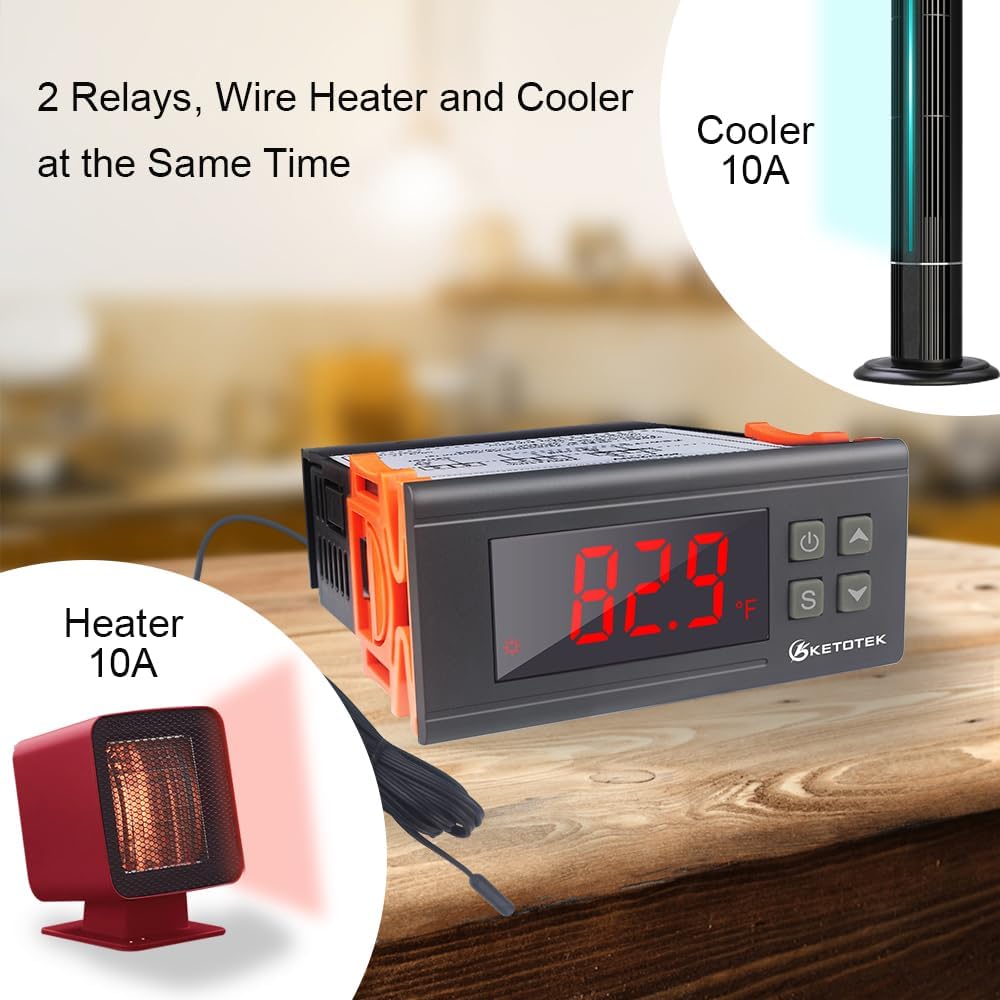
Image 5.2: The KETOTEK KT1000 controller shown connected to both a heater and a cooler, demonstrating its dual relay capability for simultaneous temperature management.
6. Operating Instructions
The KETOTEK KT1000 features a clear LCD display and four buttons for easy operation and parameter setting.

Image 6.1: Diagram illustrating the control panel of the KETOTEK KT1000, labeling each button (Power, Up, Set, Down) and explaining their respective functions.
Button Functions:
- Power Key (⏻): Power On/Off. Confirm setting value. Save and Exit function.
- Up Key (▲): Choose parameter. Increase value. Check setting temperature value.
- Down Key (▼): Choose parameter. Decrease value. Check setting difference value.
- Set Key (S): Entry, Exit, and Set parameters.
Setting the Temperature:
- Press the 'S' button briefly. The display will show the current set temperature.
- Use the 'Up' (▲) or 'Down' (▼) buttons to adjust the desired temperature set point.
- Press the 'S' button again to confirm and save the setting.
Setting Parameters (P0-P6):
To access advanced parameters, press and hold the 'S' button for approximately 3 seconds until 'P0' appears on the display.
| Parameter | Description | Default Value | Range |
|---|---|---|---|
| P0 | Heating/Cooling Mode | C (Cooling) | H (Heating) / C (Cooling) |
| P1 | Hysteresis (Temperature Difference) | 2°F (1°C) | 0.1-30°F (0.1-15°C) |
| P2 | Upper Temperature Limit | 212°F (99°C) | -58°F to 212°F (-50°C to 99°C) |
| P3 | Lower Temperature Limit | -58°F (-50°C) | -58°F to 212°F (-50°C to 99°C) |
| P4 | Temperature Calibration | 0°F (0°C) | -10°F to 10°F (-5°C to 5°C) |
| P5 | Compressor Delay Protection | 0 minutes | 0-10 minutes |
| P6 | High Temperature Alarm | 212°F (99°C) | -58°F to 212°F (-50°C to 99°C) |
How to Set Parameters:
- Press and hold the 'S' button for 3 seconds to enter parameter setting mode.
- Use the 'Up' (▲) or 'Down' (▼) buttons to navigate between parameters (P0-P6).
- Once the desired parameter (e.g., P0) is displayed, press 'S' again to view its current value.
- Use the 'Up' (▲) or 'Down' (▼) buttons to change the value.
- Press 'S' to confirm the new value and move to the next parameter, or press the 'Power' (⏻) button to save all changes and exit.
7. Maintenance
Regular maintenance ensures the longevity and accuracy of your KETOTEK KT1000 Digital Temperature Controller.
- Cleaning: Wipe the controller's display and casing with a soft, dry cloth. Do not use abrasive cleaners or solvents.
- Sensor Care: While the sensor is waterproof, avoid unnecessary physical stress or sharp bends to the cable. Periodically check the sensor cable for any signs of damage.
- Connections: Periodically inspect all wiring connections to ensure they are secure and free from corrosion.
- Environment: Ensure the controller is installed in an environment within its specified operating conditions (temperature and humidity).
8. Troubleshooting
If you encounter issues with your KETOTEK KT1000, refer to the following common problems and solutions:
| Problem | Possible Cause | Solution |
|---|---|---|
| Display shows 'HHH' or 'LLL' | Sensor error (open circuit or short circuit) or temperature out of range. | Check sensor connection. Replace sensor if damaged. Ensure temperature is within -58°F to 212°F. |
| Controller not powering on | No power supply or incorrect wiring. | Verify power connections to terminals 1 and 2. Check power source. |
| Heating/Cooling device not activating | Incorrect wiring, set temperature/hysteresis, or compressor delay. | Check wiring to terminals 5-8. Verify set temperature and P1 (hysteresis). Check P5 (compressor delay). Ensure load device is functional. |
| Temperature reading is inaccurate | Sensor calibration needed or sensor fault. | Adjust P4 (temperature calibration). If issue persists, sensor may be faulty. |
| Alarm sounds frequently | Temperature exceeding set limits (P2/P3) or sensor error. | Check temperature limits (P2/P3) and P6 (high temperature alarm). Verify sensor functionality. |
If the problem persists after attempting these solutions, please contact customer support.
9. Warranty and Support
KETOTEK products are manufactured to high-quality standards. This product comes with a standard manufacturer's warranty against defects in materials and workmanship. Please refer to the product packaging or contact your retailer for specific warranty terms and duration.
Customer Support:
For technical assistance, troubleshooting, or warranty claims, please contact KETOTEK customer support through the retailer where you purchased the product or visit the official KETOTEK website for contact information.
Manufacturer: Xiamen Atfinger Technology Co.,Ltd
Address: NO.80, Huli Avenue, Xiamen, China 361000