
ricambigrossclima.com LAE AT2-5BS4E-AG
LAE AT2-5BS4E-AG Electronic Controller Thermostat User Manual
Model: AT2-5BS4E-AG | Brand: ricambigrossclima.com
1. Introduction
This manual provides detailed instructions for the installation, operation, and maintenance of the LAE AT2-5BS4E-AG Electronic Controller Thermostat. This device is designed for precise temperature control in various industrial and commercial refrigeration applications, including compatibility with specific DEXION and MBM refrigeration units.
Please read this manual thoroughly before installation and operation to ensure proper functioning and to prevent damage to the unit or associated equipment.

This image provides a visual representation of the diverse environments where the LAE AT2-5BS4E-AG controller can be utilized. It highlights its applicability in professional settings such as refrigeration units, bar equipment, industrial cooking systems, and industrial washing machines, emphasizing its role as a professional spare part.
2. Safety Information
Always observe the following safety precautions to prevent personal injury or damage to the controller:
- Ensure the power supply is disconnected before performing any installation, wiring, or maintenance.
- Installation and wiring should only be performed by qualified personnel in accordance with local electrical codes.
- Do not expose the controller to water, excessive humidity, or corrosive substances.
- Verify that the voltage supply matches the controller's specifications (230V AC).
- Do not attempt to open or repair the unit yourself. Refer to qualified service personnel.
3. Product Overview
The LAE AT2-5BS4E-AG is an advanced electronic controller designed for precise temperature management. It features multiple relay outputs for controlling various refrigeration components.
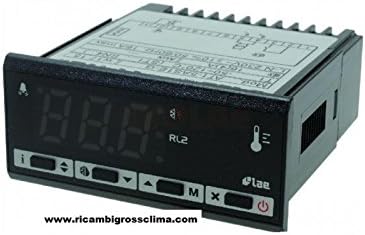
This image displays the LAE AT2-5BS4E-AG electronic controller thermostat. It features a digital display for temperature readings and various control buttons for settings and navigation. The compact design is suitable for panel mounting.
Key Features:
- Voltage: 230V AC, 50/60 Hz
- Compressor Output: 1 x 16A relay
- Defrost Output: 1 x 7A relay
- Fan Output: 1 x 7A relay
- Probe Inputs: 2 x NTC/PTC selectable probes (probes not included)
- Additional Features: Built-in buzzer, TTL serial port for communication.
4. Installation
The controller is designed for panel mounting. Follow these steps for proper installation:
- Prepare the Panel Opening: Create a rectangular opening in the control panel with dimensions of approximately 71 mm x 29 mm (drilling diameter). The front panel dimensions of the controller are 77 mm x 35 mm.
- Insert the Controller: Carefully insert the controller into the prepared opening from the front of the panel.
- Secure the Controller: Use the provided mounting clips or brackets to secure the controller firmly in place from the rear of the panel.
- Wiring:
- Connect the 230V AC power supply to the designated terminals.
- Connect the compressor, defrost heater, and fan loads to their respective relay output terminals (16A for compressor, 7A for defrost, 7A for fans).
- Connect the NTC/PTC temperature probes to the designated probe input terminals. Ensure correct polarity if applicable for the probe type.
- If using, connect the TTL serial port for external communication or programming.
- Verify Connections: Double-check all wiring connections for correctness and security before applying power.
5. Setup and Configuration
After installation, the controller needs to be configured for your specific application. Refer to the detailed programming manual (if provided separately) for advanced settings. Basic setup typically involves:
- Power On: Apply power to the controller. The display will illuminate.
- Probe Type Selection: If applicable, select the correct probe type (NTC or PTC) in the controller's parameters menu.
- Set Temperature Setpoint: Adjust the desired temperature setpoint using the up/down arrow buttons.
- Differential/Hysteresis: Configure the temperature differential (hysteresis) to prevent rapid cycling of the compressor.
- Defrost Parameters: Set defrost cycle duration, interval, and termination temperature.
- Alarm Settings: Configure high/low temperature alarms and other alarm conditions.
6. Operating Instructions
Once configured, the LAE AT2-5BS4E-AG operates automatically to maintain the set temperature. Here are common operational aspects:
- Display: The digital display shows the current temperature measured by the primary probe.
- Setpoint Adjustment: Press the 'Set' button (or equivalent) to view the current setpoint, then use arrow keys to modify it. Press 'Set' again to confirm.
- Manual Defrost: Some models allow for manual initiation of a defrost cycle by pressing and holding a specific button (refer to controller's button layout).
- Alarm Indication: The buzzer will sound and/or an alarm code will be displayed if an alarm condition (e.g., high/low temperature, probe error) is met.
- Parameter Access: Access advanced parameters by holding specific button combinations, usually requiring a password to prevent unauthorized changes.
7. Maintenance
Regular maintenance ensures the longevity and accurate operation of your controller:
- Cleaning: Periodically clean the front panel of the controller with a soft, damp cloth. Do not use abrasive cleaners or solvents.
- Connections Check: Annually, or as needed, inspect all electrical connections to ensure they are tight and free from corrosion.
- Probe Inspection: Check temperature probes for physical damage or signs of wear. Ensure they are securely mounted and making good contact with the measured medium.
- Software Updates: If available, consult the manufacturer for any firmware updates that might improve performance or add features.
8. Troubleshooting
This section provides solutions to common issues you might encounter:
| Problem | Possible Cause | Solution |
|---|---|---|
| Controller display is off. | No power supply; Blown fuse; Loose wiring. | Check power source; Inspect and replace fuse; Verify all wiring connections. |
| Temperature reading is inaccurate. | Faulty probe; Incorrect probe type setting; Probe not properly installed. | Check probe for damage and replace if necessary; Verify probe type in settings; Ensure probe is correctly positioned. |
| Compressor not starting. | Setpoint too high; High temperature alarm active; Compressor relay fault; Wiring issue. | Lower setpoint; Check and clear alarm conditions; Consult technician for relay check; Inspect wiring. |
| Defrost not initiating. | Incorrect defrost parameters; Defrost probe fault; Defrost relay fault. | Review defrost settings (interval, duration); Check defrost probe; Consult technician for relay check. |
| Buzzer constantly sounding. | Active alarm condition (e.g., high/low temp); Buzzer setting. | Identify and resolve the alarm condition; Check buzzer settings in parameters. |
9. Specifications
| Parameter | Value |
|---|---|
| Model Number | LAE AT2-5BS4E-AG |
| Power Supply | 230V AC, 50/60 Hz |
| Compressor Relay Output | 16A |
| Defrost Relay Output | 7A |
| Fan Relay Output | 7A |
| Probe Inputs | 2 (NTC/PTC selectable, probes not included) |
| Front Panel Dimensions (W x H) | 77 mm x 35 mm |
| Mounting Hole Dimensions (W x H) | 71 mm x 29 mm |
| Depth | 70 mm |
| Item Weight | 200 grams |
| Connectivity | TTL Serial Port |
| Features | Buzzer |
10. Warranty and Support
For warranty information, technical support, or service inquiries, please contact the manufacturer or your authorized distributor. Keep your purchase receipt as proof of purchase.
Manufacturer/Brand: ricambigrossclima.com

This image displays the Grossclima brand logo along with essential contact details for support and inquiries. It includes their website (ricambigrossclima.com), physical address (Via Macchiavelli 27 Selargius (CA)), phone number (+39 070 543 5282), and email address (info@ricambigrossclima.com). This information is crucial for customer support and warranty claims.
You can also visit their official website for more resources:
Ask a question about this manual
Ask about setup, troubleshooting, compatibility, parts, safety, or missing instructions. Manuals+ will review the question and use this page’s manual context to help answer it.