1. Introduction
Thank you for choosing the TOOLPORT 6x12m Reception Tent FLEX Smart. This manual provides essential information for the safe and correct assembly, operation, and maintenance of your tent. Please read these instructions carefully before beginning assembly and retain them for future reference.
This tent is designed as a temporary shelter for outdoor events, parties, and storage. It features a robust galvanized steel frame and a high-quality PE 450 N polyethylene tarp, offering protection against various weather conditions.
2. Safety Information
- Wind and Weather: This tent is a temporary structure. Do not use it in extreme weather conditions such as strong winds, heavy rain, snow, or thunderstorms. Disassemble the tent if adverse weather is forecast.
- Anchoring: Always ensure the tent is securely anchored to the ground using all provided pegs and guy ropes. Insufficient anchoring can lead to structural failure and injury.
- Fire Safety: Keep all heat sources, open flames, and flammable materials away from the tent fabric. The tent material is not fireproof.
- Assembly: Assembly requires at least 2-4 people. Follow the instructions carefully. Do not force components together. Wear appropriate safety gear, such as gloves, during assembly.
- Children: Keep children away from the assembly area. Do not allow children to play unsupervised inside or around the tent.
- Inspection: Regularly inspect all components for damage or wear. Do not use the tent if any part is damaged.
3. Package Contents
Before starting assembly, verify that all parts listed below are present and undamaged. Refer to the included parts list for detailed identification.
- Galvanized Steel Frame (tubes and connectors)
- PE 450 N Roof Tarp (single piece)
- PE 450 N Side Tarps (modular, with windows)
- PE 450 N Gable End Panels (one with zipper entrance)
- Tensioners / Elastic loops
- Ground Pegs / Stakes
- Guy Ropes
- Assembly Instructions
4. Setup Instructions
Follow these steps for a safe and efficient assembly. It is recommended to have 3-4 people for the assembly of this 6x12m tent.
4.1 Site Preparation
- Choose a level, clear area free from overhead obstructions (e.g., tree branches, power lines).
- Ensure the ground is suitable for anchoring pegs securely.
- Clear any sharp objects that could damage the tarp.
4.2 Frame Assembly
- Unpack all frame components and lay them out. Tubes are typically numbered for easier identification.
- Begin by assembling the base frame. Connect the horizontal base tubes using the appropriate connectors.
- Insert the vertical leg tubes into the base connectors.
- Attach the roof ridge tubes and side roof tubes to the top of the vertical legs using the roof connectors. Ensure all bolt connections are tightened with wing screws for maximum stability.
- Gradually raise the frame, ensuring all connections are secure.

Image: The robust galvanized steel frame structure of the tent before tarp installation.

Image: Detail of a secure bolt-together frame connection, ensuring structural integrity.
4.3 Tarp Installation
- Carefully unfold the roof tarp and position it over the assembled frame. The roof tarp is a single piece for enhanced stability and weather protection.
- Secure the roof tarp to the frame using the provided elastic loops or tensioners. Ensure it is taut to prevent water pooling.
- Attach the gable end panels to the front and back of the frame. One gable panel includes a zippered entrance.
- Install the modular side panels along the length of the tent. These panels typically attach every 2 meters and feature windows. Secure them to the vertical poles using the integrated fasteners.
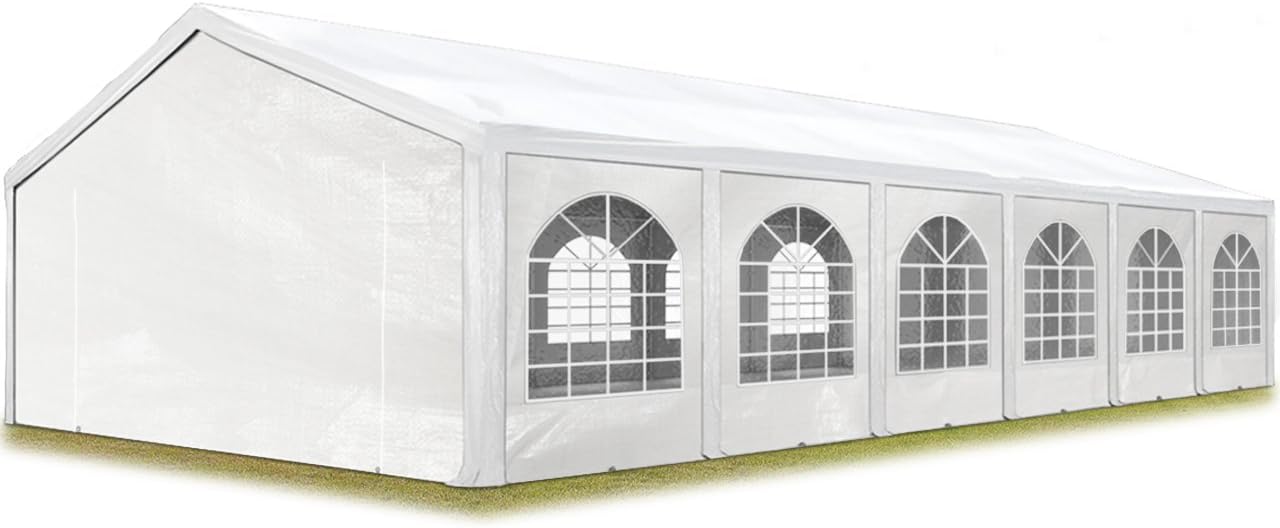
Image: The complete 6x12m reception tent with all tarps installed, ready for use.

Image: Detail of a side panel, showing the arched window design and how the panel attaches to the frame.
4.4 Ground Anchoring
- Once the frame and tarps are in place, secure the tent to the ground using all provided pegs/stakes through the foot plates at the base of each vertical pole.
- Attach guy ropes to designated points on the frame and secure them to the ground with additional pegs, pulling them taut to provide extra stability.

Image: A foot plate at the base of a vertical pole, secured to the ground with a peg for stability.
5. Operating Instructions (Usage)
- Access: Use the zippered entrance on the gable end for entry and exit. Ensure zippers are operated smoothly to prevent damage.
- Ventilation: The modular side panels can be partially or fully removed to allow for optimal air circulation, especially in warm weather. The wind deflectors on the side panels also aid in air regulation.
- Temperature Regulation: Adjust the side panels as needed to manage internal temperature. In cooler weather, keeping all panels closed helps retain warmth.
- Temporary Use: Remember this tent is for temporary use. Prolonged exposure to harsh elements can reduce its lifespan.

Image: The tent with some side panels open, demonstrating modularity and ventilation options.

Image: An interior view of the spacious 6x12m tent, suitable for various event setups.
6. Maintenance
- Cleaning: Clean the tarps with mild soap and water. Do not use harsh chemicals or abrasive cleaners, as these can damage the material. Rinse thoroughly and allow to air dry completely before storage.
- Frame Care: The galvanized steel frame is designed for corrosion resistance. However, inspect it periodically for any signs of rust or damage. Clean any dirt or debris from the frame.
- Storage: Ensure all tarps are completely dry before folding and storing to prevent mold and mildew. Store the tent components in a dry, cool place, protected from direct sunlight and pests.
- Component Check: Before each assembly, check all tubes, connectors, tarps, pegs, and ropes for wear, tears, bends, or other damage. Replace any damaged parts immediately.
7. Troubleshooting
- Water Pooling on Roof: Ensure the roof tarp is installed tightly and evenly across the frame. Adjust tensioners if necessary. Water pooling can lead to structural stress and damage.
- Tent Instability: Verify that all frame connections are securely bolted. Check that all ground pegs are fully inserted and guy ropes are taut and properly anchored. Disassemble the tent if wind conditions exceed its design limits.
- Difficulty with Zippers: Ensure the zipper path is clear of fabric. Apply a silicone-based lubricant if the zipper is stiff. Do not force the zipper.
- Missing or Damaged Parts: Refer to the package contents list. If parts are missing or damaged upon delivery, contact TOOLPORT customer service immediately.
8. Specifications
| Model Number | FLEX Smart (91118) |
| Dimensions (L x W x H) | 12.0m x 6.0m x 3.0m (peak height) / 2.0m (side height) |
| Weight | Approximately 130.8 kg |
| Frame Material | Galvanized Alloy Steel |
| Tube Diameter | Approx. 38mm |
| Connector Diameter | Approx. 42mm |
| Tarp Material | Polyethylene (PE 450 N) |
| Water Resistance | Impermeable |
| UV Protection | 30+ |
| Recommended Use | Reception tent, party tent, temporary shelter |
| Temperature Resistance | -20°C to +50°C |

Image: A diagram illustrating the overall dimensions of the 6x12m tent, including height, width, and length.
9. Warranty and Support
For warranty information, spare parts, or technical support, please contact TOOLPORT customer service directly. Keep your purchase receipt and model number (FLEX Smart, 91118) handy when contacting support.
You can typically find contact information on the TOOLPORT official website or through your point of purchase.


