NEEWER 10095781
Neewer Professional Studio Flash Strobe Light Monolight S400N User Manual
Model: 10095781
Introduction
This user manual provides detailed instructions for the operation, maintenance, and troubleshooting of your NEEWER S400N Professional Studio Flash Strobe Light. Please read this manual thoroughly before using the product to ensure safe and optimal performance.
Safety Information
Always observe the following safety precautions to prevent injury or damage to the product:
- Do not expose the unit to rain or moisture.
- Do not disassemble the unit. Refer servicing to qualified personnel.
- Ensure the power supply voltage matches the unit's requirements.
- Keep out of reach of children.
- Avoid direct eye exposure to the flash.
- Unplug the unit from the power source before cleaning or when not in use for extended periods.
Package Contents
Verify that all items listed below are included in your package:

Image: All components included in the Neewer S400N Studio Strobe Light package.
- 1 × Vision5 Studio Strobe (S400N)
- 1 × Lithium Battery (included in the strobe)
- 1 × LED Modeling Lamp (included in the strobe)
- 1 × AC Charger
- 1 × Standard Reflector
- 1 × Protective Cover
- 1 × 13’/4m 3.5mm Sync Cord
- 1 × Wireless Trigger (battery not included)
Product Overview
Familiarize yourself with the various parts and controls of the Neewer S400N Studio Strobe Light.

Image: Detailed diagram showing the control panel and various ports on the back of the strobe light.
- Power Adjustment Knob: Adjusts flash power output.
- Modeling Lamp Full Light Switch: Toggles the modeling lamp to full brightness.
- Test Button: Fires a test flash.
- Model Lamp Synchronous Mode Switch: Controls modeling lamp behavior (e.g., proportional to flash power).
- Lamp Switch: Turns the modeling lamp on/off.
- Synchronous Socket: For connecting a sync cord.
- Power Switch: Turns the unit on/off.
- Power Supply Socket: For connecting the AC power cord.
- Power Fuse Box: Contains the fuse for circuit protection.
- Flash Switch: Activates or deactivates the flash function.
- Infrared Sensor Cell Button: Toggles the optical slave mode.
- Buzz Switch: Turns the audible ready indicator on/off.
Setup
Mounting the Strobe Light
The strobe light features a mounting bracket for attachment to a light stand and an umbrella mounting hole.
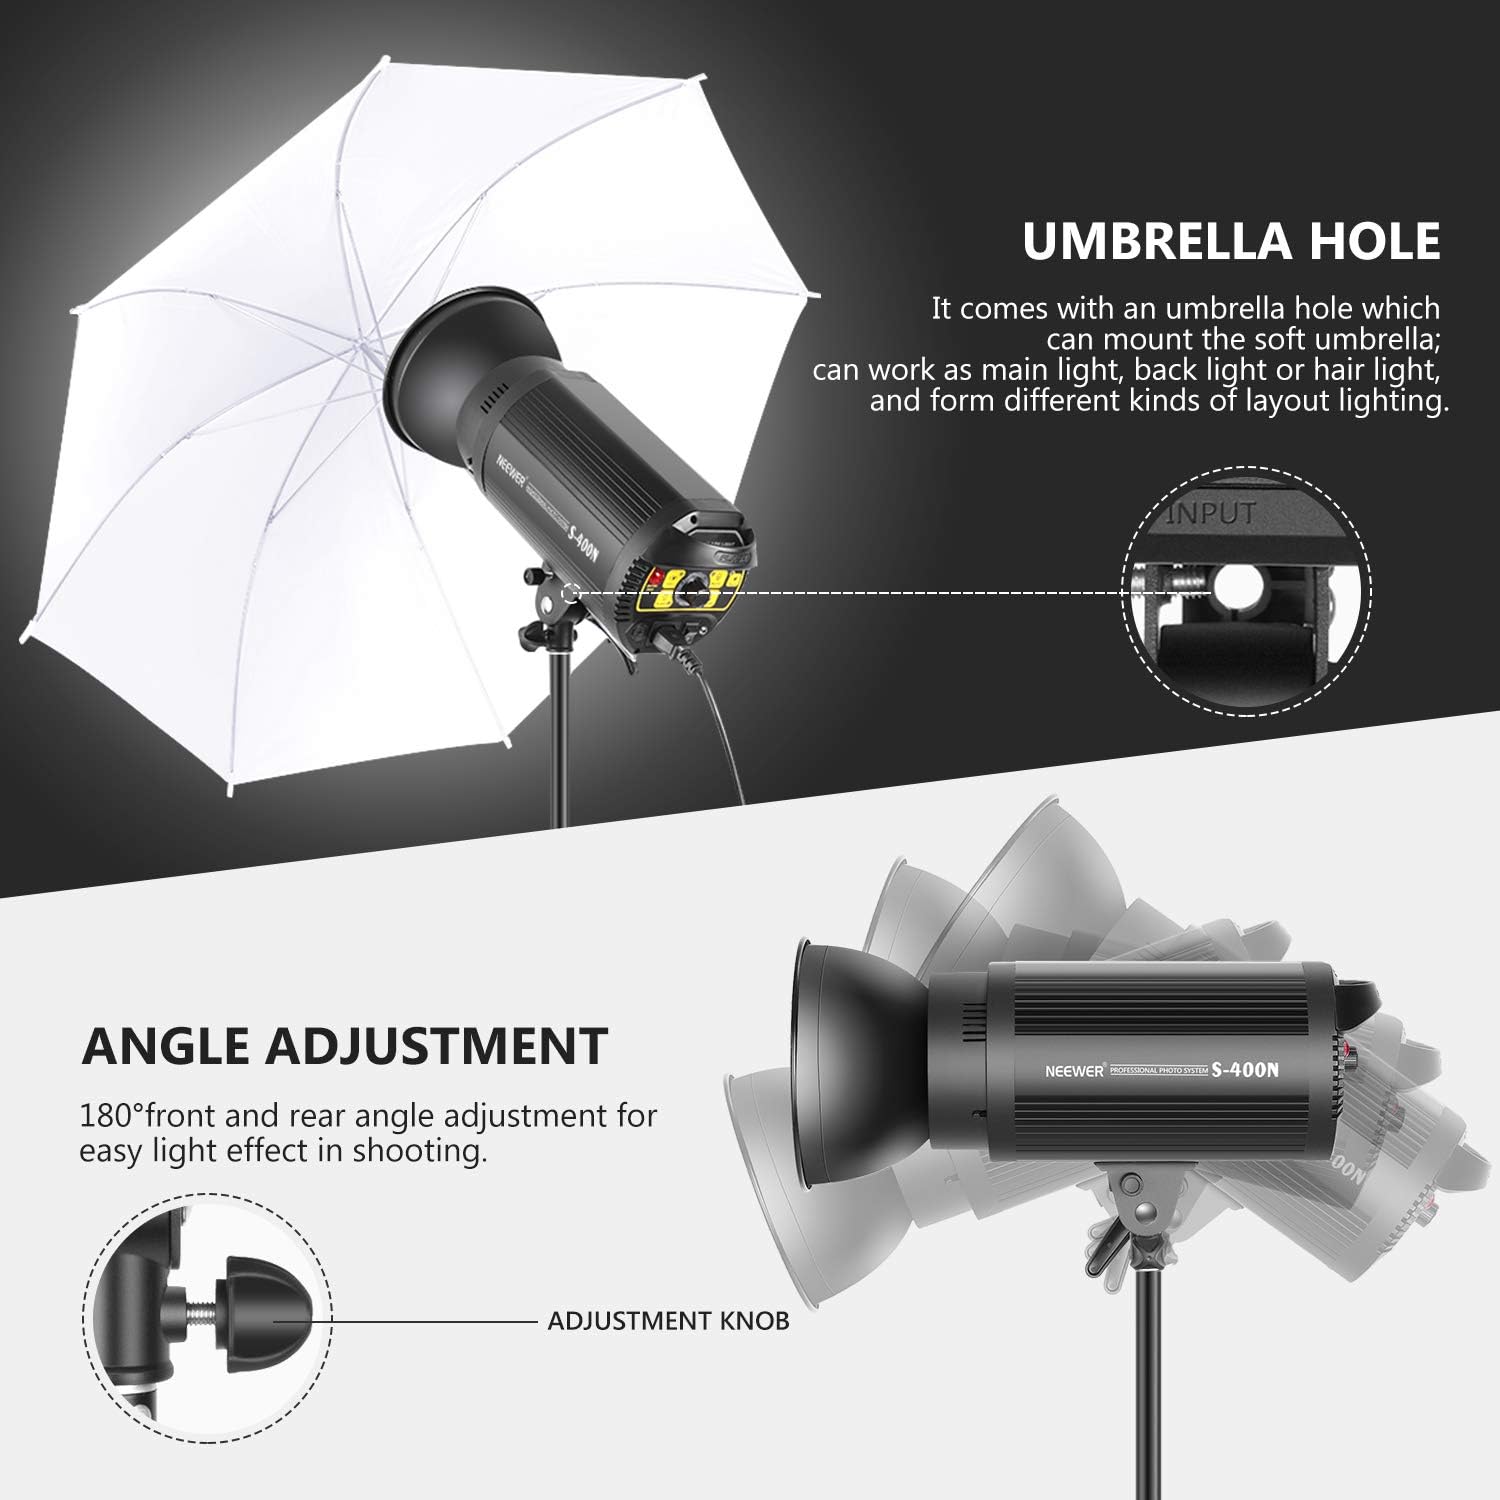
Image: The strobe light mounted on a light stand, demonstrating the 180-degree angle adjustment and the umbrella hole for attaching a photography umbrella.
- Attach the strobe light's mounting bracket to a compatible light stand.
- Secure the strobe light firmly using the adjustment knob on the bracket.
- Adjust the beam angle by loosening the adjustment knob, tilting the strobe to the desired position (up to 180 degrees), and then tightening the knob.
- If using a photography umbrella, insert its shaft into the umbrella mounting hole on the bracket.
Power Connection
- Ensure the power switch on the strobe light is in the "OFF" position.
- Connect the AC power cord to the Power Supply Socket on the back of the strobe.
- Plug the other end of the AC power cord into a suitable power outlet (AC 110~130V).
- The internal lithium battery is pre-installed. Charge the battery fully before first use.
Operating Instructions
Turning On/Off
- To turn on the strobe, flip the Power Switch to the "ON" position.
- To turn off the strobe, flip the Power Switch to the "OFF" position.
Adjusting Flash Power
The flash power can be adjusted over an 8 f-stop range, from full power (1/1) down to 1/128th power.

Image: The strobe light demonstrating adjustable brightness from 10% to 100%, highlighting features like long life, excellent heat dissipation, and energy saving.
- Rotate the Power Adjustment Knob to increase or decrease the flash output. The current power level will be displayed on the digital screen.
Modeling Lamp Operation
The 13W 1370-lumen dimmable LED modeling lamp assists in previewing lighting effects.

Image: Close-up of the strobe light's modeling lamp, indicating its 13W output and 5600K color temperature.
- Press the Lamp Switch to turn the modeling lamp on or off.
- Use the Modeling Lamp Full Light Switch to set the lamp to full brightness.
- The modeling lamp can also be set to proportional mode via the Model Lamp Synchronous Mode Switch, where its brightness adjusts with the flash power setting.
Flash Modes and Sync
The strobe supports TTL, Manual (M), and Multi flash modes, along with High-Speed Sync (HSS), First Curtain Sync, and Second Curtain Sync.
- TTL Mode: Automatic flash exposure control (requires compatible trigger).
- Manual (M) Mode: Manually set flash power using the adjustment knob.
- Multi Mode: Fires a series of rapid flashes for stroboscopic effects (up to 20 times, 30Hz).
- High-Speed Sync (HSS): Allows flash synchronization at shutter speeds up to 1/8000s.
- Optical Slave Mode: Activate the Infrared Sensor Cell Button to trigger the strobe by another flash.
- Sync Cord: Connect a 3.5mm sync cord to the Synchronous Socket for wired triggering.
Using Bowens Mount Accessories
The strobe features a Bowens mount for compatibility with a wide range of light modifiers.

Image: The front of the strobe light showing the Bowens mount, with examples of compatible accessories such as softboxes, conical snoots, soft balls, beauty dishes, and four-leaf barndoors with honeycomb grids.
- Align the accessory with the Bowens mount on the strobe.
- Twist the accessory clockwise until it clicks into place, securing it.
- To remove, press the release button on the strobe's mount and twist the accessory counter-clockwise.
Maintenance
- Cleaning: Use a soft, dry cloth to clean the exterior of the strobe. Do not use abrasive cleaners or solvents.
- Storage: Store the unit in a cool, dry place away from direct sunlight and excessive humidity.
- Battery Care: If storing for extended periods, charge the lithium battery to approximately 50% every three months to prolong its lifespan.
- Fuse Replacement: If the unit does not power on, check the fuse in the Power Fuse Box. Replace with a fuse of the same type and rating if necessary.
- Modeling Lamp Replacement: The LED modeling lamp is replaceable. Ensure the unit is unplugged and cooled down before attempting replacement.
Troubleshooting
| Problem | Possible Cause | Solution |
|---|---|---|
| Strobe does not power on. | Power cord not connected; Power switch off; Blown fuse; Battery depleted. | Ensure power cord is securely connected; Turn power switch to ON; Check and replace fuse; Charge the battery. |
| Flash does not fire. | Flash switch off; Trigger not working; Optical sensor blocked; Sync cord loose. | Ensure Flash switch is ON; Check trigger battery/settings; Ensure optical sensor is clear; Reconnect sync cord. |
| Modeling lamp not working. | Lamp switch off; Lamp damaged. | Turn Lamp switch ON; Replace modeling lamp if damaged. |
| Overheating warning. | Excessive continuous use. | Allow the unit to cool down. Reduce frequency of flashes. |
Specifications
| Feature | Detail |
|---|---|
| Studio Strobe Flash Modes | TTL, M, Multi |
| Sync Modes | High-Speed Sync (HSS, up to 1/8000s), First Curtain Sync, Second Curtain Sync |
| Guide Number | 68 (2m, ISO 100) |
| Maximum Flash Power | 400Ws |
| Flash Power Range | 7 f-stop range (8 f-stop adjustment) from full power (1/1) to 1/128th power |
| Multi Flash | Provided (up to 20 times, 30Hz) |
| Recycling Time | 0.01s~2.8s |
| Full-Power Flashes | 500 |
| Flash Duration | 1/650s~1/10000s |
| Color Temperature | 5600K (±200K) |
| 2.4GHz Wireless Control | 8 channels (Channel 1~8), 3 groups (Group A/B/C) |
| 2.4GHz Control Range | Up to 262’/80m |
| Modeling Lamp | 13W 1370-lumen dimmable LED |
| Flash Tube | Replaceable tube |
| Strobe Light Dimensions | 7.87” × 4.72” × 4.72” / 200 × 120 × 120mm |
| Weight (strobe light with battery) | 4.6lb / 2.1kg |
| Battery Capacity | 6000mAh (12V) |
| Charging Voltage | AC 110~130V |
| Strobe Light Safety Features | Overheating/overvoltage/overcurrent/flash charging protection |
| Wireless Trigger Battery Type | 2 AA alkaline batteries or Ni-MH batteries (not included) |
Warranty and Support
For warranty information and technical support, please refer to the official NEEWER website or contact their customer service directly. Keep your purchase receipt as proof of purchase for warranty claims.
Official NEEWER Website: www.neewer.com
Ask a question about this manual
Ask about setup, troubleshooting, compatibility, parts, safety, or missing instructions. Manuals+ will review the question and use this page’s manual context to help answer it.