VELAB VE-T2
VELAB VE-T2 Trinocular Compound Microscope
User Manual
Model: VE-T2 | Brand: VELAB
1. Introduction
The VELAB VE-T2 Trinocular Compound Microscope is designed for higher education, clinical research, and laboratory routine work. It features wide-field eyepieces and a trinocular head for easy integration with image and video documentation devices. Its portable design, powered by rechargeable batteries, allows for up to 4 hours of continuous operation.
2. Product Components Overview

Figure 2.1: Front-side view of the VE-T2 microscope, showing the trinocular head, objectives, and mechanical stage.
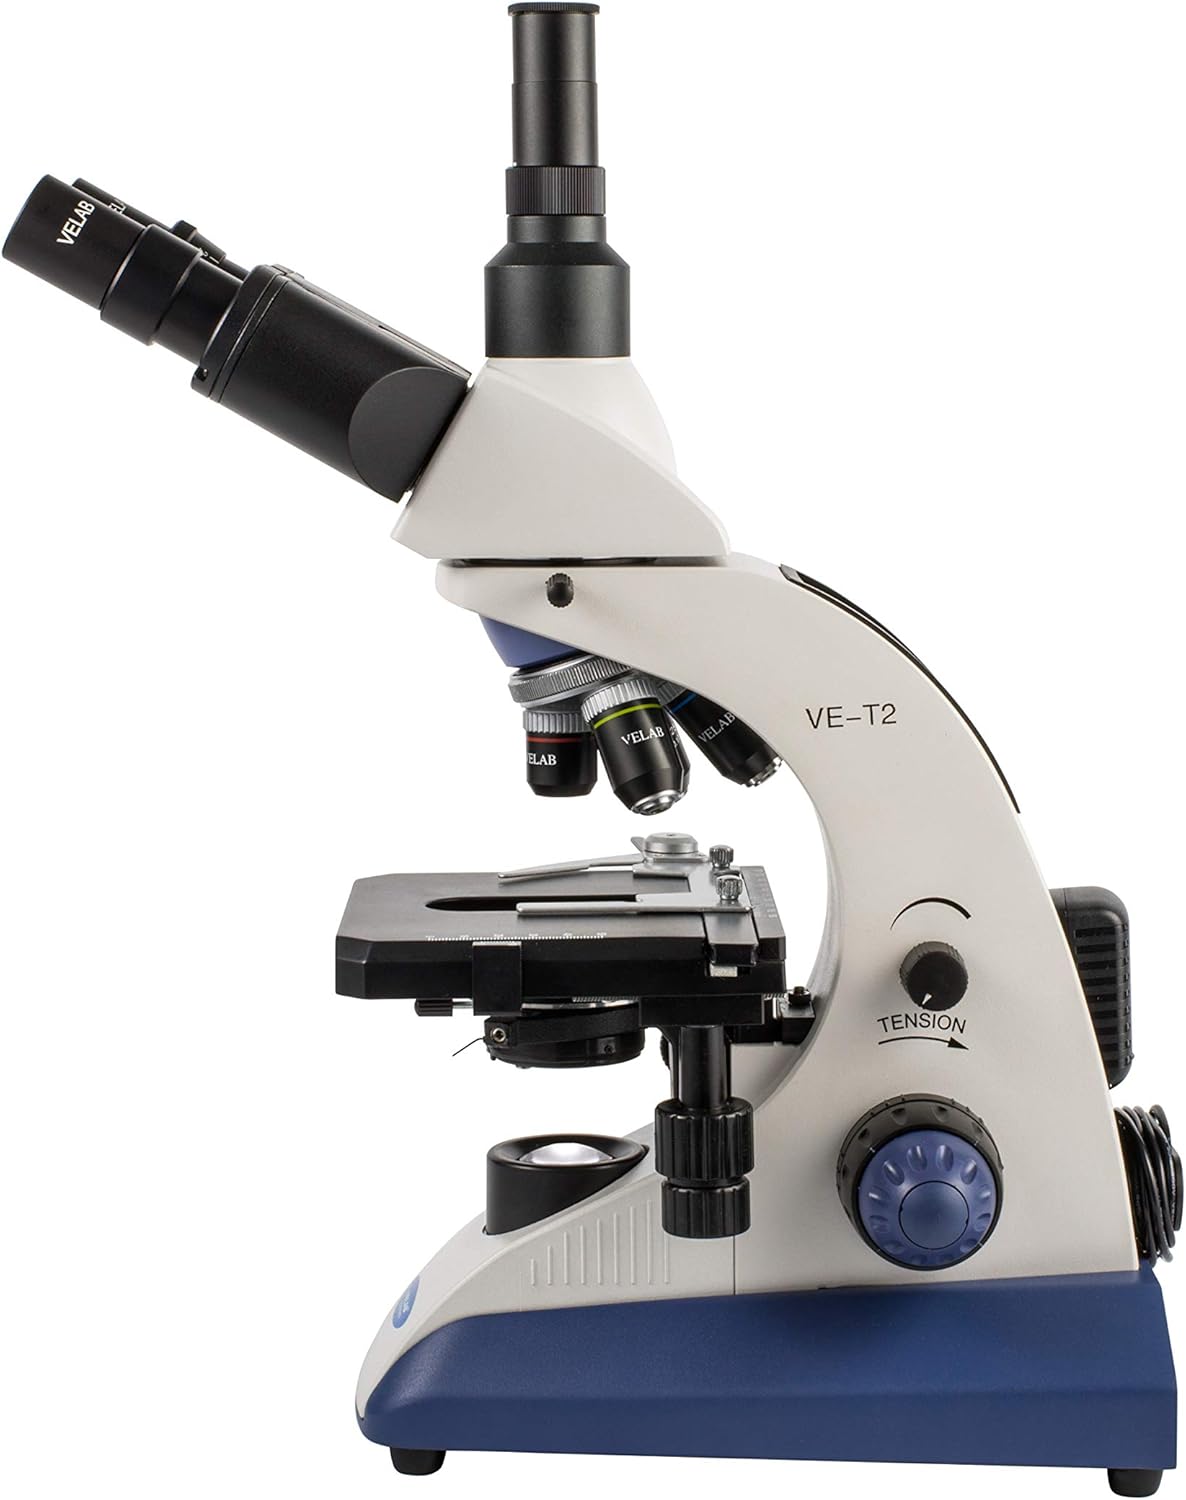
Figure 2.2: Side view of the VE-T2 microscope, highlighting the coarse and fine focus knobs and tension adjustment.

Figure 2.3: Top view of the VE-T2 microscope, showing the eyepieces and objective turret from above.
- Eyepieces: WF 10x/20mm with diopter adjustment on one eyepiece.
- Head: Trinocular Siedentopf type, 30° inclined and 360° rotation, with interpupillary distance adjustment between 48 - 75mm.
- Nosepiece: Quadruple nosepiece with anti-slip grip and click-stops for objective selection.
- Objectives: 4X, 10X, 40X (retractable), and 100X (retractable) oil immersion with achromatic optics, anti-slip grip, and color rings for easy identification.
- Stage: Double plate with X-Y coaxial movement, 140 x 132mm, vernier, millimeter scale, clamp, and height adjustment with stop.
- Condenser: Abbe, 1.25 N.A. with height adjustment screw.
- Diaphragm: Iris with filter holder.
- Focusing: Coarse and fine anti-slip control knob with tension adjustment.
- Illumination: LED with variable intensity control.
- Power Supply: Three 1.5V AA rechargeable batteries (included) for portable use, and a 120V, 50/60 Hz AC adapter.
3. Setup and Initial Operation
- Unpacking: Carefully remove all components from the packaging. Retain packaging for future transport or storage.
- Placement: Place the microscope on a stable, level surface away from direct sunlight, vibrations, and excessive dust.
- Power Connection: Connect the AC/DC adapter to the microscope's power input and then to a suitable electrical outlet. Ensure the batteries are charged for portable use.
- Eyepiece Installation: Insert the WF 10x/20mm eyepieces into the eyepiece tubes of the trinocular head.
- Interpupillary Distance Adjustment: While looking through the eyepieces, adjust the distance between them until a single, circular field of view is observed. The range is 48 - 75mm.
- Diopter Adjustment: If one eyepiece has a diopter adjustment ring, focus on a specimen with your dominant eye first (without adjusting the diopter). Then, use your other eye and adjust the diopter ring until the image is sharp for that eye, without touching the main focus knobs.
4. Operating Instructions
- Power On: Turn on the LED illumination using the variable intensity control knob. Start with a lower intensity and adjust as needed.
- Specimen Placement: Place a prepared slide on the mechanical stage, securing it with the stage clips. Use the X-Y coaxial movement knobs to position the specimen over the light aperture.
- Objective Selection: Rotate the quadruple nosepiece to select the lowest power objective (e.g., 4X). Ensure it clicks firmly into place.
- Focusing:
- Using the coarse focus knob, lower the objective close to the slide (without touching).
- While looking through the eyepieces, slowly raise the objective using the coarse focus knob until the specimen comes into rough focus.
- Use the fine focus knob for precise focusing.
- Illumination Adjustment: Adjust the LED intensity and the iris diaphragm on the Abbe condenser to achieve optimal contrast and brightness for your specimen. The Abbe condenser's height can also be adjusted for optimal illumination.
- Changing Magnification: Once focused with a lower power objective, rotate the nosepiece to a higher power objective (e.g., 10X, 40X). Due to the parfocal design, only minor adjustments with the fine focus knob should be needed.
- Using 100X Oil Immersion Objective:
- After focusing with the 40X objective, rotate the nosepiece halfway between the 40X and 100X objectives.
- Place a small drop of immersion oil (included) directly onto the center of the specimen slide.
- Carefully rotate the 100X objective into the oil drop until it is immersed.
- Use only the fine focus knob for focusing with the 100X objective. Do not use the coarse focus knob.
- After use, clean the 100X objective and the slide immediately with lens paper and lens cleaning solution to remove all oil residue.
- Power Off: When finished, turn off the illumination, remove the slide, and cover the microscope with the dust cover.
5. Maintenance and Care
- Cleaning Lenses: Use only specialized lens cleaning paper and lens cleaning solution. Gently wipe lenses in a circular motion. Never use abrasive materials or harsh chemicals.
- Cleaning Body: Wipe the microscope body with a soft, damp cloth. Avoid getting moisture into electrical components.
- Dust Protection: Always use the provided dust cover when the microscope is not in use to prevent dust accumulation on optical and mechanical parts.
- Battery Charging: The microscope uses three 1.5V AA rechargeable batteries. Connect the AC/DC adapter to charge the batteries. Ensure the charging port is clear and functional.
- Storage: Store the microscope in a cool, dry place, away from direct sunlight and extreme temperatures.
6. Troubleshooting
| Problem | Possible Cause | Solution |
|---|---|---|
| No illumination. | Power cord not connected; batteries depleted; illumination control off or set to minimum; faulty LED. | Check power connection and outlet. Charge or replace batteries. Adjust illumination intensity knob. If problem persists, contact support. |
| Image is blurry or out of focus. | Incorrect focus adjustment; objective not fully engaged; slide upside down; dirty lenses. | Use coarse and fine focus knobs. Rotate nosepiece until objective clicks into place. Ensure slide cover slip is facing up. Clean objectives and eyepieces. |
| Dark spots or dust in the field of view. | Dust on eyepieces, objectives, or condenser. | Rotate eyepieces to see if spots move (dust on eyepiece). Rotate objectives (dust on objective). Clean all accessible optical surfaces. |
| Difficulty charging batteries / charging port issue. | Charging port obstruction or damage; faulty adapter. | Inspect the charging port for any visible obstructions or damage. Ensure the AC/DC adapter is fully inserted and functional. If the port appears damaged or charging does not initiate, contact customer support for assistance. |
7. Technical Specifications
| Feature | Description |
|---|---|
| Eyepieces | WF 10x/20mm with diopter adjustment |
| Head | Trinocular Siedentopf type, 30° inclined, 360° rotation |
| Interpupillary Distance | 48 - 75mm (1.88” - 2.95”) |
| Nosepiece | Quadruple, anti-slip grip, click-stops |
| Objectives | 4X, 10X, 40X (retractable), 100X (retractable) oil immersion; achromatic optics |
| Stage | Double plate with X-Y coaxial movement, 140 x 132mm (5.51” x 5.19”) |
| Condenser | Abbe, 1.25 N.A. with height adjustment |
| Diaphragm | Iris with filter holder |
| Focusing | Coarse and fine anti-slip control knob with tension adjustment |
| Illumination | LED with variable intensity control |
| Power Supply | Three 1.5V AA rechargeable batteries (4 hours continuous operation); 120V, 50/60 Hz AC adapter |
| Dimensions (L x W x H) | 10.04 x 12.99 x 23.62 inches |
| Item Weight | 17.68 pounds (8.02 kg) |
| Model Number | VE-T2 |
8. Included Accessories
- AC/DC adapter
- Blue filter
- Dust cover
- Immersion oil
- Three 1.5V AA rechargeable batteries (pre-installed or included separately)
9. Warranty and Support
This VELAB VE-T2 Trinocular Compound Microscope comes with a 10-year limited warranty. For warranty claims, technical support, or any operational questions not covered in this manual, please contact VELAB customer service. Keep your purchase receipt as proof of purchase.
Ask a question about this manual
Ask about setup, troubleshooting, compatibility, parts, safety, or missing instructions. Manuals+ will review the question and use this page’s manual context to help answer it.