PULUZ PU70 diving case
PULUZ Underwater Camera Housing User Manual
Model: PU70 Diving Case
1. Introduction
This user manual provides comprehensive instructions for the PULUZ PU70 Underwater Camera Housing, designed for the Canon EOS-5D Mark III camera. This housing allows you to capture high-quality photographs and videos in various challenging environments, including underwater, rain, snow, wind, dust, and muddy conditions. It offers robust protection for your camera, ensuring its safety and optimal performance.
2. Product Overview
The PULUZ PU70 Diving Case is a durable and reliable waterproof housing engineered to protect your Canon EOS-5D Mark III camera up to a depth of 40 meters (130 feet). Its design ensures full functionality of camera controls while submerged, making it ideal for diving, snorkeling, surfing, and other water sports. The housing is also effective against dust, dirt, and adverse weather conditions.

Figure 2.1: Front view of the PULUZ PU70 Underwater Camera Housing, showing the lens port and main controls.

Figure 2.2: Rear view of the PULUZ PU70 Underwater Camera Housing, displaying the transparent back panel and control buttons.
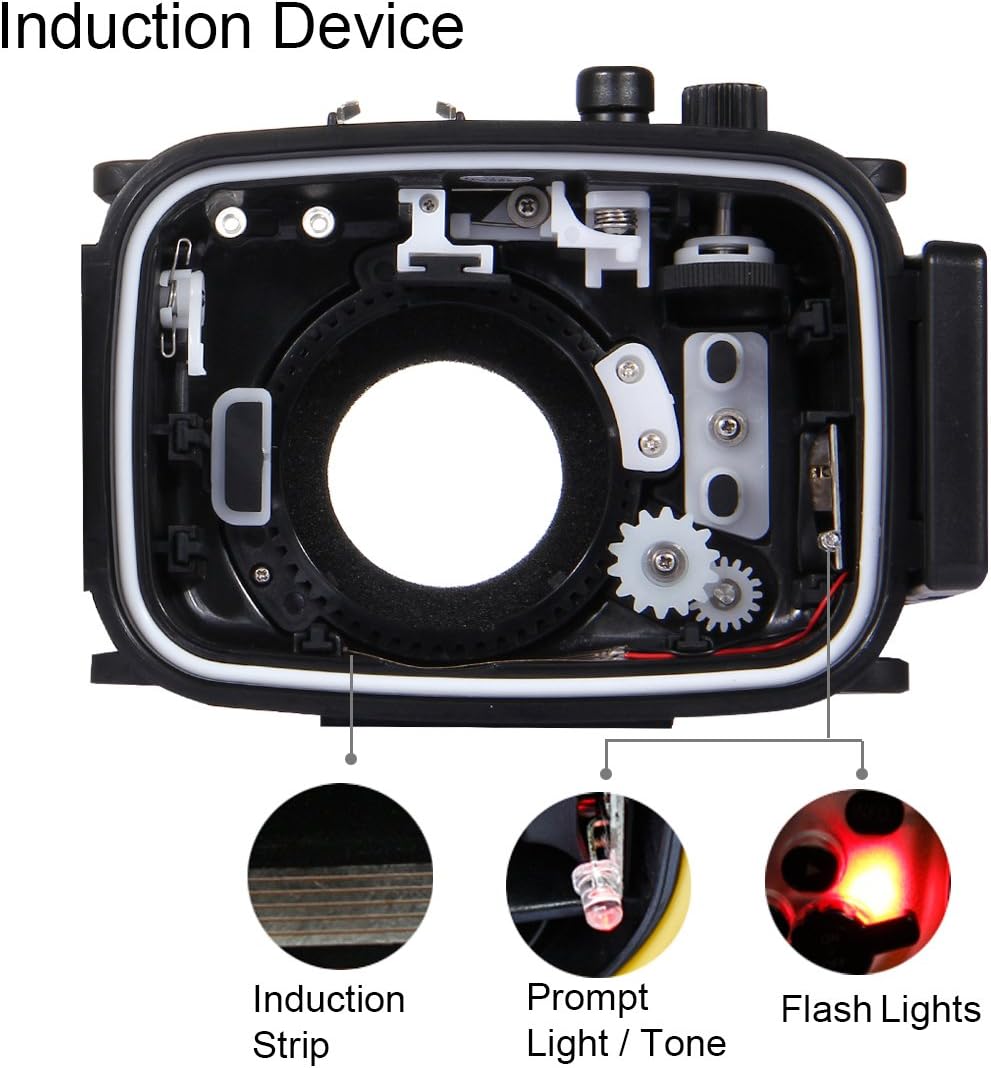
Figure 2.3: Examples of the PULUZ PU70 Underwater Camera Housing being used in various aquatic and outdoor environments, highlighting its versatility and waterproof performance up to 40 meters.
3. Package Contents
Upon unboxing, please verify that all the following items are included in your package:

Figure 3.1: Illustration of the complete package contents, including the user manual, O-ring seal, cleaning cloth, soft plate, hand strap, and neck strap.
- 1 x PULUZ PU70 Underwater Camera Housing
- 1 x User Manual
- 1 x O-ring Seal (Spare)
- 1 x Cleaning Cloth
- 1 x Soft Plate
- 1 x Hand Strap
- 1 x Neck Strap
4. Parts Identification
Familiarize yourself with the various components of your underwater camera housing:

Figure 4.1: Detailed diagram illustrating the names and locations of key parts on the PULUZ PU70 Underwater Camera Housing.
- Shutter Button: Activates the camera's shutter.
- Mode Dial: Allows selection of camera modes.
- Zoom Lever: Controls the camera's zoom function.
- Hot Shoe: For external accessories.
- Optical Fiber Connector: For external flash connection.
- Flash: Built-in flash control.
- ON/OFF (Power): Power button for the camera.
- Exposure Compensation: Adjusts exposure.
- Safety Lock: Secures the housing.
- Screen: Viewfinder/LCD area.
- Lens: Lens port area.
- Bracket Hole: For mounting accessories.
- Control Ring: For various camera settings.

Figure 4.2: Close-up views of the PULUZ PU70 Underwater Camera Housing, detailing the control buttons, safety latch, and top dials for operation.
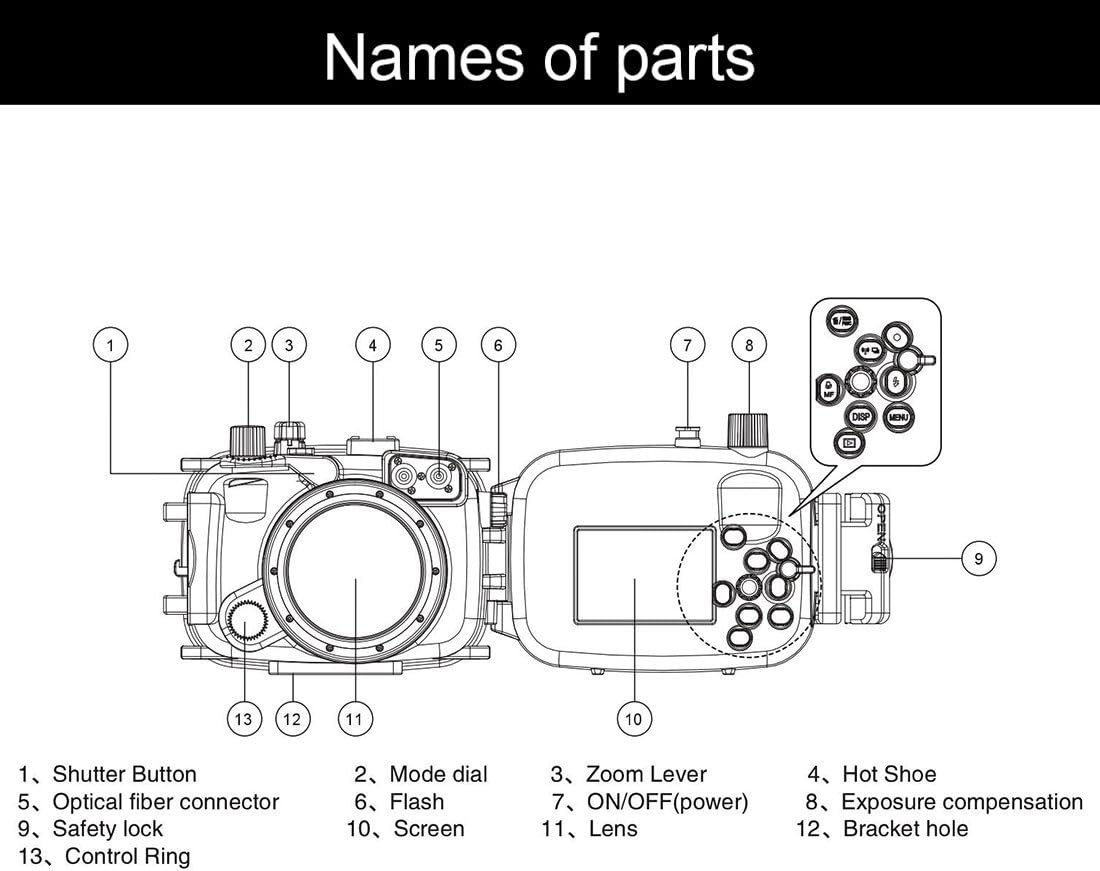
Figure 4.3: Internal view of the housing showing the induction strip, prompt light/tone, and flash lights, which are part of the induction device for camera communication.
5. Setup and Preparation
Before securing your camera in the waterproof case, perform the following checks and steps to ensure proper sealing and functionality:
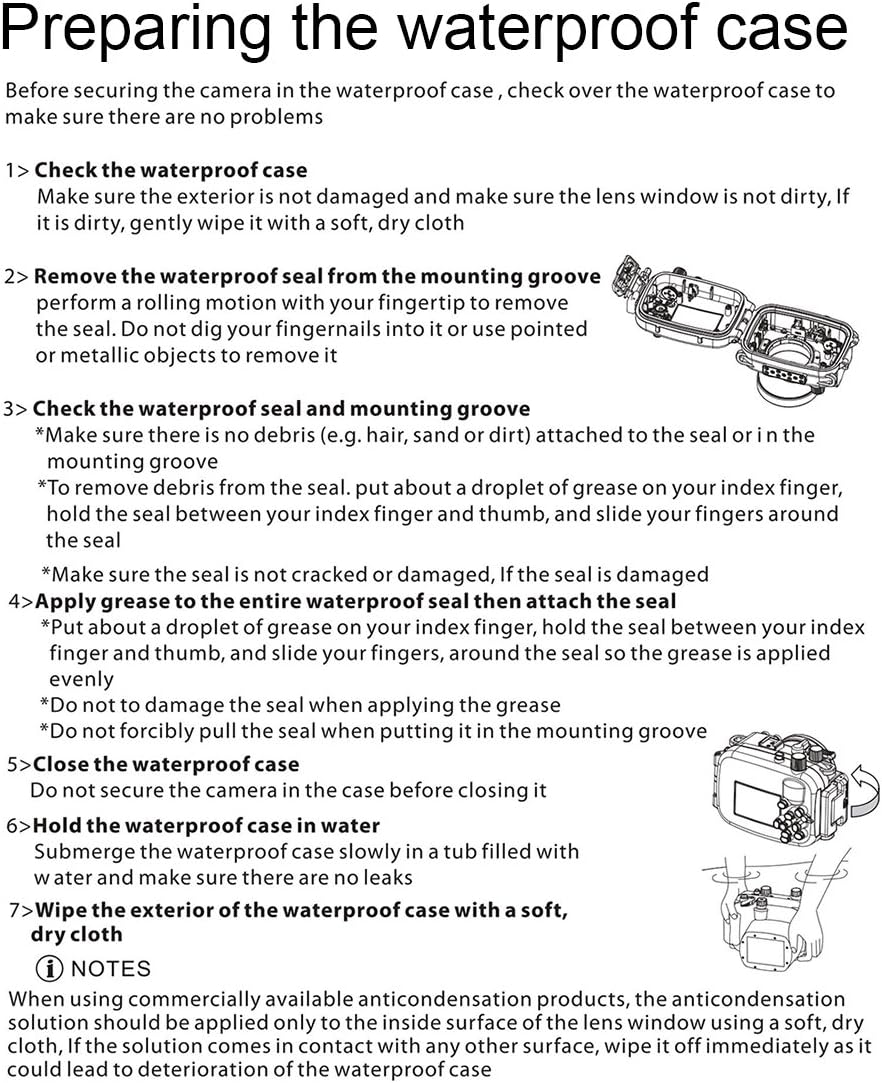
Figure 5.1: Visual guide for preparing the waterproof case, including checking the case, removing and checking the seal, applying grease, and performing a water test.
- Check the waterproof case:
Ensure the exterior is not damaged and the lens window is clean. If dirty, gently wipe it with a soft, dry cloth.
- Remove the waterproof seal from the mounting groove:
Perform a rolling motion with your fingertip to remove the seal. Do not dig your fingernails into it or use pointed or metallic objects to remove it.
- Check the waterproof seal and mounting groove:
Make sure there is no debris (e.g., hair, sand, or dirt) attached to the seal or in the mounting groove. To remove debris from the seal, put a droplet of grease on your index finger, hold the seal between your index finger and thumb, and slide your fingers around the seal. Make sure the seal is not cracked or damaged. If the seal is damaged, replace it immediately.
- Apply grease to the entire waterproof seal then attach the seal:
Put a droplet of grease on your index finger, hold the seal between your index finger and thumb, and slide your fingers around the seal so the grease is applied evenly. Do not damage the seal when applying the grease. Do not forcibly pull the seal when putting it in the mounting groove.
- Close the waterproof case:
Do not secure the camera in the case before closing it for the water test.
- Hold the waterproof case in water:
Submerge the waterproof case slowly in a tub filled with water and make sure there are no leaks. Observe for at least 15-20 minutes. If no leaks are detected, proceed to install your camera.
- Wipe the exterior of the waterproof case with a soft, dry cloth:
After the water test, thoroughly dry the exterior of the case.
NOTE: When using commercially available anti-condensation products, the anti-condensation solution should be applied only to the inside surface of the lens window using a soft, dry cloth. If the solution comes in contact with any other surface, wipe it off immediately as it could lead to deterioration of the waterproof case.
5.1. Installing the Camera
Once the housing has passed the water test, carefully insert your Canon EOS-5D Mark III camera. Ensure the camera is properly aligned with the internal controls and the lens is centered within the lens port. Close the housing securely using the safety latches.

Figure 5.2: The waterproof housing opened, showing the internal mechanism for camera placement and control alignment.
6. Operating Instructions
The PULUZ PU70 Diving Case is designed to allow full access to your camera's functions while submerged. Refer to the "Parts Identification" section for button locations.
- Power On/Off: Use the designated ON/OFF button on the housing to power your camera.
- Shutter Release: Press the Shutter Button to take photos.
- Zoom Control: Use the Zoom Lever to adjust the focal length.
- Mode Selection: Rotate the Mode Dial to change shooting modes.
- Other Controls: All other accessible buttons (e.g., Menu, Info, Flash, Exposure Compensation) function as they would outside the housing.
6.1. Underwater Photography Tips
- Lighting: Natural light diminishes quickly underwater. Consider using an external flash or video light for better results, connected via the optical fiber connector.
- Buoyancy: The housing may be slightly buoyant or negative depending on the camera and lens. Use a wrist or neck strap for security.
- Focus: Autofocus can be challenging underwater. Pre-focusing or using manual focus may yield sharper images.
- White Balance: Adjust your camera's white balance settings for underwater conditions to correct color casts.
7. Maintenance and Care
Proper maintenance ensures the longevity and reliability of your underwater housing:
- After Each Use: Rinse the housing thoroughly with fresh water immediately after each use, especially after saltwater exposure. Operate all buttons and levers while rinsing to flush out any salt or debris.
- Drying: Dry the housing completely with a soft, lint-free cloth. Do not use abrasive materials.
- O-ring Care: Regularly inspect the O-ring for any signs of damage, cracks, or debris. Clean the O-ring and its groove with a soft cloth. Apply a thin, even layer of silicone grease (provided) to the O-ring before each use to maintain its sealing properties. Store the O-ring separately or loosely in the groove when not in use for extended periods.
- Storage: Store the housing in a cool, dry place away from direct sunlight and extreme temperatures. Ensure the housing is open or the latches are not fully engaged to prevent compression of the O-ring during storage.
- Lens Port: Clean the lens port with a lens cleaning solution and a microfiber cloth. Avoid touching the lens port with bare fingers.
8. Troubleshooting
If you encounter any issues with your PULUZ PU70 Diving Case, refer to the following common problems and solutions:
| Problem | Possible Cause | Solution |
|---|---|---|
| Water Leakage | Damaged or dirty O-ring; improper closure; foreign object in seal groove. | Inspect O-ring for damage and replace if necessary. Clean O-ring and groove thoroughly. Ensure housing is closed correctly and latches are fully engaged. Perform a water test without the camera. |
| Buttons/Controls Not Working | Camera not properly seated; debris around buttons; internal mechanism misalignment. | Re-seat the camera inside the housing, ensuring it aligns with all controls. Clean around the external buttons. If the issue persists, contact customer support. |
| Fogging Inside Housing | Humidity trapped inside; temperature difference. | Ensure camera and housing are dry before sealing. Use anti-fog inserts or silica gel packets inside the housing. Avoid assembling in humid environments. |
| Difficulty Opening/Closing Latches | Salt crystal buildup; stiff mechanism. | Rinse thoroughly with fresh water after use. Apply a small amount of silicone grease to the latch mechanisms if they are stiff. |
If the problem persists after attempting these solutions, please contact PULUZ customer support for further assistance.
9. Specifications
| Feature | Detail |
|---|---|
| Model Number | PU70 diving case |
| Compatibility | Canon EOS-5D Mark III (Specific model for this housing) |
| Water Resistance Depth | Up to 40 meters (130 feet) |
| Material | Polyurethane thermoplastic (TPU), Fiberglass, Silicone, Plastic |
| Dimensions (Packaging) | 20 x 17 x 14.5 cm |
| Weight (Packaging) | 1.22 kg |
| Water Resistance Level | Impermeabile (Waterproof) |
| Mounting Type | Handheld Mount |
10. Warranty and Support
PULUZ products are manufactured to the highest quality standards. For warranty information and customer support, please refer to the terms and conditions provided at the point of purchase or visit the official PULUZ website. If you have received a defective or damaged product, please consult the return policy of your retailer.
For specific inquiries or technical assistance, you may contact PULUZ customer service through their official channels. Please have your product model number (PU70 diving case) and purchase details ready when contacting support.
Ask a question about this manual
Ask about setup, troubleshooting, compatibility, parts, safety, or missing instructions. Manuals+ will review the question and use this page’s manual context to help answer it.