Introduction
Thank you for choosing the Dörr 204473 8 MP Snapshot IR TFT Trail Camera. This camera is designed for versatile surveillance, offering high-quality images and videos both day and night. Its robust, weatherproof design makes it ideal for outdoor use, capturing wildlife or monitoring property with its motion detection capabilities. Please read this manual carefully before operating the camera to ensure proper use and to maximize its performance.
Safety Information
- Do not expose the camera to extreme temperatures or direct sunlight for prolonged periods.
- Ensure the battery compartment is securely closed to maintain water resistance.
- Use only recommended battery types (AA batteries). Do not mix old and new batteries, or different types of batteries.
- Keep the camera away from strong magnetic fields.
- Do not attempt to disassemble or modify the camera. This will void the warranty.
- Dispose of batteries and electronic components responsibly according to local regulations.
Product Overview
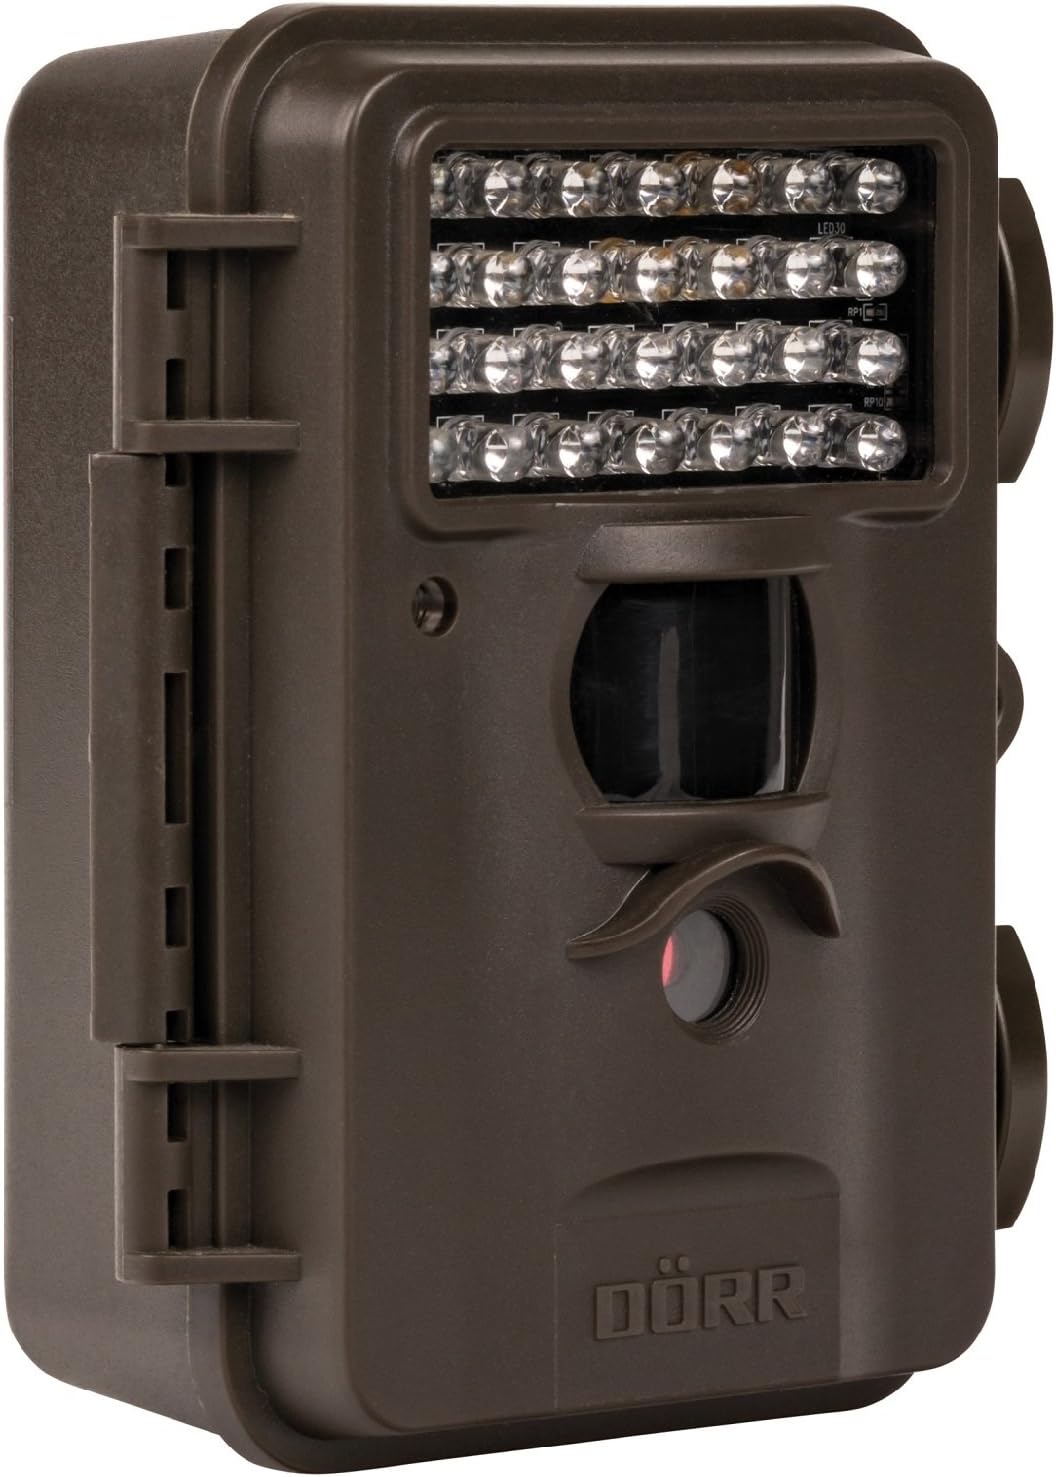
This image displays the front of the Dörr 204473 Trail Camera. Visible features include the array of 28 infrared LEDs at the top, the passive infrared (PIR) motion sensor below the LEDs, and the camera lens at the bottom. The camera has a rugged, dark brown, weatherproof casing with a latch on the left side.
The Dörr 204473 camera features a compact and durable design. Key components include:
- Infrared LEDs: 28 nearly invisible LEDs for night illumination up to 15 meters.
- PIR Motion Sensor: Detects movement to trigger photo or video capture.
- Camera Lens: Captures 8MP still images and video.
- TFT Display: For menu navigation and viewing captured media (located inside the camera).
- Control Keypad: For setting up and operating the camera.
- Weatherproof Housing: Protects the camera from environmental elements.
Setup
1. Battery Installation
- Open the camera housing latch on the side.
- Locate the battery compartment.
- Insert 4 or 8 AA batteries, ensuring correct polarity (+/-).
- Close the battery compartment cover securely.
2. SD Card Installation
- With the camera housing open, locate the SD/SDHC card slot.
- Insert an SD/SDHC memory card (up to 32 GB) into the slot until it clicks into place. Ensure the card is inserted in the correct orientation.
- To remove, gently push the card in until it springs out.
3. Mounting the Camera
The camera can be mounted using a strap or a wall mount. Ensure the camera is positioned to capture the desired area without obstructions. The mounting type is wall mount.
- Strap Mounting: Thread the provided strap through the slots on the back of the camera and secure it around a tree or pole.
- Wall Mounting: Use appropriate screws and anchors (not included) to secure the camera to a wall or flat surface.
Operating Instructions
1. Powering On/Off
- To power on, slide the power switch to the 'ON' position.
- To power off, slide the power switch to the 'OFF' position.
2. Menu Navigation
Once powered on, the TFT display will activate. Use the keypad buttons (UP, DOWN, LEFT, RIGHT, OK, MENU) to navigate through the settings menu. The menu is available in English and German.
3. Setting Date and Time
- Enter the menu and navigate to 'Date/Time' settings.
- Use the navigation buttons to set the current date and time.
- Confirm with 'OK'. Each captured image will display the time, date, and temperature in °C.
4. Photo/Video Modes and Settings
The camera supports both still image and video capture. Adjust settings such as resolution, trigger interval, and burst mode via the menu.
- Resolution: Set to 8MP for still images.
- Trigger Time: The camera has a fast trigger time of 1.3 seconds.
- Motion Detection: Configure the sensitivity of the PIR sensor.
- Night Vision: The 28 IR LEDs automatically activate in low light conditions for night vision up to 15 meters.
5. Viewing Files
You can view captured photos and videos directly on the camera's TFT display or by connecting the camera to a computer via USB (cable not included) or by inserting the SD card into a card reader.
Maintenance
- Cleaning: Use a soft, dry cloth to clean the camera lens and housing. Do not use abrasive cleaners or solvents.
- Battery Care: Remove batteries if the camera will not be used for an extended period to prevent leakage.
- Storage: Store the camera in a cool, dry place away from direct sunlight when not in use.
Troubleshooting
| Problem | Possible Cause | Solution |
|---|---|---|
| Camera not powering on | Low or dead batteries; incorrect battery polarity. | Replace batteries; ensure correct polarity. |
| No images/videos captured | SD card full or not inserted correctly; motion sensor blocked or sensitivity too low. | Insert/replace SD card; format SD card; clear sensor path; increase sensor sensitivity. |
| Poor image quality at night | Subject too far from camera; IR LEDs obstructed. | Ensure subject is within 15m range; clear any obstructions from IR LEDs. |
| Camera not detecting motion | PIR sensor sensitivity too low; camera positioned incorrectly. | Increase PIR sensitivity; reposition camera for optimal detection angle. |
Specifications
| Feature | Detail |
|---|---|
| Brand | DÖRR |
| Model Number | 204473 |
| Effective Still Resolution | 8 MP |
| Effective Video Resolution | 8 MP |
| Night Vision Range | 15 meters |
| Number of IR LEDs | 28 |
| Trigger Time | 1.3 seconds |
| Storage | SD/SDHC Memory Card (up to 32 GB) |
| Power Source | 4x or 8x AA Batteries |
| Color | Black |
| Material | Metal |
| Item Dimensions (L x W x H) | 10 x 7 x 12.2 cm |
| Water Resistance Level | Waterproof |
| Mounting Type | Wall Mount |
| Recommended Applications | Motion Detection, Night Vision |
Warranty and Support
For warranty information and technical support, please refer to the documentation provided with your purchase or visit the official Dörr website. Keep your proof of purchase for any warranty claims.


