1. Introduction
This manual provides essential instructions for the safe and effective use of your Weldpro MIG200GDsv 200 Amp Inverter Multi-Process Welder. This versatile 3-in-1 machine is designed for MIG, Lift TIG, and Stick welding applications, suitable for various tasks including hardware, decoration, car modification, and equipment maintenance. Featuring IGBT inverter technology, it delivers high power in a compact and portable unit. Please read this manual thoroughly before operation to ensure proper setup, safe use, and optimal performance.
2. Important Safety Information
WARNING: Welding can be dangerous. Always follow safety precautions to prevent serious injury or death.
- Electric Shock: Can kill. Do not touch live electrical parts. Wear dry welding gloves and protective clothing. Ensure the workpiece is properly grounded.
- Fumes and Gases: Can be hazardous to your health. Keep your head out of the fumes. Use adequate ventilation or exhaust at the arc.
- Arc Rays: Can injure eyes and burn skin. Wear a welding helmet with a proper shade of filter to protect your face and eyes. Wear appropriate protective clothing.
- Fire and Explosion: Welding sparks can cause fire or explosion. Keep flammable materials away from the welding area. Have a fire extinguisher nearby.
- Hot Parts: Can cause severe burns. Do not touch hot parts with bare hands. Allow equipment to cool before handling.
- Noise: Can damage hearing. Wear ear protection.
- Always ensure the machine is turned off and unplugged before performing any maintenance or adjustments.
3. Product Overview
The Weldpro MIG200GDsv is a robust multi-process welder designed for versatility and performance. It features dual digital displays for precise control and an intuitive synergic design for ease of use.
3.1 Key Features
- Multi-Process Capability: MIG, Lift TIG, and Stick (MMA) welding.
- Dual Voltage: Operates on 220V/110V power supplies.
- High Output: Maximum 200 Amp output for various welding tasks.
- IGBT Inverter Technology: Provides high power in a light, compact unit (approximately 13.8 kg).
- Dual Digital Display: Easy to read and set amperage and wire speed for repeatable welds.
- 2T/4T Modes: For trigger control flexibility.
- Spool Gun Capability: Supports aluminum welding with an optional spool gun.
- Advanced DC Lift TIG Features.
- VRD (Voltage Reduction Device) High Temp and Overload Protection with indication.
- User Adjustable Inductance Settings.
3.2 Included Components
The Weldpro MIG200GDsv package includes the following items:
- MIG Torch: 10 ft. ERGOPLUS15
- TIG Torch: 13 ft. WP-17
- Electrode Holder: 5AWGx10 ft. Cable with 35-50 quick connector (200A)
- Earth Clamp: 5AWGx10 ft. Cable with 35-50 quick connector (300A T-shape)
- Gas Hose: 55 inches
- Power Adapter
3.3 Product Visuals
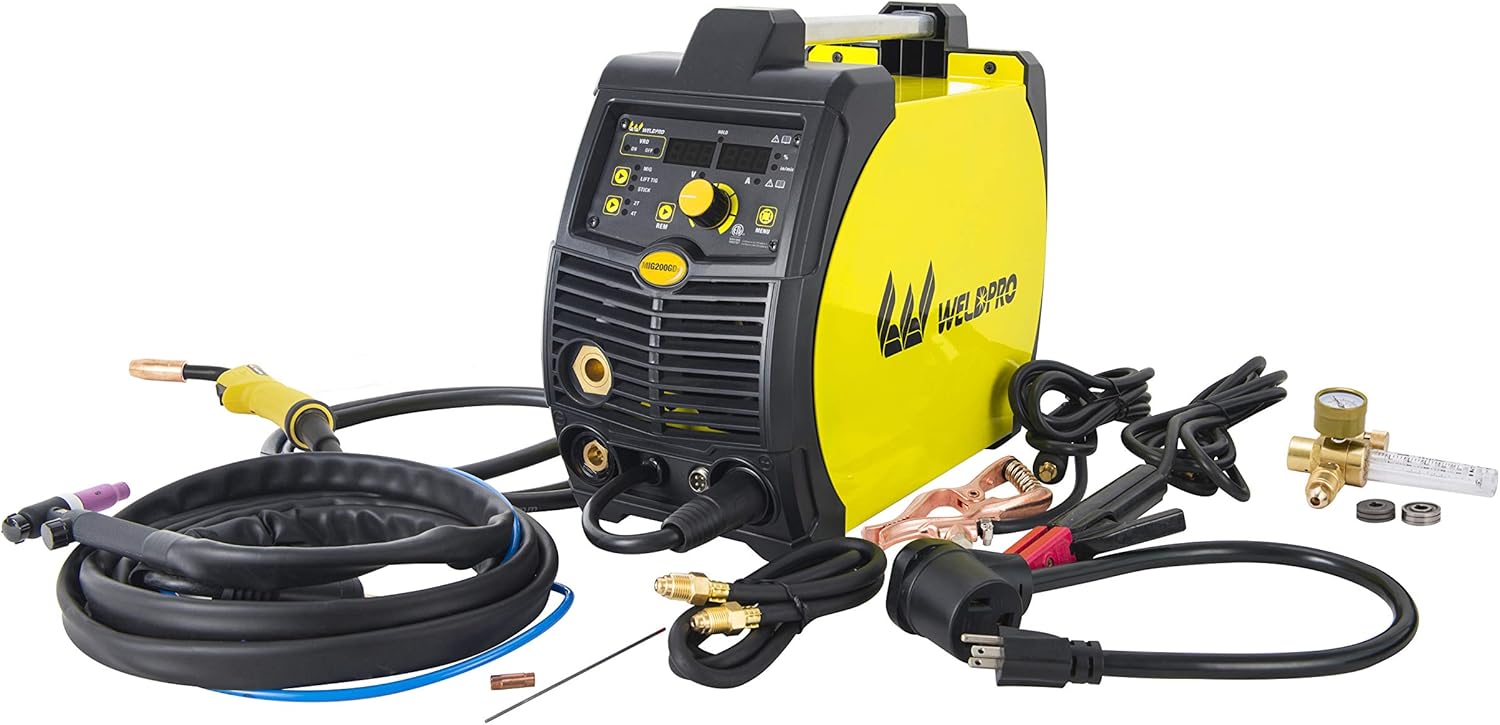
Figure 1: The Weldpro MIG200GDsv multi-process welder shown with all included accessories, including MIG torch, TIG torch, electrode holder, earth clamp, gas hose, and power adapter.

Figure 2: A detailed view of the various welding accessories that come with the Weldpro MIG200GDsv, such as the MIG and TIG torches, ground clamp, and electrode holder.

Figure 3: The front control panel of the Weldpro MIG200GDsv, displaying the dual digital readouts for amperage and wire speed, mode selection buttons (MIG, Lift TIG, Stick), and adjustment knobs.

Figure 4: The rear panel of the Weldpro MIG200GDsv, showing the main power switch, gas inlet connection, and power cable entry point.

Figure 5: The internal wire feed compartment of the Weldpro MIG200GDsv, illustrating the spool holder and the wire feeding mechanism.

Figure 6: A close-up view of the wire feed mechanism within the Weldpro MIG200GDsv, highlighting the drive rollers and tension adjustment.
4. Setup
Proper setup is crucial for safe and effective welding. Follow these steps carefully:
4.1 Power Connection
- Ensure the welder's power switch is in the OFF position.
- The Weldpro MIG200GDsv supports dual voltage input (110V or 220V). Use the appropriate power adapter and plug the machine into a suitable grounded electrical outlet.
- Verify that the power supply matches the machine's requirements and that the circuit breaker can handle the welding amperage.
4.2 Gas Connection (for MIG/TIG)
- Connect one end of the provided gas hose to the gas inlet on the rear panel of the welder (refer to Figure 4).
- Connect the other end of the gas hose to your shielding gas regulator, which should be attached to a suitable gas cylinder (e.g., Argon for TIG, Argon/CO2 mix for MIG).
- Ensure all connections are tight to prevent gas leaks.
4.3 Accessory Connections
Connect the appropriate torch and ground clamp based on the welding process you intend to use:
- MIG Welding: Connect the ERGOPLUS15 MIG torch to the designated MIG connector on the front panel. Connect the earth clamp to the negative (-) terminal.
- Lift TIG Welding: Connect the WP-17 TIG torch to the negative (-) terminal. Connect the earth clamp to the positive (+) terminal.
- Stick (MMA) Welding: Connect the electrode holder to the positive (+) terminal. Connect the earth clamp to the negative (-) terminal.
4.4 Wire Installation (for MIG)
- Open the wire feed compartment (refer to Figure 5).
- Place the welding wire spool onto the spool holder.
- Feed the wire through the guide tube and into the drive rollers (refer to Figure 6).
- Close the drive roller tension arm and adjust the tension appropriately for the wire diameter (e.g., 0.023, 0.030, 0.035 inches).
- Ensure the correct drive roller size is installed for your wire diameter.
5. Operation
The Weldpro MIG200GDsv offers three primary welding processes. Always wear appropriate personal protective equipment (PPE) before operating the machine.
5.1 Selecting a Welding Mode
Use the mode selection buttons on the front panel (refer to Figure 3) to choose between MIG, Lift TIG, or Stick welding.
5.2 MIG Welding (Gas/Flux Core)
- Select the MIG mode.
- Adjust the amperage and wire speed using the digital display and control knobs. The synergic design assists in setting optimal parameters.
- For gas MIG, ensure shielding gas is flowing at the correct rate. For Flux Core, no external gas is required.
- The machine supports 2T (two-touch) and 4T (four-touch) trigger modes for MIG welding. Select the desired mode.
- For aluminum welding, an optional spool gun is required. Connect it according to its specific instructions.
5.3 Lift TIG Welding
- Select the Lift TIG mode.
- Ensure pure Argon shielding gas is flowing.
- Adjust the amperage using the control knob.
- To initiate the arc, touch the tungsten electrode to the workpiece and then lift it slightly. The arc will start without high-frequency interference.
5.4 Stick (MMA) Welding
- Select the Stick mode.
- Insert the appropriate electrode into the electrode holder.
- Adjust the amperage based on the electrode type and diameter.
- Strike the arc by lightly scratching the electrode against the workpiece.
5.5 Inductance Settings
The Weldpro MIG200GDsv allows for user-adjustable inductance settings, which can influence the arc characteristics and bead profile in MIG welding. Experiment with these settings to achieve desired weld quality for different materials and thicknesses.
6. Maintenance
Regular maintenance ensures the longevity and optimal performance of your welder.
- Cleaning: Periodically clean the internal components with dry compressed air to remove dust and metal particles. Ensure the machine is unplugged before cleaning.
- Cable Inspection: Regularly inspect all welding cables, torches, and clamps for damage, fraying, or loose connections. Replace damaged components immediately.
- Wire Feed System: Clean the wire drive rollers and guide tubes to prevent wire feeding issues. Check for wear on the drive rollers and replace if necessary.
- Gas Connections: Check gas hoses and fittings for leaks using a leak detection solution.
- Storage: Store the welder in a clean, dry environment when not in use.
7. Troubleshooting
This section addresses common issues you might encounter. For problems not listed here, contact Weldpro customer support.
| Problem | Possible Cause | Solution |
|---|---|---|
| Welder does not power on | No power supply; Power switch off; Faulty power cable | Check power outlet and circuit breaker; Ensure power switch is ON; Inspect power cable for damage. |
| No arc in MIG/TIG/Stick | Poor ground connection; Incorrect settings; Consumables worn; Gas flow issue (MIG/TIG) | Ensure ground clamp has good contact; Verify welding parameters; Replace contact tip/tungsten/electrode; Check gas supply and flow. |
| Poor weld quality | Incorrect settings; Contaminated material; Improper technique; Wrong shielding gas | Adjust amperage/voltage/wire speed/inductance; Clean workpiece; Practice welding technique; Use correct shielding gas. |
| Wire feeding issues (MIG) | Incorrect drive roller tension; Clogged liner; Wrong drive roller size; Tangled wire spool | Adjust drive roller tension; Clean or replace liner; Install correct drive rollers; Untangle wire spool. |
| Overload/VRD indicator active | Exceeded duty cycle; Insufficient ventilation; Internal fault | Allow machine to cool down; Ensure adequate airflow around the welder; Contact service if issue persists. |
8. Specifications
| Feature | Detail |
|---|---|
| Model Number | MIG200GDsv |
| Manufacturer | Zhejiang Linlong Welding Equipment Co., LTD |
| Product Dimensions | 45.01 x 22 x 38 cm |
| Item Weight | 13.8 kg |
| Voltage | 230 Volts (Dual Voltage 110V/220V capable) |
| Material | Metal |
| Color | Yellow |
| Welding Amperage Ranges (230V) | MIG: 40-200A; MMA: 40-200A; TIG: 15-200A |
| Welding Amperage Ranges (115V) | MIG: 40-120A; MMA: 40-120A; TIG: 15-120A |
| Duty Cycle | 30% at 200 Amp |
| MIG Wire Diameter | 0.023, 0.030, 0.035 inches |
| MIG Welding Thickness | 19ga - 0.197 inches |
| TIG Tungsten Needle Diameter | 0.063, 0.094 inches |
| TIG Welding Thickness | 25ga - 1/4 inches |
| MMA Electrode Diameter | 0.063 - 0.157 inches (acid and alkaline electrodes) |
| MMA Welding Thickness | 14ga - 0.315 inches |
9. Warranty & Support
The Weldpro MIG200GDsv comes with a 3-Year Warranty. For warranty claims, technical assistance, or any questions regarding your welder, please contact Weldpro customer support. Refer to your purchase documentation for specific contact details.


