1. Introduction
This manual provides essential instructions for the proper setup, operation, and maintenance of your Hoffen Universal Outboard Motor Water Flusher, Model BS8201PS. This device is designed to facilitate the flushing of your boat's engine cooling system, helping to remove contaminants such as salt, sand, and silt. Adhering to these instructions will ensure optimal performance and longevity of your outboard motor.
2. Product Features
- Universal Compatibility: Suitable for most outboard and inboard marine engines.
- Easy Installation: Designed for quick attachment and removal without the need for tools.
- Effective Flushing: Helps remove contaminants from the engine's cooling system.
- Standard Hose Connection: Connects directly to a standard garden hose.
- Durable Construction: Made from rubber and metal components for marine environments.
3. Specifications
| Attribute | Detail |
|---|---|
| Brand | Hoffen |
| Model Number | BS8201PS |
| Material | Rubber |
| Color | Black |
| Overall Length | 11-4/5 inches (300mm) |
| Arms Length | 10 inches (254mm) |
| Rectangular Cup Size | 5 inches x 3 inches (125mm x 75mm) |
| Recommended Use | For Salt Water and Fresh Water applications |

Figure 1: Product dimensions showing overall length, arm length, and cup size.
4. Setup
- Prepare the Engine: Ensure your boat's engine is turned off and cooled down. The boat should be out of the water or the engine trimmed up to allow access to the water intake ports.
- Locate Water Intake Ports: Identify the water intake ports on the lower unit of your outboard or inboard engine. These are typically small grates or openings.
- Attach the Flusher:
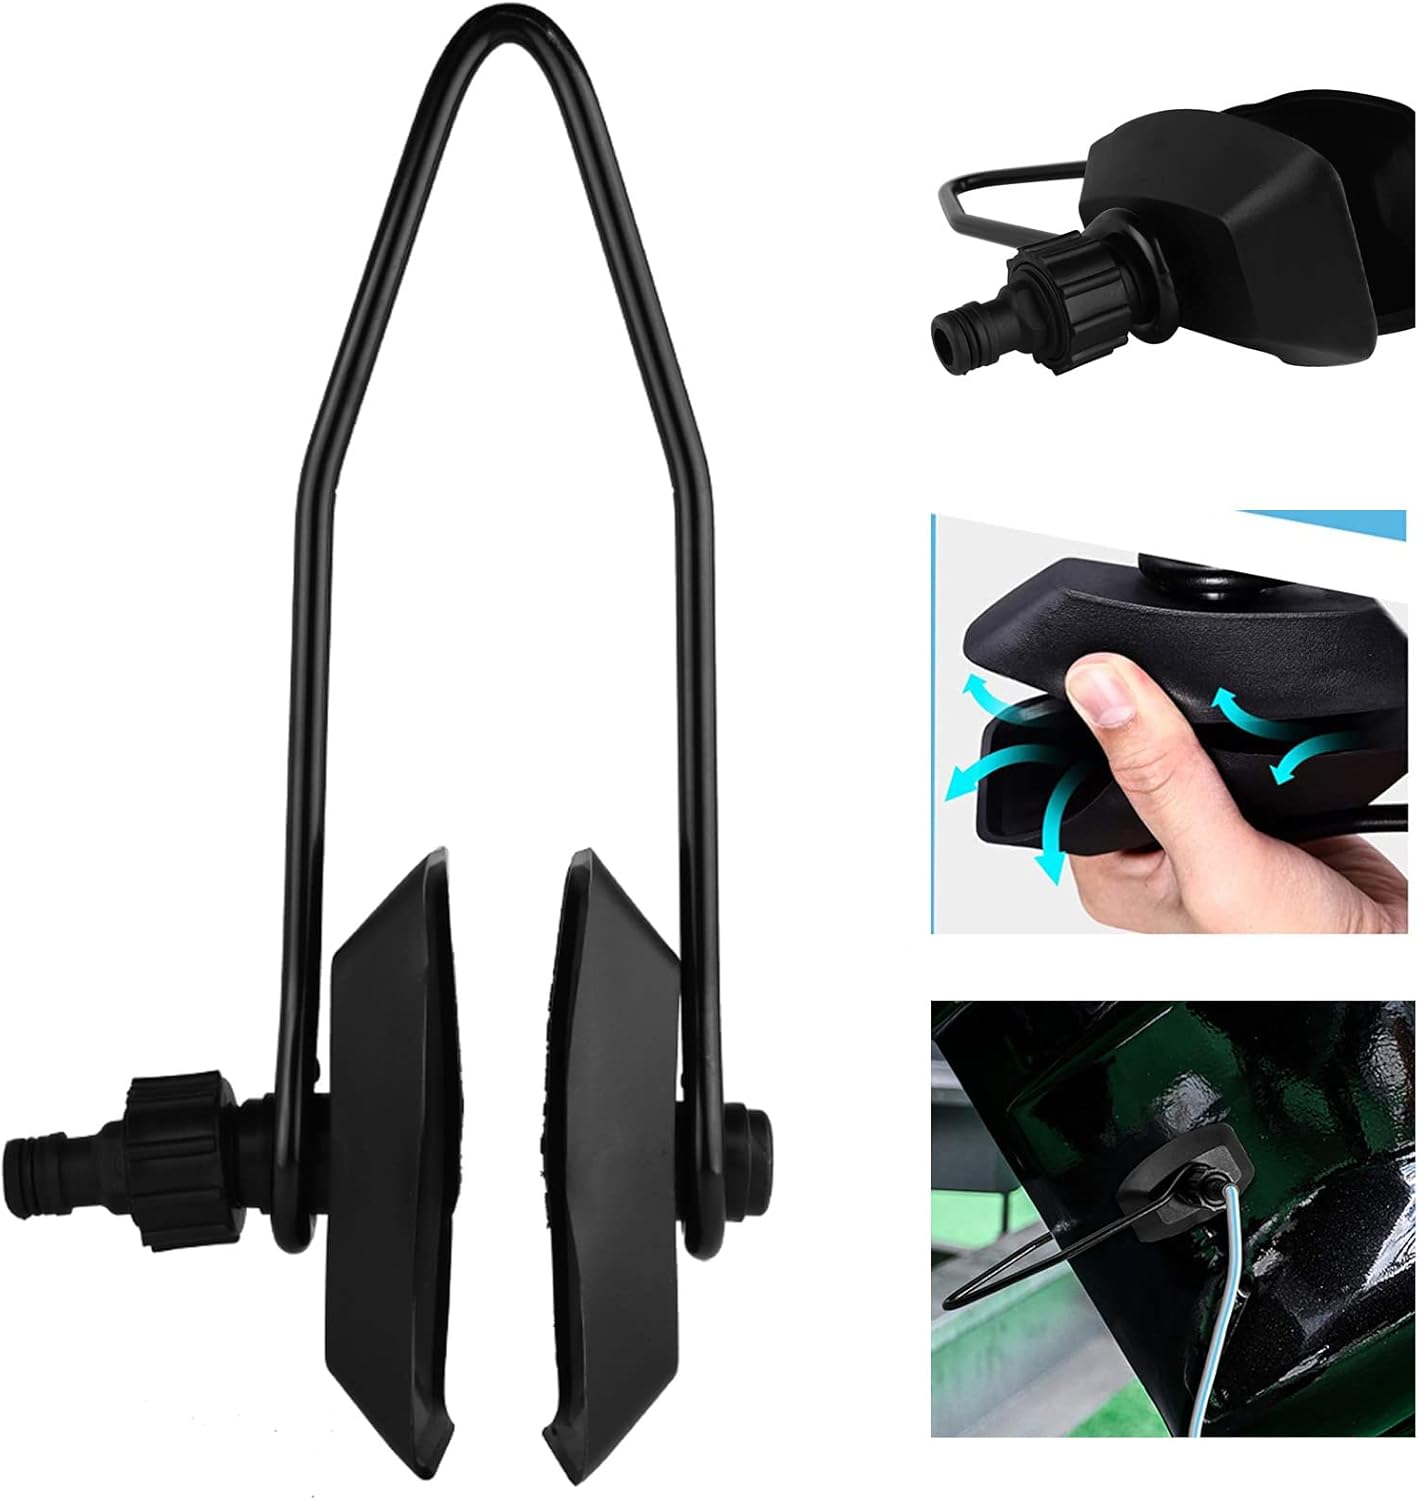
Figure 2: The flusher showing its clamping mechanism and hose connection.
Position the rectangular rubber cups of the flusher over the water intake ports. Squeeze the metal frame to open the cups and then release to clamp them firmly over the intake ports. Ensure a good seal to prevent water leakage.

Figure 3: The water flusher correctly installed on an outboard motor's water intake.
- Connect Garden Hose: Attach a standard garden hose to the flusher's hose connection fitting. Hand-tighten the connection to ensure it is secure and leak-free.
- Turn on Water Supply: Slowly turn on the water supply to the garden hose. Check for any leaks around the flusher cups and the hose connection. Adjust the flusher's position or tighten the hose if necessary.
5. Operating Instructions
- Ensure Water Flow: Confirm that water is flowing through the flusher and exiting the engine's tell-tale (pilot water discharge) or exhaust ports. This indicates proper water circulation.
- Start the Engine: Once a steady flow of water is confirmed, start your engine according to the manufacturer's instructions.
- Idle the Engine: Allow the engine to idle at a low RPM for approximately 10-15 minutes. This duration is generally sufficient to flush out salt, sand, and other debris from the cooling system. Avoid running the engine at high RPMs while flushing.
- Monitor Engine Temperature: Observe the engine's temperature gauge (if available) to ensure it remains within normal operating limits.
- Shut Down: After the flushing period, turn off the engine first, then turn off the water supply to the garden hose.
- Remove Flusher: Disconnect the garden hose and then remove the flusher from the engine's water intake ports.
Important Safety Note: Never run your engine without adequate water supply to the cooling system. Doing so can cause severe engine damage. Always ensure a strong, steady water flow before starting the engine.
6. Maintenance
- Cleaning: After each use, rinse the flusher thoroughly with fresh water to remove any salt or debris.
- Inspection: Regularly inspect the rubber cups for cracks, tears, or excessive wear. Check the metal frame for corrosion or bending.
- Storage: Store the flusher in a cool, dry place away from direct sunlight when not in use.
- Hose Connection: Ensure the hose connection threads are clean and free of debris to maintain a good seal.
7. Troubleshooting
| Problem | Possible Cause | Solution |
|---|---|---|
| Water leaks from flusher cups. | Improper placement; worn or damaged rubber cups; insufficient clamping force. | Reposition the flusher for a better seal. Inspect rubber cups for damage and replace if necessary. Ensure the clamping mechanism is fully engaged. |
| No water or weak water flow from engine tell-tale. | Insufficient water pressure from hose; flusher not properly seated; engine cooling system blockage. | Increase water pressure. Re-seat the flusher. If problem persists, consult an engine mechanic for cooling system inspection. |
| Hose connection leaks. | Loose connection; damaged hose washer; damaged threads. | Tighten hose connection. Replace hose washer. Inspect threads for damage. |
8. Warranty and Support
The Hoffen Universal Outboard Motor Water Flusher is designed for durability and performance. For specific warranty information, please refer to the product packaging or contact Hoffen customer support directly. Keep your purchase receipt as proof of purchase.
For further assistance or inquiries, please visit the official Hoffen website or contact their customer service department.