1. Introduction
The AAXA Technologies P2-A is a compact and versatile Android Smart LED Pico Projector designed for various applications, including business presentations, educational purposes, gaming, and home cinema. This ultra-portable device features an integrated Android operating system, Wi-Fi, and Bluetooth connectivity, allowing for direct streaming and smartphone mirroring. It supports up to 1080p resolution input and utilizes a durable LED light source.
Key features include 130 LED Lumens brightness, Vibrant Color Technology for clear images, and a built-in battery providing up to 2.5 hours of operation. Its small form factor makes it an ideal companion for on-the-go projection needs.
2. What's in the Box
Please verify that all items are present in the package:
- AAXA P2-A Smart Pico Projector
- Remote Control
- Composite AV Cable
- Power Adapter
- Mini Tripod
- User Manual
3. Product Overview
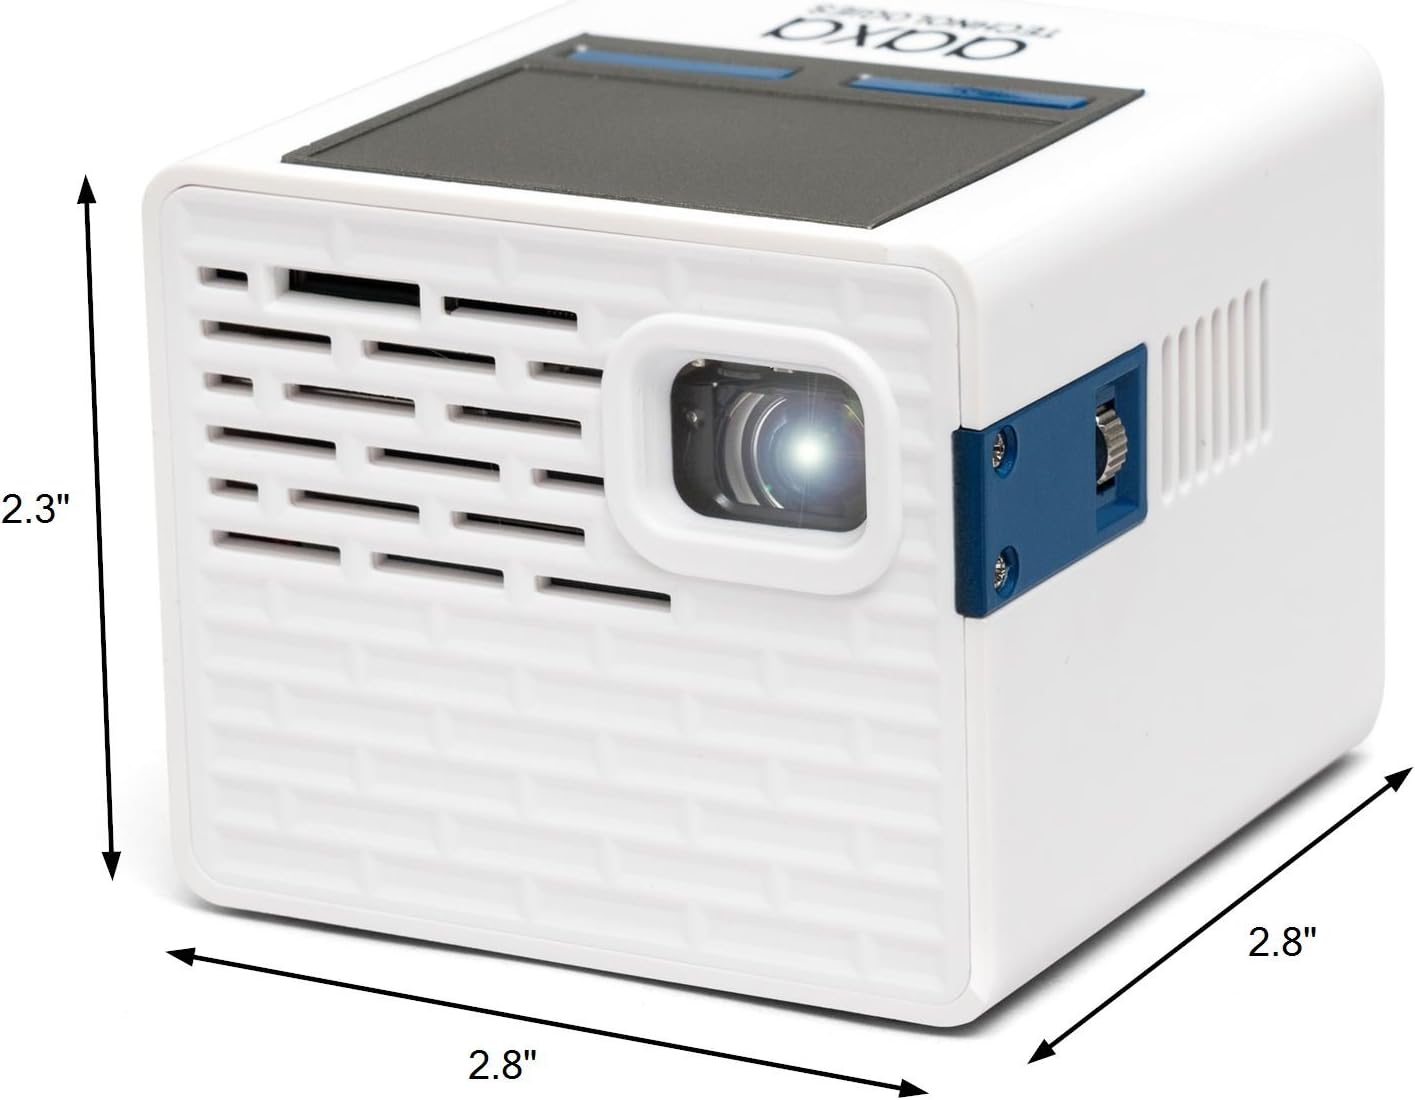
Figure 3.1: The AAXA P2-A Pico Projector, showcasing its compact dimensions of 2.8 inches by 2.8 inches by 2.3 inches.

Figure 3.2: Top view of the projector, illustrating the integrated trackpad for navigation.
The P2-A projector is designed for portability and ease of use. It features a robust set of connectivity options and an intuitive interface powered by Android.
3.1 Physical Features
- Compact Design: Small cube form factor for maximum portability.
- Integrated Trackpad: Located on the top surface for easy navigation of the Android interface.
- Focus Wheel: Manual focus adjustment for image clarity.
- Built-in Speaker: Provides audio output directly from the projector.
3.2 Connectivity Ports

Figure 3.3: Detailed diagram of the P2-A's input and output ports.
- Mini-HDMI: For connecting external video sources such as laptops, gaming consoles, and streaming devices.
- Composite A/V (3.5mm Jack): For connecting older video sources.
- USB 2.0: For connecting USB storage devices to play media directly.
- MicroSD Card Slot: For playing media from microSD cards.
- 3.5mm Audio Out: For connecting external speakers or headphones.
- DC Power Input: For connecting the power adapter to charge the device and operate it.
- MicroUSB: For firmware reflash only.
3.3 Wireless Connectivity
- Wi-Fi: Built-in Wi-Fi for internet access and streaming.
- Bluetooth: For connecting wireless audio devices like speakers or headphones.
4. Setup
4.1 Initial Charging
- Connect the provided power adapter to the DC Power input port on the projector.
- Plug the power adapter into a wall outlet.
- Allow the projector to charge fully before first use. The charging indicator light will change color (e.g., from red to green or orange to blue) when charging is complete.
4.2 Powering On/Off
- To power on, press and hold the Power Button located on the rear of the projector until the device starts.
- To power off, press and hold the Power Button until a shutdown prompt appears on the screen, then confirm. Alternatively, a quick press may initiate shutdown depending on settings.
4.3 Focus Adjustment
After powering on, adjust the focus wheel located on the side of the projector until the projected image appears sharp and clear on your screen or surface.
4.4 Wi-Fi Connection
- Navigate to the 'Settings' menu on the Android interface.
- Select 'Wi-Fi' and turn it on.
- Choose your desired Wi-Fi network from the list.
- Enter the network password if prompted and connect.

Figure 4.1: The P2-A projector positioned on its included mini tripod for stable projection.
5. Operating Instructions
5.1 Navigation
Use the integrated trackpad on the top of the projector or the provided remote control to navigate the Android interface. The trackpad functions like a mouse, allowing you to move a cursor and select items. The remote control offers direct button access for common functions.
5.2 Media Playback
The P2-A supports direct media playback from USB drives and MicroSD cards.
- Insert your USB drive into the USB 2.0 port or your MicroSD card into the MicroSD slot.
- Access the file manager application from the Android home screen.
- Browse to your media files (videos, photos, music) and select to play.
5.3 Streaming Applications

Figure 5.1: The Netflix application interface projected by the P2-A, demonstrating streaming capabilities.
With built-in Wi-Fi and Android OS, you can download and use various streaming applications directly on the projector.
- Ensure the projector is connected to a Wi-Fi network.
- Access the app store (e.g., Google Play Store or pre-installed app store) from the home screen.
- Download and install your preferred streaming applications (e.g., Netflix, YouTube).
- Launch the application and log in with your credentials to begin streaming content.
5.4 Smartphone Mirroring
The P2-A supports mirroring content from smartphones and tablets.
- For iOS devices (iPhone, iPad): Use Airplay functionality. Ensure both the projector and your iOS device are on the same Wi-Fi network. Select the projector from your device's Airplay options.
- For Android devices: Third-party Android mirroring applications may be required. Refer to the AAXA Technologies website for recommended applications and instructions.

Figure 5.2: The P2-A projecting a movie outdoors, demonstrating its versatility.
6. Maintenance
6.1 Lens Cleaning
To maintain optimal image quality, keep the projector lens clean.
- Use a soft, lint-free cloth specifically designed for optical lenses.
- Gently wipe the lens in a circular motion.
- Avoid using abrasive cleaners or excessive force, which can scratch the lens.
6.2 Ventilation
Ensure proper ventilation to prevent overheating.
- Do not block the ventilation openings on the projector.
- Operate the projector on a stable, flat surface with adequate airflow.
- Avoid placing the projector on soft surfaces like bedding or carpets that can obstruct airflow.
6.3 Battery Care
To prolong battery life:
- Avoid fully discharging the battery frequently.
- Store the projector in a cool, dry place when not in use for extended periods.
- Charge the battery periodically if stored for a long time to prevent deep discharge.
7. Troubleshooting
| Problem | Possible Cause | Solution |
|---|---|---|
| Projector does not power on | Low battery or power adapter issue | Ensure the projector is fully charged or connected to a working power outlet. Verify the power adapter is functioning correctly. |
| Image is blurry or out of focus | Focus wheel not adjusted | Rotate the focus wheel on the side of the projector until the image becomes clear. |
| No sound output | Volume too low, external audio not connected, or incorrect audio settings | Increase the volume. Check if external speakers/headphones are properly connected to the 3.5mm Audio Out or paired via Bluetooth. Verify audio output settings in the Android menu. |
| Cannot connect to Wi-Fi or Bluetooth | Incorrect settings, out of range, or network issue | Ensure Wi-Fi/Bluetooth is enabled in settings. Confirm correct network password. Move closer to the Wi-Fi router or Bluetooth device. Restart the projector and router. |
| Remote control not responding | Low battery in remote, obstructed IR sensor | Replace the batteries in the remote control. Ensure there is a clear line of sight between the remote and the projector's IR sensor. |
| Smartphone mirroring not working | Network issues, incompatible app, or device settings | Ensure both devices are on the same Wi-Fi network. For Android, verify the correct mirroring app is installed and configured. For iOS, check Airplay settings. |
8. Specifications
| Feature | Specification |
|---|---|
| Brand | AAXA Technologies |
| Model Name | P2 A |
| Model Number | KP-200-03 |
| Display Technology | DLP |
| Native Resolution | 854x480 (WVGA) |
| Maximum Display Resolution | 1920 x 1080 (1080p input support) |
| Brightness | 130 LED Lumens |
| Contrast Ratio | 1000:1 |
| Light Source Operating Life | 30,000 Hours |
| Maximum Image Size | 100 Inches |
| Minimum Throw Distance | 1 Foot |
| Maximum Throw Distance | 10 Feet |
| Connectivity Technology | Mini-HDMI, Composite A/V (3.5mm Jack), USB 2.0, MicroSD, Wireless (Wi-Fi, Bluetooth) |
| Controller Type | App Control, Remote Control |
| Battery Life | Up to 2.5 Hours (internal Lithium-ion) |
| Item Weight | 8.8 Ounces |
| External Testing Certification | CE, FCC |
9. Warranty and Support
The AAXA Technologies P2-A Pico Projector is backed by a 1-year limited manufacturer warranty. This warranty covers defects in materials and workmanship under normal use.
For technical support, warranty claims, or further assistance, please contact AAXA Technologies customer service. Contact information can typically be found on the official AAXA Technologies website or within the product packaging.
You can visit the official AAXA Technologies store for more information: AAXA Technologies Store