Introduction
Thank you for choosing the Hoover Freemotion FM18LI 2-in-1 Cordless Stick and Handheld Vacuum Cleaner. This appliance is designed for efficient and convenient cleaning of various surfaces in your home. It combines the versatility of a stick vacuum for floors with the portability of a handheld unit for smaller tasks and hard-to-reach areas. Please read this manual thoroughly before operating the appliance to ensure safe and optimal performance.
Safety Instructions
Important: Always follow basic safety precautions when using electrical appliances to reduce the risk of fire, electric shock, or injury.
- Do not use the appliance outdoors or on wet surfaces.
- Do not allow children to operate the vacuum cleaner. Close supervision is necessary when used near children.
- Do not pick up flammable or combustible materials, hot ashes, or large, sharp objects.
- Ensure the filter is correctly installed before use.
- Use only Hoover recommended attachments and replacement parts.
- Do not immerse the vacuum cleaner in water or other liquids.
- If the charging cable is damaged, it must be replaced by the manufacturer or a qualified service agent.
- Always turn off the appliance before cleaning or performing maintenance.
Product Overview
Familiarize yourself with the components of your Hoover Freemotion vacuum cleaner.

Figure 1: The Hoover Freemotion FM18LI in its full stick vacuum configuration.
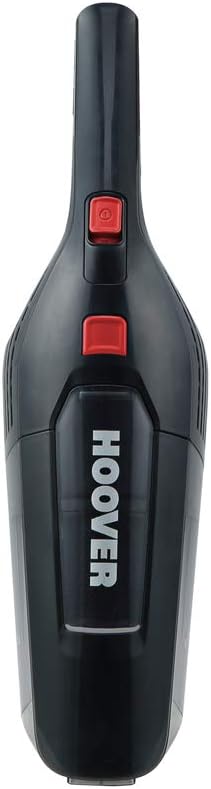
Figure 2: The detachable handheld vacuum unit, showing the dustbin and power button.

Figure 3: Example of an included accessory: a crevice tool with an integrated brush for detailed cleaning.
Main Components:
- Handheld Unit: Contains the motor, dustbin, and battery.
- Extension Wand/Stick: Connects the handheld unit to the floor nozzle.
- Floor Nozzle: Equipped with a rotating brush bar and LED lights for effective floor cleaning.
- Charger: For recharging the lithium-ion battery.
- Accessories: May include crevice tool, dusting brush, etc.
Setup
1. Assembly
To assemble your Hoover Freemotion, slide the handheld unit into the top of the extension wand until it clicks securely into place. Then, attach the floor nozzle to the bottom of the extension wand, ensuring it is also firmly connected.

Figure 4: Illustration of connecting the handheld unit to the stick for full assembly.
2. Initial Charging
Before first use, fully charge the appliance. Connect the charger to the charging port on the handheld unit and plug it into a suitable wall outlet. The charging indicator light will show the charging status. A full charge typically takes approximately 3 hours.
Operating Instructions
1. Using as a Stick Vacuum
- Ensure the vacuum is fully assembled and charged.
- Press the power button on the handheld unit to turn on the vacuum.
- Guide the floor nozzle over the surface to be cleaned. The rotating brush bar and LED lights will assist in picking up debris and illuminating dark areas.
- The vacuum features a parking position, allowing it to stand upright independently when not in use or during a pause in cleaning.
- The typical runtime on a full charge is approximately 35 minutes.

Figure 5: The vacuum's flexible design allows for easy cleaning under furniture.
2. Using as a Handheld Vacuum
- To detach the handheld unit, press the release button located where the handheld unit connects to the extension wand.
- Once detached, you can use the handheld unit for cleaning upholstery, car interiors, stairs, or other small areas.
- Attach appropriate accessories (e.g., crevice tool, dusting brush) directly to the handheld unit's nozzle for specialized cleaning tasks.
- Press the power button to operate.

Figure 6: The handheld unit being used with an attachment for targeted cleaning.
Maintenance
Regular maintenance ensures optimal performance and extends the life of your vacuum cleaner.
1. Emptying the Dustbin
- Ensure the vacuum is turned off.
- Press the dustbin release button and remove the dustbin from the handheld unit.
- Hold the dustbin over a waste bin and open the bottom flap to empty the contents.
- Reattach the dustbin securely.

Figure 7: A user demonstrating how to remove and empty the dustbin.
2. Cleaning the Filters
The Hoover Freemotion FM18LI uses EPA filters. It is recommended to clean the filters regularly, especially when suction power decreases.
- Remove the dustbin as described above.
- Carefully remove the filter assembly from the dustbin.
- Tap the filter gently over a waste bin to remove loose dust. For a more thorough clean, rinse the filter under cold running water.
- Allow the filter to air dry completely for at least 24 hours before reinserting it into the dustbin. Do not use the vacuum with a wet filter.
3. Cleaning the Brush Bar
Periodically check the brush bar in the floor nozzle for tangled hair or debris. Use scissors to cut away any tangled hair and remove it. Ensure the brush bar spins freely after cleaning.
Troubleshooting
If you encounter issues with your vacuum cleaner, refer to the following common problems and solutions:
| Problem | Possible Cause | Solution |
|---|---|---|
| Vacuum does not turn on. | Battery is discharged. | Charge the battery fully. |
| Reduced suction power. | Dustbin is full or filter is clogged. | Empty the dustbin and clean the filter. |
| Brush bar not rotating. | Obstruction in the brush bar or nozzle. | Turn off the vacuum and remove any obstructions from the brush bar or nozzle. |
| Vacuum stops during operation. | Battery is depleted or motor overheating. | Recharge the battery. If overheating, turn off and allow to cool for 30 minutes before resuming use. |
Specifications
| Brand | Hoover |
| Model Number | FM18LI (39400283) |
| Battery Type | 18V Lithium-ion |
| Runtime | Up to 35 minutes |
| Charging Time | Approximately 3 hours |
| Filter Type | EPA Cartridge |
| Product Dimensions (L x W x H) | 28.5 x 16.5 x 112.3 cm |
| Item Weight | 2.4 kg |
| Noise Level | 76 Decibels |
| Form Factor | Stick (Upright) |
| Surface Recommendation | Upholstery (with appropriate attachment) |
Warranty and Support
For information regarding warranty coverage, technical support, or to purchase replacement parts, please refer to the warranty card included with your product or visit the official Hoover website. Keep your proof of purchase for warranty claims.