Introduction
This manual provides detailed instructions for the installation, operation, maintenance, and troubleshooting of your Cisa Professional Plus Multiforce 2 Gin 4 Door Closer with Hold. Please read these instructions carefully before installation and use to ensure proper function and safety. Keep this manual for future reference.
Safety Information
- Always wear appropriate personal protective equipment (PPE) during installation, including safety glasses and gloves.
- Ensure the door and frame are structurally sound and capable of supporting the door closer.
- Do not attempt to modify the door closer. Unauthorized modifications may void the warranty and compromise safety.
- Keep children and pets away from the installation area.
- Exercise caution when adjusting the door closer, as incorrect adjustments can cause the door to close too quickly or forcefully, potentially leading to injury or damage.
Package Contents
Verify that all components are present before beginning installation:

Image: All components of the Cisa door closer, including the main closer body, the articulated arm, and various mounting screws and caps.
- Door Closer Body
- Main Arm Assembly
- Parallel Arm Bracket (if applicable)
- Mounting Screws and Fasteners
- End Cap/Cover
- Instruction Template (if included)
Setup and Installation
The Cisa door closer can be installed in various configurations (standard, top jamb, parallel arm). Refer to the dimensional drawing and your specific door type for optimal placement.
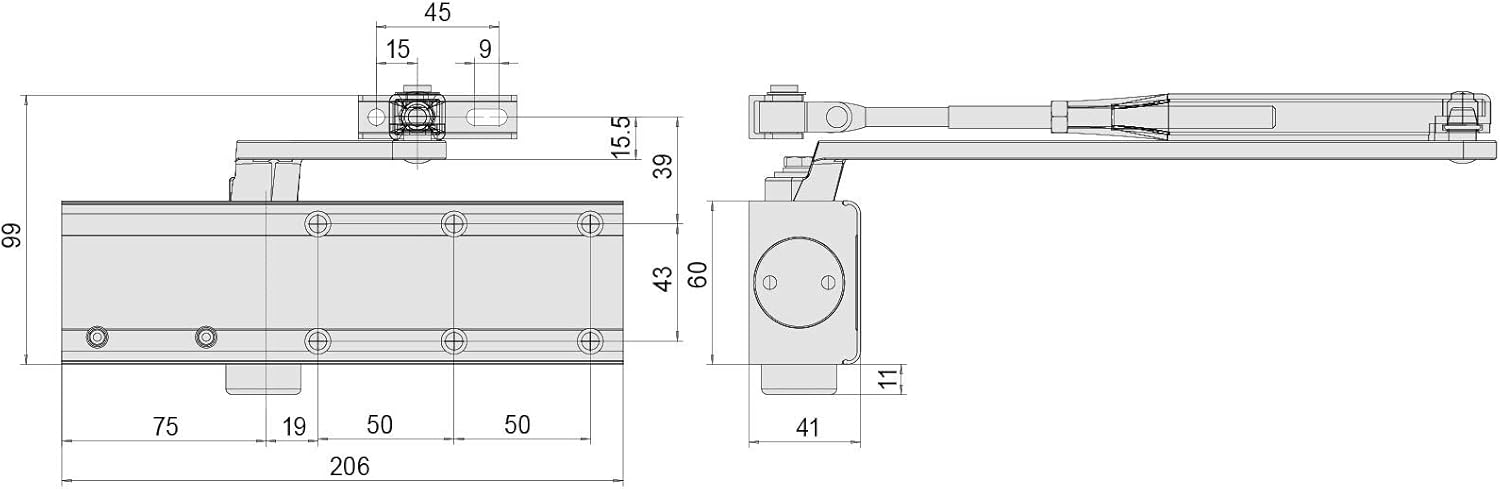
Image: Technical drawing showing the dimensions of the Cisa door closer body and arm assembly, with measurements in millimeters for precise installation.
General Installation Steps:
- Determine Mounting Position: Choose the appropriate mounting position (e.g., regular arm, top jamb, parallel arm) based on your door and frame type.
- Mark Drilling Points: Use the provided template (if available) or the dimensional drawing to accurately mark the drilling points on the door and/or frame.
- Drill Pilot Holes: Drill pilot holes at the marked positions, ensuring the correct drill bit size for your screws and door material.
- Mount Closer Body: Securely attach the door closer body to the door or frame using the provided screws. Ensure it is level and firmly fastened.
- Assemble and Attach Arm: Assemble the main arm and attach it to the closer spindle. Then, attach the shoe bracket to the door frame (for regular arm) or the door (for parallel arm).
- Connect Arm to Shoe Bracket: Connect the arm to the shoe bracket. Ensure all connections are tight.
- Adjust Arm Length: Adjust the arm length as necessary to achieve the desired opening angle and proper function.
Operating and Adjustment
The Cisa door closer allows for adjustment of closing speed, latching speed, and the hold-open function.

Image: Detail view of the Cisa door closer showing the adjustment valves labeled 'LATCHING SPEED ADJUSTING VALVE' and 'CLOSING VALVE', along with the model number.
Adjusting Closing Speed:
The closing speed (the main sweep of the door) is controlled by the 'CLOSING VALVE'.
- To decrease closing speed (slower close), turn the valve screw clockwise in small increments.
- To increase closing speed (faster close), turn the valve screw counter-clockwise in small increments.
- Test the door after each adjustment. Do not overtighten or loosen excessively.
Adjusting Latching Speed:
The latching speed (the final few degrees of closing before the door latches) is controlled by the 'LATCHING SPEED ADJUSTING VALVE'.
- To decrease latching speed (slower latch), turn the valve screw clockwise in small increments.
- To increase latching speed (faster latch), turn the valve screw counter-clockwise in small increments.
- Test the door after each adjustment. Ensure the door latches securely without slamming.
Hold-Open Function:
This model features a hold-open function. To engage the hold-open, open the door to the desired position (typically between 90-105 degrees) and the mechanism will engage. To release, simply pull the door slightly to disengage the hold-open. Specific adjustment for the hold-open angle may vary; consult the detailed diagram if provided with your specific unit for fine-tuning.
Maintenance
Regular maintenance ensures optimal performance and extends the lifespan of your door closer.
- Cleaning: Wipe the door closer body and arm with a soft, damp cloth periodically to remove dust and grime. Avoid abrasive cleaners.
- Lubrication: The internal mechanism is factory-lubricated and generally does not require additional lubrication. If squeaking or stiffness occurs in the arm joints, a small amount of silicone-based lubricant can be applied to the pivot points.
- Fastener Check: Periodically check all mounting screws and fasteners to ensure they are tight. Retighten if necessary to prevent loosening over time.
- Performance Check: Test the door closer's closing and latching speeds regularly to ensure it operates smoothly and effectively. Readjust if performance degrades.
Troubleshooting
Refer to the following table for common issues and their solutions:
| Problem | Possible Cause | Solution |
|---|---|---|
| Door closes too fast/slow | Incorrect closing speed adjustment. | Adjust the 'CLOSING VALVE' screw (see Operating and Adjustment section). |
| Door does not latch properly | Incorrect latching speed adjustment or door/frame misalignment. | Adjust the 'LATCHING SPEED ADJUSTING VALVE' screw. Check door and frame for proper alignment. |
| Door closer leaks oil | Damaged seals or internal components. | This indicates a serious issue. Contact Cisa customer support for assistance. Do not attempt to repair yourself. |
| Door closer makes excessive noise | Loose fasteners, worn arm joints, or internal issue. | Check and tighten all mounting screws. Lubricate arm joints if necessary. If noise persists, contact support. |
| Hold-open function not engaging/disengaging | Incorrect arm adjustment or internal mechanism issue. | Ensure the door opens to the correct angle for hold-open engagement. Check arm assembly for proper installation. If issues persist, contact support. |
Specifications
| Feature | Detail |
|---|---|
| Model Number | 1.C1511.03.0.90 |
| Manufacturer Part Number | 75893 |
| Brand | Cisa |
| Material | Metal |
| Colour | Matt Black |
| Exterior Finish | Matte Black |
| Item Weight | 2.3 Kilograms |
| Installation Type | Screw-In |
| Recommended Uses | Door Latch |
| Specification Met | CE |
Warranty Information
Cisa products are manufactured to high-quality standards. This product is covered by a manufacturer's warranty against defects in materials and workmanship. Specific warranty terms and duration may vary by region and purchase date. Please retain your proof of purchase for warranty claims. For detailed warranty information, refer to the documentation provided with your purchase or visit the official Cisa website.
Customer Support
If you encounter any issues not covered in this manual or require further assistance, please contact Cisa customer support:
- Online Support: Visit the official Cisa website for FAQs, product registration, and contact forms.
- Technical Assistance: Refer to the contact information provided on your product packaging or the Cisa website for technical support.
- When contacting support, please have your product model number (1.C1511.03.0.90) and proof of purchase readily available.