Introduction
This manual provides comprehensive instructions for the installation, operation, and maintenance of your MOUNTAINONE Touch Key 7 LCD RFID Password Video Door Phone Intercom System. Please read this manual carefully before installation and use to ensure proper function and longevity of the product.
The system combines multiple security and communication features, including two-way intercom, surveillance, remote unlock, hands-free calling, and access control via RFID cards, passwords, and remote control.
Product Overview
The MOUNTAINONE Video Door Phone Intercom System is designed for enhanced security and convenience in various environments such as single-family houses, villas, offices, and hotels. The kit includes an outdoor unit, an indoor monitor, and various accessories for complete functionality.
Package Contents
- 1 x Outdoor Unit with Rain Shield and Access Control System
- 1 x Indoor Unit (7" TFT LCD Monitor)
- 1 x Power Adapter (Plug)
- 1 x 6-pin Cable (5m)
- 2 x 2-pin Cables
- 1 x Mounting Plate for Indoor Unit
- 1 x Bag of Screws
- 1 x User Manual (this document)
- 5 x 125KHz RFID Cards
- 1 x Remote Control
- 1 x Electric Strike Lock
- 1 x Push Release Button

Figure 1: Complete package contents of the MOUNTAINONE Intercom System, including the outdoor unit, indoor monitor, electric strike lock, remote control, RFID cards, and various cables and mounting hardware.
Component Identification

Figure 2: The main components of the system, showing the outdoor unit with keypad and RFID reader, the indoor 7-inch LCD monitor, the electric strike lock, remote control, and RFID key fobs.

Figure 3: The 7-inch TFT LCD indoor monitor, featuring a clear display for video feed and touch-sensitive buttons for control functions.
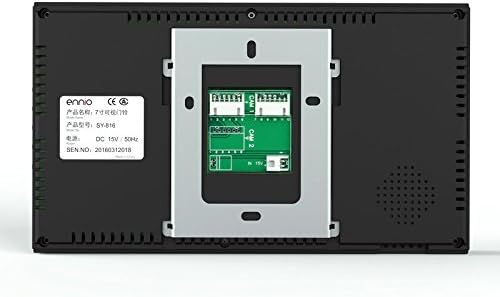
Figure 4: Rear view of the indoor monitor, showing the mounting plate and connection ports for wiring.

Figure 5: Detailed diagram of the outdoor unit, highlighting key features such as the IR LED, lens, rainproof cover, speaker, indicator LED, card reader, keyboard, microphone, and call button.
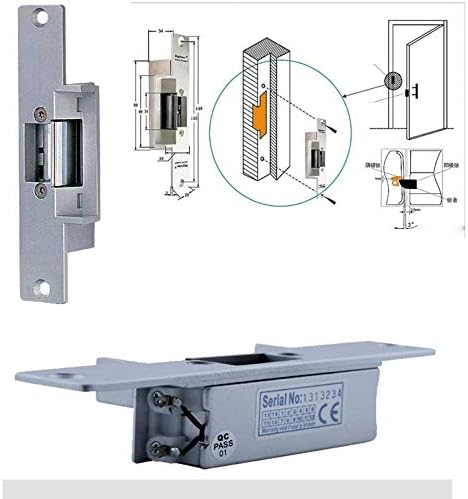
Figure 6: Technical drawing and perspective view of the electric strike lock, showing its dimensions and operational mechanism for secure door access.
Setup and Installation
Careful installation is crucial for optimal performance. It is recommended to plan your wiring path before beginning the installation process.
Wiring Diagram and Cable Requirements
The system includes necessary cables for connection. Ensure proper cable length and type are used for stable operation.

Figure 7: Wiring diagram illustrating the connections between the outdoor unit, indoor monitor, electric strike lock, and power adapter. Note the recommended wire types based on cable length.
| Cable Length | Recommended Wire Type |
|---|---|
| 1-20 meters | 6P/Use UTP net wire or 0.3 square copper wire |
| 21-50 meters | 6P/Use 0.5 square copper wire |
| 51-80 meters | 6P/Use 0.75 square copper wire |
| 81-100 meters | 6P/Use 1.0 square copper wire |
Installation Steps
- Mounting the Outdoor Unit: Choose a suitable location near your door, ensuring it is protected by the rain shield. Secure the outdoor unit using the provided screws.
- Mounting the Indoor Monitor: Install the mounting plate on an interior wall at a convenient height. The indoor monitor can then be easily attached to this plate.
- Wiring Connections:
- Connect the 6-pin cable from the outdoor unit to the indoor monitor.
- Connect the electric strike lock to the outdoor unit using the 2-pin cables. Ensure correct polarity if applicable.
- Connect the push release button to the outdoor unit.
- Connect the power adapter to the indoor monitor.
- Power On: Once all connections are secure, plug in the power adapter. The system should power on automatically.
- Initial Test: Test the intercom, video display, and unlock functions to ensure proper operation.
Operating Instructions
Basic Functions
- Two-Way Intercom: When a visitor presses the call button on the outdoor unit, the indoor monitor will ring. Answer the call to initiate two-way audio communication.
- Surveillance: Press the monitor button on the indoor unit to view the live video feed from the outdoor camera at any time.
- Unlock Function: During an intercom call or surveillance, press the unlock button on the indoor monitor to remotely open the connected electric strike lock.
- Hands-Free Call and Talk: The indoor monitor supports hands-free operation for convenience.
Access Control Features
The outdoor unit features an integrated access control system with support for RFID cards, passwords, and remote control.
- RFID Card Access: Present a programmed 125KHz RFID card to the card reader on the outdoor unit to unlock the door. The system supports up to 500 user cards.
- Password Access: Enter a pre-set password on the keypad of the outdoor unit to unlock the door.
- Remote Control Unlock: Use the provided wireless remote control to unlock the door from a distance of 6-20 meters. This is useful for granting access without needing to be at the indoor monitor.
Indoor Monitor Settings
The 7-inch TFT LCD monitor allows for adjustment of various settings:
- Volume Adjustment: Adjust the ringtone and communication volume using the dedicated controls on the side of the monitor.
- Melody Selection: Choose from 25 different melodies for the incoming call ringtone.
- Display Settings: The monitor features a 16:9 display with a resolution of 960x480 pixels, providing clear video.
Maintenance
Regular maintenance ensures the longevity and optimal performance of your intercom system.
- Cleaning: Use a soft, dry cloth to clean the indoor monitor and outdoor unit. Avoid abrasive cleaners or solvents that could damage the surfaces.
- Outdoor Unit Protection: The outdoor unit is designed with a rain shield for protection. Ensure it remains clear of debris and is securely mounted.
- Cable Inspection: Periodically check all cables for any signs of wear, damage, or loose connections. Secure or replace as necessary.
- Software Updates: While not user-serviceable, ensure the system operates on its intended firmware. Consult support if unusual behavior occurs.
Troubleshooting
This section addresses common issues you might encounter with your MOUNTAINONE intercom system.
| Problem | Possible Cause | Solution |
|---|---|---|
| No video on indoor monitor | Loose cable connection, power issue, camera malfunction. | Check all wiring connections between outdoor unit and indoor monitor. Ensure power adapter is securely plugged in. |
| No audio during intercom | Microphone/speaker issue, loose audio wiring. | Verify audio cable connections. Check volume settings on the indoor monitor. |
| Door lock not unlocking | Incorrect wiring to electric strike lock, lock malfunction, power supply issue. | Check 2-pin cable connections to the electric strike lock. Ensure the lock receives power. Verify the unlock button on the monitor is functioning. |
| RFID cards/password not working | Card not programmed, incorrect password, RFID reader malfunction. | Ensure RFID cards are properly programmed into the system. Double-check the entered password. Refer to the full user manual for programming instructions. |
| Remote control not working | Battery low/dead, out of range, remote not paired. | Replace remote control battery. Ensure you are within the 6-20 meter operating range. Check pairing instructions if applicable. |
| Poor video quality (snowy/blurry) | Cable interference, damaged cable, dirty camera lens. | Ensure cables are not running parallel to high-voltage lines. Clean the camera lens on the outdoor unit. Check cable integrity. |
Specifications
| Feature | Detail |
|---|---|
| Model Number | SY816MJIDSENO11 |
| Indoor Monitor Screen | 7" TFT LCD (16:9 display) |
| Indoor Monitor Resolution | 960 x 480 |
| Indoor Monitor Material | Plastic |
| Indoor Monitor Dimensions | 22.5 x 12.8 x 2.2 cm |
| Outdoor Unit Camera | 1/3 CMOS 1000 TVL |
| Outdoor Unit LEDs | 6 x Infrared LED lights (for night vision) |
| Outdoor Unit Viewing Angle | 92 degrees |
| Outdoor Unit Dimensions | 15.5 x 9.5 x 5.5 cm |
| RFID Card Capacity | 500 User Cards |
| Password Capacity | 1 Password |
| RFID Frequency | 125KHz |
| RFID Read Range | 10-50mm |
| Remote Control Range | 6-20 meters |
| Melodies | 25 selectable melodies |
| Power Source | Power Adapter (Plug) |
| Wattage | 10 watts |
| Connectivity Technology | Wired (Intercom), Wireless (Remote Control) |
| IP Rating | IP65 (Outdoor Unit) |
Warranty and Support
For warranty information, please refer to the terms and conditions provided at the time of purchase or contact your retailer. MOUNTAINONE products are designed for reliability and performance.
If you encounter any issues not covered in the troubleshooting section, or require further assistance, please contact MOUNTAINONE customer support through the vendor information provided with your purchase. Please have your model number (SY816MJIDSENO11) and purchase details ready when contacting support.
