
Introduction
This manual provides essential instructions for the installation, operation, maintenance, and troubleshooting of the Thinkit7 Spare Parts 03T6821 Motherboard. This motherboard is designed as a replacement or upgrade component for Lenovo ThinkCentre M92 and M92P desktop systems. Please read this manual thoroughly before proceeding with any installation or operation to ensure proper functionality and system stability.
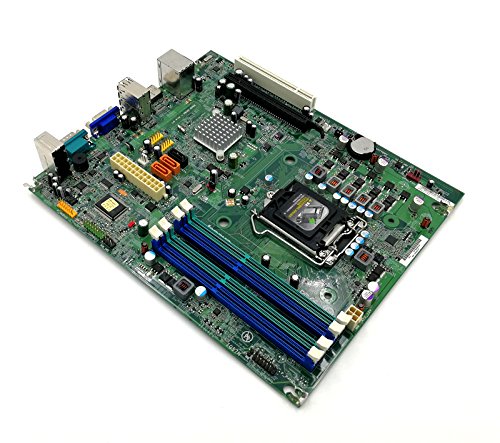
Figure 1: The Thinkit7 Spare Parts 03T6821 Motherboard. This image displays the full motherboard with its various components including the CPU socket, RAM slots, PCIe slots, and I/O ports.
Setup and Installation
Proper installation is crucial for the stability and longevity of your system. Always ensure you are working in a static-free environment and handle the motherboard by its edges to avoid damaging components.
- Preparation:
- Power off and unplug your computer from the wall outlet.
- Open the computer case and discharge any static electricity by touching a grounded metal object.
- Remove the existing motherboard, carefully disconnecting all cables and components.
- CPU Installation:
- Open the CPU socket retention lever.
- Align the CPU (LGA 1155) with the socket, ensuring the notches match. Gently place the CPU into the socket without forcing it.
- Close the retention lever to secure the CPU.
- Apply thermal paste and install the CPU cooler according to its manufacturer's instructions.
- RAM Installation:
- Locate the DDR3 memory slots (2 available).
- Open the clips at both ends of the memory slot.
- Align the RAM module with the slot, ensuring the notch on the module matches the key in the slot.
- Press down firmly on both ends of the RAM module until the clips snap into place.
- Motherboard Mounting:
- Carefully place the new motherboard into the computer case, aligning it with the standoffs.
- Secure the motherboard with screws, ensuring it is firmly seated but not overtightened.
- Cable Connections:
- Connect the 24-pin ATX power connector and the 4/8-pin CPU power connector from the power supply to the motherboard.
- Connect SATA data cables to the SATA 3 ports on the motherboard and to your storage devices (HDDs/SSDs).
- Connect front panel connectors (power button, reset button, USB ports, audio jacks, indicator LEDs) to their respective headers on the motherboard. Refer to your computer case manual for specific pin assignments.
- Install any necessary expansion cards (e.g., graphics card) into the PCIe slots and secure them.
- Final Checks:
- Double-check all connections to ensure they are secure.
- Ensure no loose screws or tools are inside the case.
- Close the computer case.
Operating Instructions
After successful installation, you can power on your system.
- Initial Boot-up:
- Plug in the power cord and connect your monitor, keyboard, and mouse.
- Press the power button on your computer case.
- The system should power on and display the manufacturer's logo or BIOS POST screen.
- BIOS/UEFI Access:
- During the initial boot sequence, repeatedly press the designated key (commonly Del, F2, or F10) to enter the BIOS/UEFI setup utility.
- In the BIOS/UEFI, you can configure boot order, system time, and other hardware settings. Save changes before exiting.
- Operating System Installation:
- If installing a new operating system (e.g., Windows 10), boot from your installation media (USB drive or DVD).
- Follow the on-screen prompts to complete the OS installation.
- Install all necessary drivers for the motherboard components (chipset, audio, network, USB) from the manufacturer's website or a provided driver disc.
Maintenance
Regular maintenance helps ensure optimal performance and extends the lifespan of your motherboard and system.
- Dust Removal:
- Periodically open your computer case and use compressed air to remove dust buildup from the motherboard, CPU cooler, and other components. Dust can impede airflow and cause overheating.
- Ensure the system is powered off and unplugged before performing any cleaning.
- BIOS/UEFI Updates:
- Check the manufacturer's website for BIOS/UEFI updates. Updates can improve compatibility, stability, and performance.
- Follow the specific update instructions provided by the manufacturer carefully, as an improper update can render the motherboard inoperable.
- Driver Updates:
- Keep your motherboard chipset, audio, network, and other device drivers updated. Outdated drivers can lead to performance issues or instability.
- Download drivers only from official sources (e.g., Lenovo support website for ThinkCentre M92/M92P components or chipset manufacturer).
Troubleshooting
If you encounter issues, refer to the following basic troubleshooting steps:
- No Power/No POST (Power-On Self-Test):
- Ensure all power cables (24-pin ATX and 4/8-pin CPU) are securely connected to the motherboard and power supply.
- Verify the power supply is functioning correctly.
- Check that the front panel power button connector is correctly attached to the motherboard.
- Try booting with only essential components (CPU, one RAM stick, CPU cooler) to isolate the issue.
- No Display:
- Ensure your monitor is connected to the correct video output port (either integrated graphics on the motherboard or a dedicated graphics card).
- Verify that the RAM modules are properly seated in their slots. Try reseating them or testing with one stick at a time.
- If using a dedicated graphics card, ensure it is fully seated in its PCIe slot and any required auxiliary power cables are connected.
- System Instability/Crashes:
- Check CPU and GPU temperatures to ensure they are not overheating.
- Run memory diagnostic tools to check for faulty RAM.
- Ensure all drivers are up to date.
- Consider resetting the BIOS to default settings. This can usually be done within the BIOS menu or by clearing the CMOS (refer to the motherboard's specific instructions for clearing CMOS, often involving a jumper or removing the CMOS battery).
- Peripheral Issues (USB, Audio, Network):
- Ensure relevant drivers are installed and up to date.
- Check BIOS settings to ensure the ports/devices are enabled.
- Verify physical connections for front panel headers.
Specifications
Key technical specifications for the Thinkit7 Spare Parts 03T6821 Motherboard:
| Feature | Specification |
|---|---|
| Manufacturer | Thinkit7 Spare Parts |
| Model Number | 03T6821 |
| Compatible Systems | Lenovo ThinkCentre M92, M92P |
| CPU Socket | LGA 1155 |
| RAM Memory Technology | DDR3 |
| Memory Slots Available | 2 |
| Max Memory Storage Capacity | 8 GB (typical for this era, check system manual for exact max) |
| System Bus Standard Supported | SATA 3 |
| Number of USB 2 Ports | 6 |
| ASIN | B072KS676B |
| UPC | 781903150640 |
Note: Maximum memory capacity may vary based on specific CPU and memory module configurations. Refer to your system's official documentation for precise details.
Warranty Information
Specific warranty terms for the Thinkit7 Spare Parts 03T6821 Motherboard are provided by the seller at the time of purchase. Please retain your proof of purchase for any warranty claims.
For detailed warranty coverage, duration, and procedures, please contact the retailer or Thinkit7 Spare Parts directly.
Support
If you require technical assistance or have questions not covered in this manual, please contact the following resources:
- Seller/Retailer: For purchase-related inquiries, returns, or initial technical support.
- Thinkit7 Spare Parts: For manufacturer-specific technical support or product information.
- Lenovo Support: For system-level documentation and drivers related to the ThinkCentre M92/M92P chassis and compatible components.
When contacting support, please have your motherboard model number (03T6821) and system details readily available.