Introduction
This manual provides detailed instructions for the installation, configuration, and operation of your Biostar H110MHC motherboard. Please read this manual thoroughly before beginning the installation process to ensure proper setup and to prevent damage to your components.
The Biostar H110MHC motherboard supports 7th and 6th Generation Intel Core processors, offering a reliable foundation for your personal computer system.
Setup and Installation
Follow these steps carefully to install your Biostar H110MHC motherboard and its components.
1. Motherboard Overview
Familiarize yourself with the layout of the motherboard before installation. This image highlights key components and connectors.

Image: Top-down view of the Biostar H110MHC motherboard, illustrating the LGA 1151 CPU socket, two DDR4 DIMM slots, PCI-E x16 slot, and various headers.
2. CPU Installation
- Locate the LGA 1151 CPU socket on the motherboard.
- Open the CPU socket lever and lift the load plate.
- Carefully align the notches on your 7th or 6th Generation Intel Core processor with the socket. Do not force the CPU into place.
- Lower the load plate and secure it with the lever.
- Apply thermal paste to the CPU and install the CPU cooler according to its manufacturer's instructions.
3. Memory (RAM) Installation
- Identify the two DDR4 DIMM slots.
- Open the clips at both ends of the memory slot.
- Align the notch on the DDR4 memory module with the key in the DIMM slot.
- Insert the memory module firmly into the slot until the clips snap into place. Ensure both clips are closed.
- The motherboard supports up to 32GB of DDR4 2400/2133/1866 MHz memory.
4. Storage Device Installation (SATA)
- Locate the four SATA3 6Gb/s connectors on the motherboard.
- Connect one end of a SATA data cable to a SATA connector on the motherboard.
- Connect the other end of the SATA data cable to your SATA hard drive or solid-state drive.
- Connect a SATA power cable from your power supply unit (PSU) to the storage device.
5. Expansion Card Installation
- The motherboard features one PCI-E x16 3.0 slot and two PCI-E x1 2.0 slots.
- Align your expansion card (e.g., graphics card) with the appropriate slot.
- Press the card firmly into the slot until it is fully seated.
- Secure the card with a screw to the chassis.
6. Connecting Peripherals and Front Panel
Connect your case's front panel connectors (power button, reset button, USB ports, audio jacks, indicator LEDs) to the corresponding headers on the motherboard. Refer to the motherboard diagram for exact header locations.
- USB 3.0 Header: 1 x USB 3.0 Header (supports 2 ports)
- USB 2.0 Headers: 2 x USB 2.0 Headers (each supports 2 ports)
- Front Audio Header: For case front audio jacks.
- Front Panel Header: For power button, reset button, power LED, HDD LED.
- Fan Headers: 1 x CPU Fan Header, 1 x System Fan Header.
- Serial Header: 1 x Serial Header.
7. Rear I/O Panel Connections
Connect your external peripherals to the ports on the rear I/O panel.
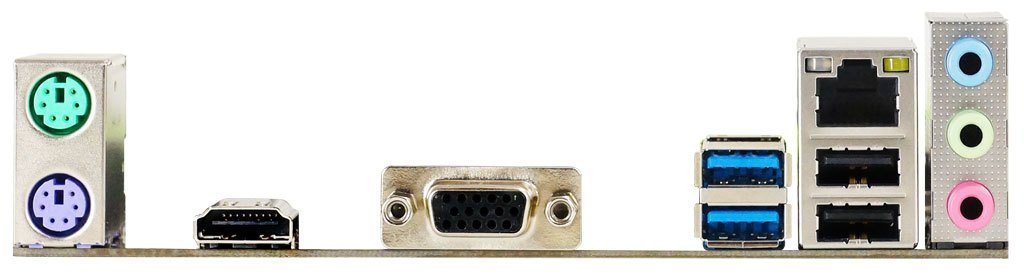
Image: Rear I/O panel of the Biostar H110MHC motherboard, featuring PS/2 ports for mouse and keyboard, USB 3.0 and USB 2.0 ports, HDMI, VGA, RJ-45 LAN, and audio jacks.
- PS/2 Ports: 1 x PS/2 Mouse, 1 x PS/2 Keyboard.
- USB Ports: 2 x USB 3.0, 2 x USB 2.0.
- Video Outputs: 1 x HDMI (up to 3840x2160 @30Hz), 1 x VGA (up to 1920x1200 @60Hz).
- LAN Port: 1 x RJ-45 (Realtek RTL8111H - 10/100/1000 Controller).
- Audio Jacks: 3 x Audio Connectors (Realtek ALC887 8-Channel HD Audio).
Operating Instructions
Initial Power On
- After all components are securely installed and connected, ensure your power supply unit (PSU) is switched on.
- Press the power button on your computer case.
- The system should power on, and you should see a display on your monitor.
Accessing BIOS/UEFI Setup
To access the BIOS/UEFI setup utility, press the DEL key repeatedly during the initial boot sequence (immediately after powering on). The BIOS allows you to configure system settings, boot order, and monitor hardware status.
Operating System Installation
Once the hardware is set up, you can proceed with installing your preferred operating system (e.g., Windows, Linux). You may need to configure the boot order in the BIOS to boot from a USB drive or optical disc containing the OS installer.
Maintenance
Dust Removal
Regularly clean the inside of your computer case to prevent dust buildup, which can lead to overheating and reduced component lifespan. Use compressed air to gently remove dust from fans, heatsinks, and other components.
Driver Updates
Keep your motherboard drivers (chipset, LAN, audio, etc.) updated to ensure optimal performance and compatibility. Visit the official Biostar website for the latest driver downloads for the H110MHC model.
BIOS/UEFI Updates
BIOS/UEFI updates can provide performance improvements, bug fixes, and support for new hardware. Exercise caution when updating the BIOS/UEFI; follow the instructions provided by Biostar precisely. Incorrect updates can render your motherboard inoperable.
Troubleshooting
This section addresses common issues you might encounter during setup or operation.
No Power / System Does Not Boot
- Ensure the power supply unit (PSU) is connected to the motherboard (24-pin ATX and 8-pin CPU power connectors) and switched on.
- Verify that the front panel power button connector is correctly attached to the motherboard's front panel header.
- Check if the CPU is properly seated and the CPU cooler is installed correctly.
- Test with a different power supply if possible.
No Display Output
- Ensure your monitor is connected to the correct video output (HDMI or VGA on the motherboard, or your dedicated graphics card).
- Verify that the graphics card (if installed) is properly seated in its PCI-E slot and has adequate power connected.
- Reseat the RAM modules. Incorrectly seated RAM is a common cause of no display.
- Try booting with only one RAM stick installed.
Peripherals Not Detected
- Check USB connections for external devices.
- Ensure SATA data and power cables are securely connected for storage devices.
- Verify that front panel USB and audio headers are correctly connected to the motherboard.
- Install the latest chipset and USB drivers from the Biostar website.
Specifications
| Feature | Detail |
|---|---|
| Chipset | Intel H110 |
| CPU Support | 7th & 6th Gen Intel Core i7/i5/i3/Pentium/Celeron LGA 1151 Processors (Max TDP: 91W) |
| Memory | 2 x DDR4 DIMM Slots, Dual Channel, 2400/2133/1866 MHz, Max. 32GB |
| Expansion Slots | 1 x PCI-E x16 3.0 Slot, 2 x PCI-E x1 2.0 Slots |
| Storage | 4 x SATA3 6Gb/s Connectors |
| USB | Rear: 2 x USB 3.0, 2 x USB 2.0; Internal: 1 x USB 3.0 Header, 2 x USB 2.0 Headers |
| LAN | Realtek RTL8111H - 10/100/1000 Controller |
| Integrated Video | By CPU model, Supports DX12, HDCP |
| Audio | Realtek ALC887 8-Channel HD Audio |
| Rear I/O Ports | 1 x PS/2 Mouse, 1 x PS/2 Keyboard, 2 x USB 3.0, 2 x USB 2.0, 1 x HDMI, 1 x VGA, 1 x RJ-45, 3 x Audio Connectors |
| Internal I/O Headers | 1 x USB 3.0 Header, 2 x USB 2.0 Headers, 4 x SATA3 6Gb/s, 1 x Front Audio Header, 1 x Front Panel Header, 1 x CPU Fan Header, 1 x System Fan Header, 1 x Serial Header |
| Dimensions | 20 x 20 x 18 cm (approximate, based on product dimensions) |
| Weight | 620 g |
Warranty Information
The Biostar H110MHC motherboard comes with a 3-year warranty. This warranty is provided directly by authorized Biostar Service Centers in India. Please retain your proof of purchase for warranty claims.
For detailed warranty terms and conditions, or to locate a service center, please refer to the official Biostar website or contact their customer support.
Technical Support
If you encounter issues that cannot be resolved using the troubleshooting steps in this manual, please visit the official Biostar support website for further assistance. You can find drivers, FAQs, and contact information for technical support there.
It is recommended to have your motherboard model (H110MHC) and serial number ready when contacting support.


