1. Product Overview
The CalFlor UniTrim is a versatile 3-in-1 waterproof floor molding designed to provide seamless transitions between various flooring types and heights. It functions as a T-molding, a reducer, and an end cap, making it suitable for laminate, WPC, LVT, and vinyl flooring installations. This molding is engineered for durability with a high wear-resistant aluminum oxide laminate surface and a PVC core, ensuring long-lasting performance in residential and commercial settings.
The UniTrim system includes the molding, a track, and a shim, allowing for flexible installation across different floor thicknesses up to 1/4 inch (6.35mm).

Image 1: Detailed view of the UniTrim molding's gray wood grain texture.
2. Components and Specifications
Each CalFlor UniTrim package includes the following components:
- Molding: The main transition piece.
- Track: A channel designed to secure the molding.
- Shim: An additional piece used to adjust height for certain installations.
Product Dimensions and Materials:
- Molding: 1/4 inch (6.35mm) thick x 2 inches (50.8mm) wide x 94 inches (238.76cm) long
- Track: 3/16 inch (4.76mm) thick x 9/16 inch (14.29mm) wide x 94 inches (238.76cm) long
- Shim: 1/8 inch (3.175mm) thick x 9/16 inch (14.29mm) wide x 94 inches (238.76cm) long
- Surface Material: High Wear Resistant Aluminum Oxide Laminate
- Core Material: PVC
- Track Material: Cold Roll Steel

Image 2: Technical diagram illustrating the dimensions of the UniTrim molding and UniTrack components.
3. Installation Instructions
The CalFlor UniTrim is designed for easy installation and can be configured in three primary ways depending on your flooring needs. Always ensure the subfloor is clean, dry, and level before installation. For optimal results, allow the molding to acclimate to room temperature for at least 24 hours prior to installation.
General Installation Steps:
- Measure the length of the transition area and cut the UniTrim molding, track, and shim (if applicable) to the required size using a fine-tooth saw.
- Clean the subfloor area where the track will be installed.
- Apply a suitable construction adhesive to the underside of the track.
- Position the track centrally over the expansion gap between the two flooring surfaces. Ensure it is straight and firmly pressed down.
- Allow the adhesive to cure according to the manufacturer's instructions.
- Once the track is securely in place, align the UniTrim molding over the track and firmly press or tap it down until it clicks into place.
Specific Applications for Floors Up To 1/4" (6.35mm) Thick:
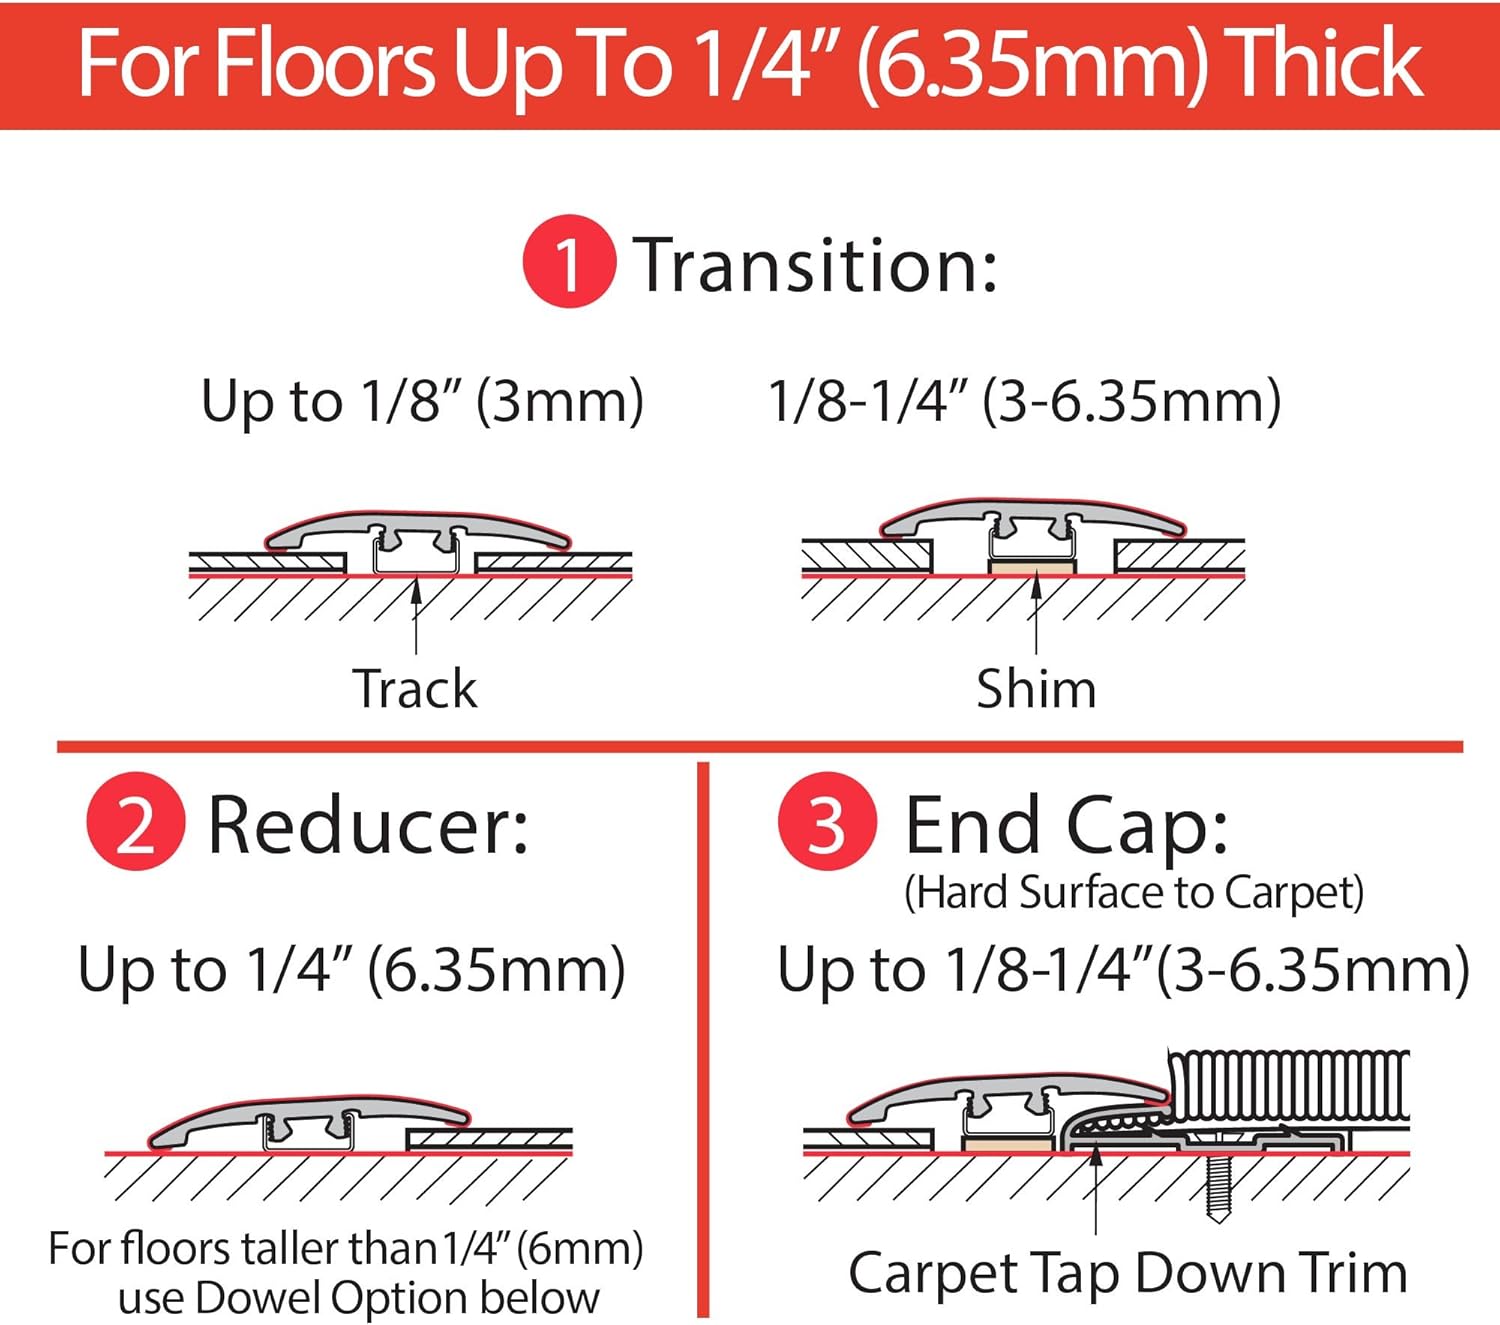
Image 3: Visual guide for UniTrim installation methods for various floor thicknesses and types.
3.1. Transition (T-Molding)
Use this configuration to join two flooring surfaces of the same or similar height.
- For floors up to 1/8 inch (3mm) thick: Use the UniTrim molding and the UniTrack alone. The molding will snap directly into the track.
- For floors between 1/8 inch and 1/4 inch (3-6.35mm) thick: Use the UniTrim molding, the UniTrack, and the UniTrack Shim. Place the shim inside the track before snapping the molding into place to achieve the correct height.
3.2. Reducer
Use this configuration to transition from a higher flooring surface to a lower one, typically for floors up to 1/4 inch (6.35mm) thick.
- For floors up to 1/4 inch (6.35mm) thick: Use the UniTrim molding and the UniTrack alone. The molding's profile is designed to create a smooth slope from the higher floor to the lower floor.
3.3. End Cap
Use this configuration to finish a flooring edge, such as where hard surface flooring meets carpet or a wall.
- For hard surface to carpet (floors up to 1/8-1/4 inch (3-6.35mm) thick): Use the UniTrim molding, the UniTrack, and the UniTrack Shim. The shim helps to elevate the molding to the correct height relative to the hard surface, providing a clean edge against the carpet.
Important Note: For floors taller than 1/4 inch (6mm), an optional dowel installation method may be required. Consult a professional or refer to advanced installation guides for such scenarios.
4. Care and Maintenance
To ensure the longevity and appearance of your CalFlor UniTrim molding, follow these simple care and maintenance guidelines:
- Cleaning: Regularly clean the molding with a damp cloth and a mild, pH-neutral cleaner. Avoid abrasive cleaners, harsh chemicals, or scouring pads, as these can damage the surface finish.
- Spills: Wipe up spills immediately to prevent staining or water damage, especially in high-moisture areas.
- Protection: While the UniTrim is designed to be wear-resistant, avoid dragging heavy furniture or objects across it, which could cause scratches or dents.
- Inspection: Periodically inspect the molding for any signs of wear or damage. Ensure it remains securely attached to the floor.
5. Troubleshooting
If you encounter issues during or after installation, consider the following common troubleshooting tips:
- Molding not snapping into track:
- Ensure the track is properly aligned and free of debris.
- Verify that the correct shim (if any) is used for the floor thickness.
- Apply even pressure along the length of the molding. A rubber mallet can be used gently to tap it into place.
- Gaps between molding and floor:
- Check if the subfloor is level. Uneven subfloors can cause gaps.
- Confirm the correct shim is used for the specific floor thickness.
- Ensure the track is securely adhered and not lifting.
- Molding appears loose:
- Re-check the adhesive bond of the track to the subfloor.
- Ensure the molding is fully engaged with the track.
- If the issue persists, the track or molding may need to be reinstalled.
For persistent issues or complex installations, it is recommended to consult with a professional flooring installer.
6. Warranty Information
Specific warranty details for the CalFlor UniTrim MD10011 are typically provided with the product packaging or can be obtained directly from the manufacturer, CalFlor. Please retain your proof of purchase for any warranty claims. Generally, warranties cover manufacturing defects and material integrity under normal use conditions. Damage resulting from improper installation, misuse, or neglect is typically not covered.
7. Customer Support
For further assistance, technical questions, or to report any issues with your CalFlor UniTrim product, please contact CalFlor customer support. Refer to the product packaging for the most current contact information, including phone numbers or website details.
You may also visit the official CalFlor website for additional resources, FAQs, and product information.
CalFlor Website: Visit the CalFlor Store on Amazon