1. Introduction
Thank you for choosing the Mirkit Baofeng UV-5R MK4 8W Max Power Two Way Radio. This manual provides essential information for the safe and efficient operation of your device. Please read it thoroughly before use and retain it for future reference.
2. Safety Information
This device complies with part 15 of the FCC Rules. FCC ID: 2AJGM-UV5R. Operation is subject to the condition that this device does not cause harmful interference.
- Do not operate the radio in explosive atmospheres (e.g., flammable gases, dust particles, metallic powders).
- Do not expose the radio to direct sunlight for extended periods or place it near heating appliances.
- Use only Mirkit-approved batteries and chargers.
- Keep the radio away from medical devices to avoid interference.
- Ensure the antenna is properly connected before transmitting to prevent damage to the radio.
3. Package Contents
The Mirkit Baofeng UV-5R MK4 kit includes the following items:
- Mirkit Baofeng UV-5R MK4 Two Way Radio
- 1800mAh Li-ion Battery
- Desktop Charger
- Power Adapter
- Antenna
- Belt Clip
- Hand Strap/Lanyard
- Earpiece
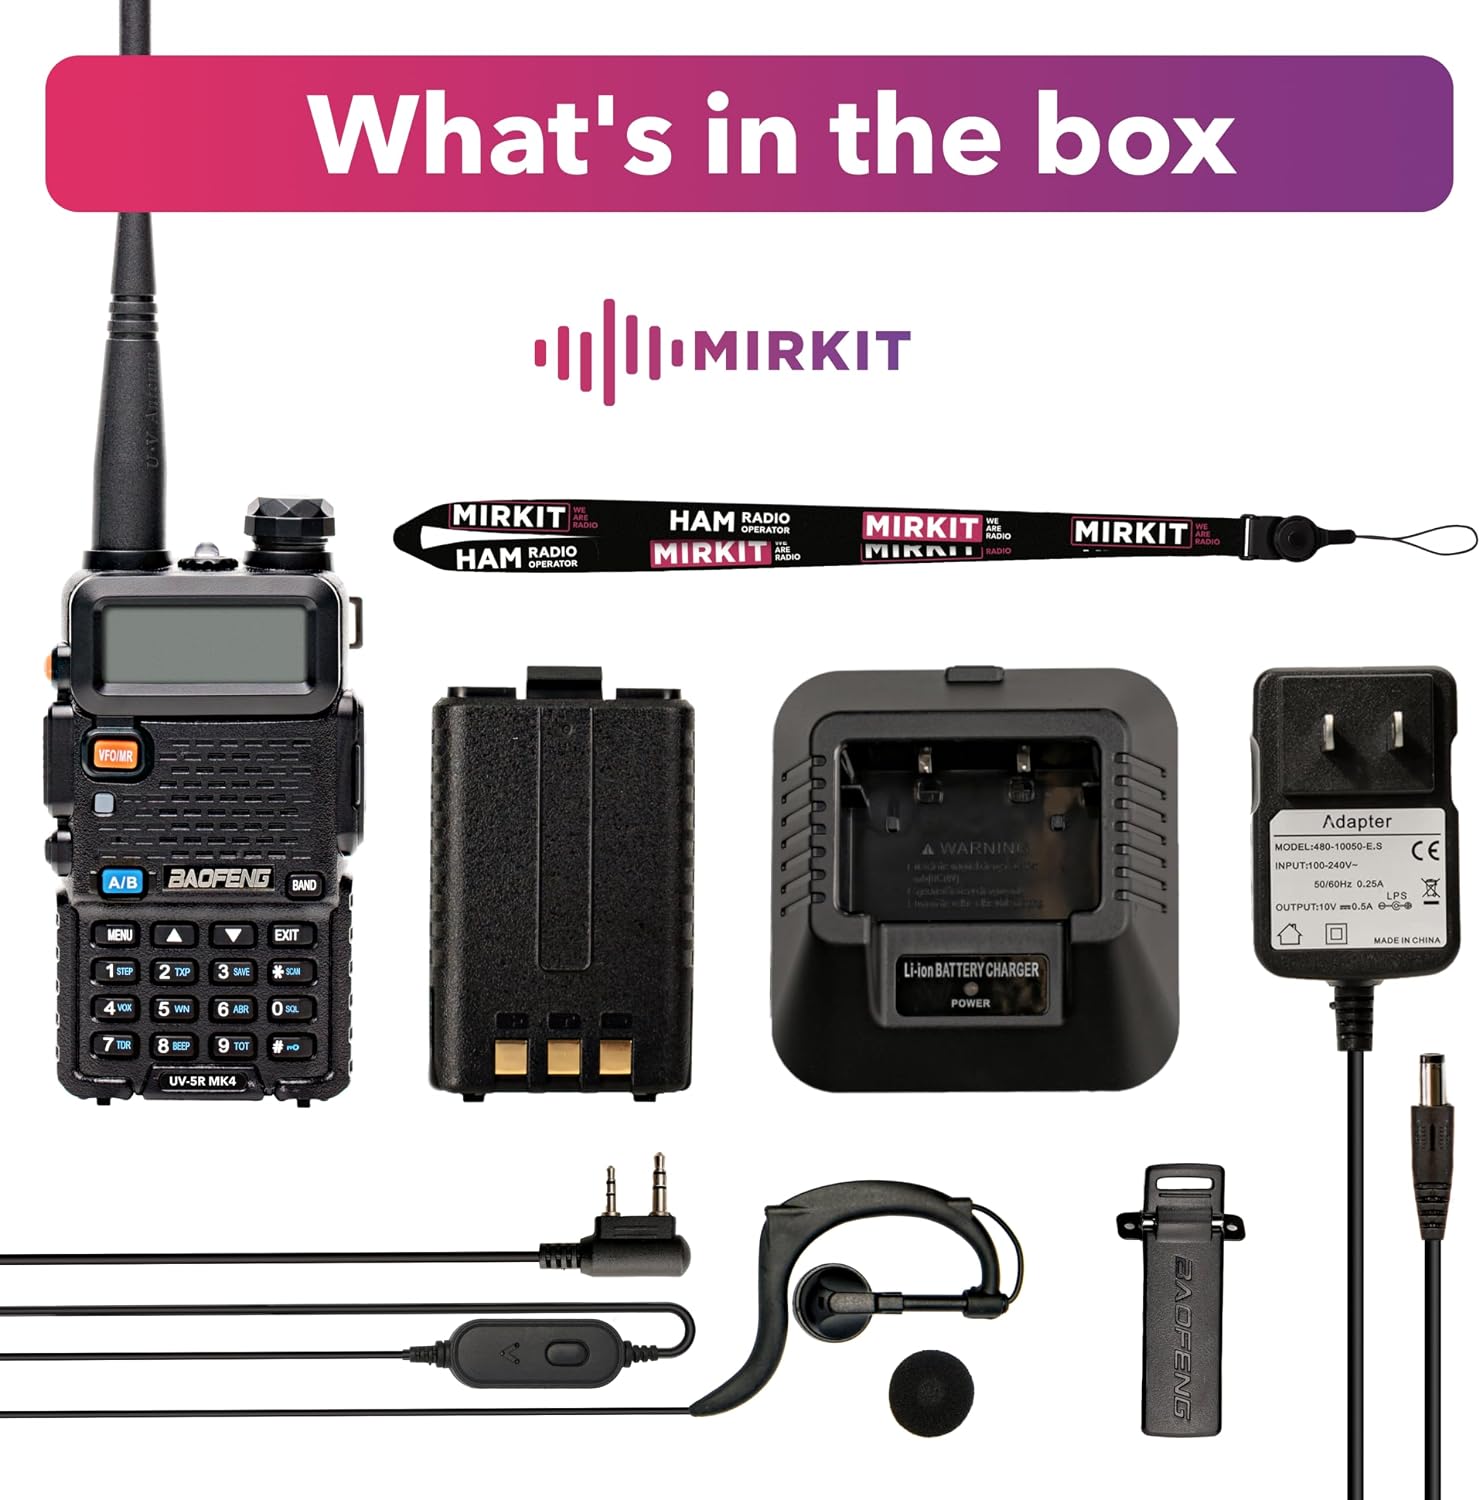
This image displays the Mirkit Baofeng UV-5R MK4 radio, its 1800mAh battery, a desktop charging cradle, a power adapter, an antenna, a belt clip, a lanyard, and an earpiece, illustrating all items typically found in the product package.
4. Product Overview
The Mirkit Baofeng UV-5R MK4 is an 8W Max Power dual-band VHF/UHF two-way radio designed for reliable communication. It features a robust design, an 1800mAh battery, and various functions for enhanced usability.

This image shows the front of the Mirkit Baofeng UV-5R MK4 two-way radio, highlighting its display, keypad, and main controls.
4.1 Key Features
- 8W Max Power Output
- VHF (144-148 MHz) and UHF (420-450 MHz) Dual Band Operation
- 128 Channels
- 50 CTCSS / 104 CDCSS Tones
- 1800mAh Li-ion Battery
- Auto Keypad Lock
- Dual Frequency Display and Dual Standby
4.2 Controls and Functions
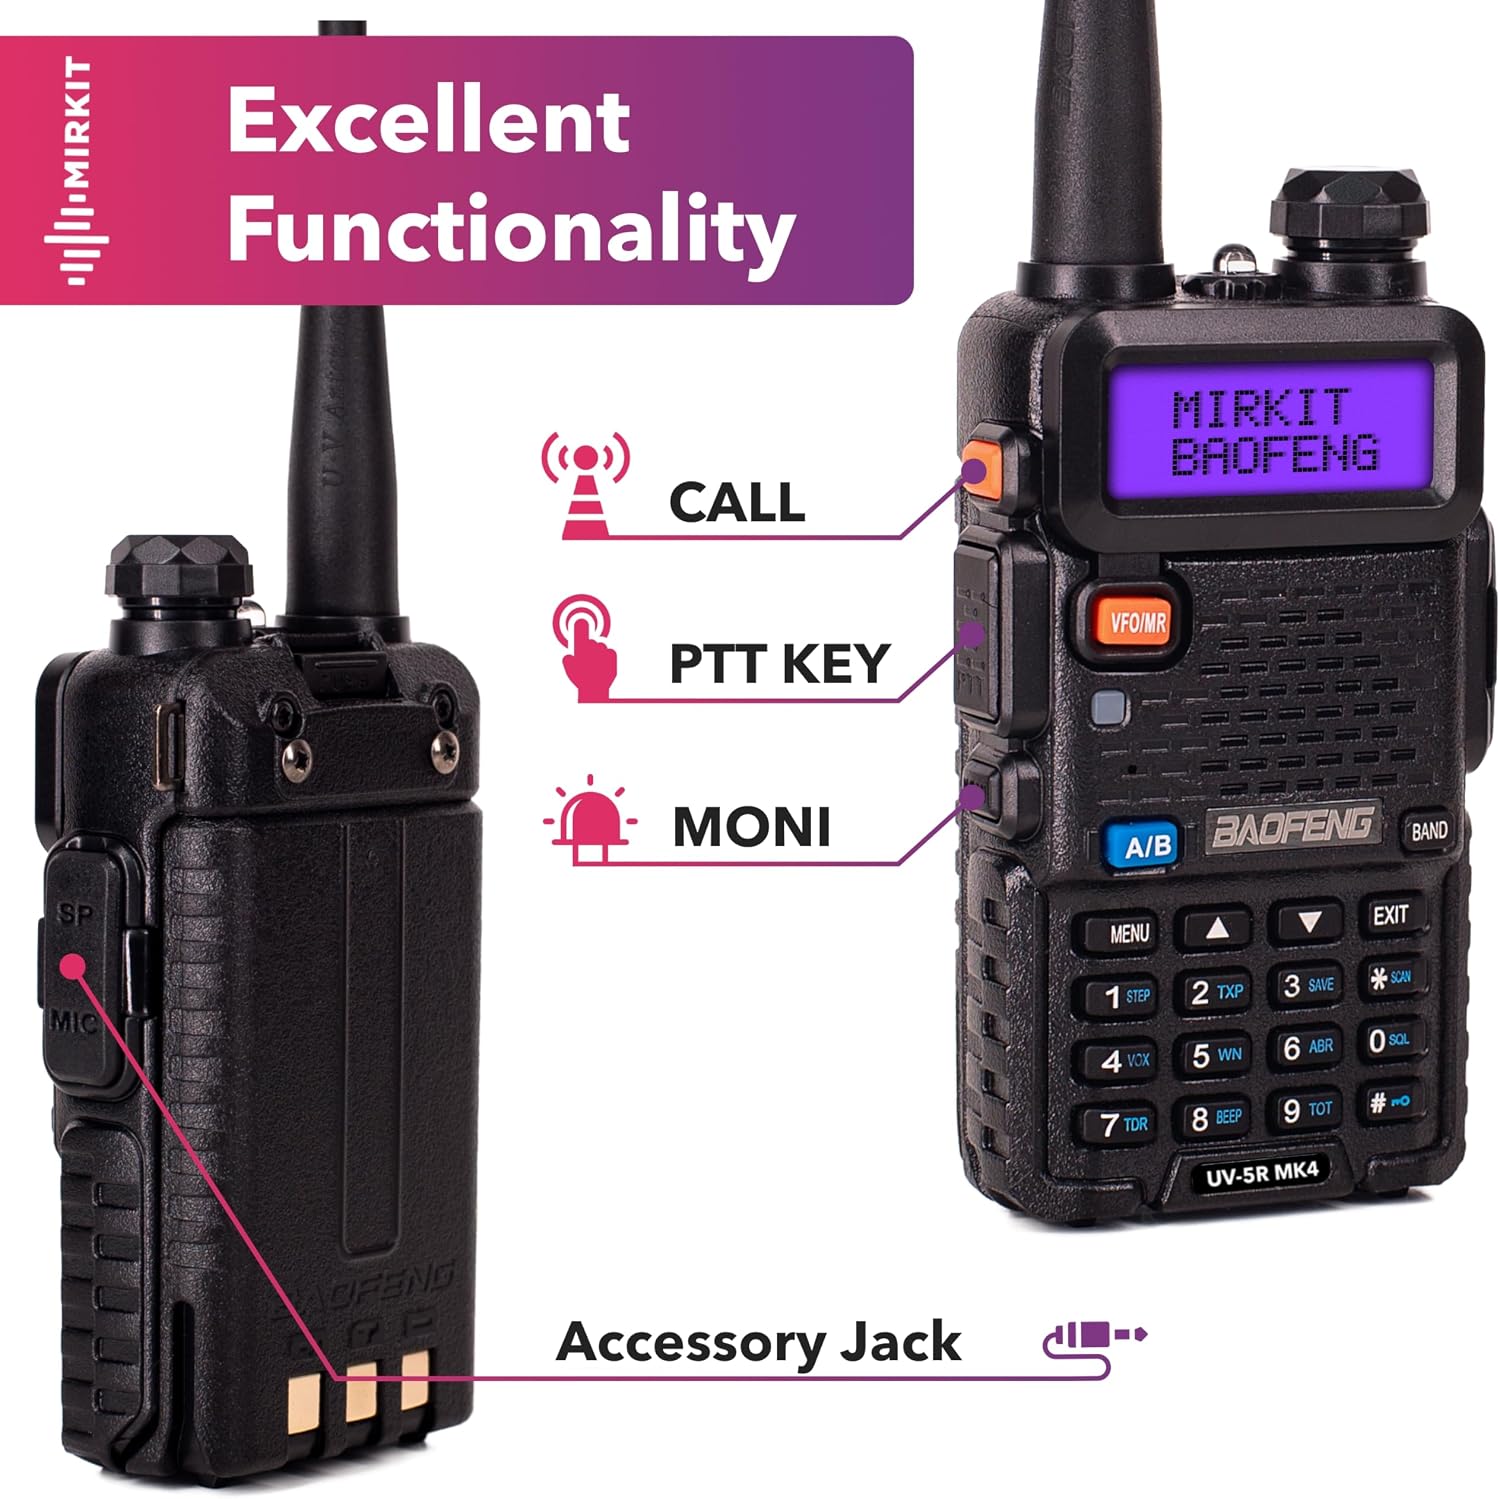
This image illustrates the key controls on the Mirkit Baofeng UV-5R MK4 radio, including the CALL button, Push-To-Talk (PTT) key, MONI (Monitor) button, and the accessory jack for external devices like earpieces or programming cables.
- PTT (Push-To-Talk) Key: Press and hold to transmit, release to receive.
- CALL Button: Initiates a call or activates a specific function depending on programming.
- MONI Button: Opens the squelch to listen for weak signals or monitor a channel without squelch.
- VFO/MR Button: Toggles between Frequency Mode (VFO) and Channel Mode (MR).
- BAND Button: Switches between VHF and UHF bands.
- MENU Button: Enters the menu system for settings adjustments.
- EXIT Button: Exits the current menu or function.
- Keypad: Used for direct frequency input, channel selection, and menu navigation.
- Accessory Jack: For connecting external audio accessories (earpiece, speaker mic) or programming cable.
5. Setup
5.1 Battery Installation
- Align the battery pack with the grooves on the back of the radio.
- Slide the battery upwards until it clicks into place.
- To remove, press the battery release latch (usually at the bottom of the battery) and slide the battery downwards.

This image shows the Mirkit Baofeng UV-5R MK4 radio alongside its 1800mAh Li-ion battery, illustrating the battery's design and how it attaches to the radio.
5.2 Charging the Battery
Before initial use, fully charge the battery. The 1800mAh battery ensures extended operation.
- Connect the power adapter to the desktop charger.
- Plug the power adapter into an AC outlet.
- Place the radio with the battery installed (or just the battery) into the charging cradle.
- The charger's LED indicator will show charging status (typically red for charging, green for fully charged).
5.3 Attaching the Antenna
Screw the antenna clockwise onto the connector on top of the radio until it is finger-tight. Do not overtighten.
5.4 Attaching the Lanyard
Attach the provided lanyard to the designated loop on the radio for secure carrying and to prevent accidental drops.

This image shows the Mirkit Baofeng UV-5R MK4 radio with a black lanyard attached, emphasizing the secure locking mechanism of the strap.
6. Operating Instructions
6.1 Power On/Off and Volume
Rotate the power/volume knob (located on top of the radio) clockwise to power on and increase volume. Rotate counter-clockwise to decrease volume and power off.
6.2 Mode Selection (VFO/MR)
Press the VFO/MR button to switch between:
- Frequency Mode (VFO): Allows direct frequency input and scanning.
- Channel Mode (MR): Allows selection of pre-programmed channels.
6.3 Band Selection
Press the BAND button to toggle between VHF (144-148 MHz) and UHF (420-450 MHz) frequency bands.
6.4 Channel Programming
Channels can be programmed manually via the keypad or using programming software (e.g., CHIRP) and a compatible programming cable. Mirkit also offers special firmware with a channel list upon request.
- Enter Frequency Mode (VFO).
- Input the desired frequency using the keypad.
- Access the menu to save the frequency to a channel memory location. Refer to the full user manual (PDF) for detailed menu navigation.
6.5 Dual Watch / Dual Standby
The radio supports monitoring two different frequencies (A/B display) simultaneously. It will automatically switch to the active frequency when a signal is detected.
6.6 CTCSS/CDCSS Tones
Continuous Tone-Coded Squelch System (CTCSS) and Digital Coded Squelch (CDCSS) are used to filter out unwanted signals. These can be set in the radio's menu for both transmit and receive.
7. Maintenance
- Cleaning: Use a soft, damp cloth to clean the radio's surface. Do not use harsh chemicals or solvents.
- Battery Care: Avoid overcharging or fully discharging the battery frequently. Store the battery in a cool, dry place when not in use.
- Antenna: Regularly check the antenna for damage. A damaged antenna can reduce performance and potentially harm the radio.
- Storage: If storing the radio for an extended period, remove the battery.
8. Troubleshooting
| Problem | Possible Cause | Solution |
|---|---|---|
| Radio does not power on | Battery discharged or not installed correctly | Charge battery, ensure proper installation |
| Cannot transmit or receive | Incorrect frequency/channel, squelch too high, antenna loose | Verify frequency/channel, adjust squelch, check antenna connection |
| Poor audio quality | Low battery, weak signal, damaged earpiece/speaker | Charge battery, move to better signal area, test with different accessory |
| Keypad locked | Auto Keypad Lock activated | Press # key for 2 seconds to unlock (default setting) |
9. Specifications
| Feature | Specification |
|---|---|
| Model Number | UV-5RMK4 |
| Frequency Range | VHF 144-148 MHz / UHF 420-450 MHz |
| Output Power | 8W (High/Med/Low selectable) |
| Number of Channels | 128 |
| Battery Type | 1800mAh Lithium Ion (included) |
| Voltage | 7.4 Volts |
| Dimensions | 8 x 4 x 5 inches |
| Item Weight | 7 ounces (0.2 Kilograms) |
| Water Resistance Level | Water Resistant |
| FCC ID | 2AJGM-UV5R |
10. Warranty and Support
Mirkit provides a 1-year 100% USA Warranty for this product. For any issues or support needs, please contact Mirkit customer service. They are committed to providing high-quality support.
11. Legal Disclaimer
Restricted to occupational use to satisfy FCC RF exposure limits. Modification of this device to receive cellular radiotelephone service signals is prohibited under FCC rules and federal law.