
General Pump 100438
General Pump Remote Thermostat #100438 User Manual
Model: 100438 | Temperature Range: 86° - 195° F
1. Introduction
This manual provides essential instructions for the safe and efficient installation, operation, and maintenance of your General Pump Remote Thermostat, Model #100438. This thermostat is designed for use with hot water pressure washers to accurately control and set water temperature within a range of 86° to 195° F (30° to 90.5° C). Please read this manual thoroughly before use and retain it for future reference.
2. Safety Information
Always observe the following safety precautions to prevent injury or damage to the equipment:
- Ensure all electrical connections are made by a qualified professional and comply with local codes.
- Disconnect power to the pressure washer before attempting any installation, maintenance, or repair.
- Verify the thermostat's voltage rating (380 Volts) matches your system's requirements.
- Do not exceed the maximum pressure rating of 4000 PSI for the capillary tube.
- Avoid bending or kinking the capillary tube sharply, as this can damage the sensing element.
- Wear appropriate personal protective equipment (PPE) during installation and maintenance.
3. Product Overview
The General Pump Remote Thermostat #100438 is a panel-mounted, capillary-style adjustable thermostat designed for precise temperature control in hot water pressure washer systems.
3.1 Features
- Temperature Range: 86° - 195° F (30° - 90.5° C)
- Mounting: Panel mounted with a dual scale knob for easy adjustment.
- Sensing Element: 60-inch capillary tube with a bulb, rated for systems up to 4000 PSI.
- Electrical Rating: 16(4)A-380V, UL/CSA approved.
3.2 Components
The thermostat assembly includes the main thermostat unit, a control knob, a 60-inch capillary tube with sensing bulb, and necessary fittings for installation.

This image displays the complete thermostat kit. Visible components include the main thermostat body with electrical terminals, the coiled 60-inch capillary tube extending to a copper sensing bulb, a black control knob with temperature markings, and a brass threaded fitting for securing the bulb.
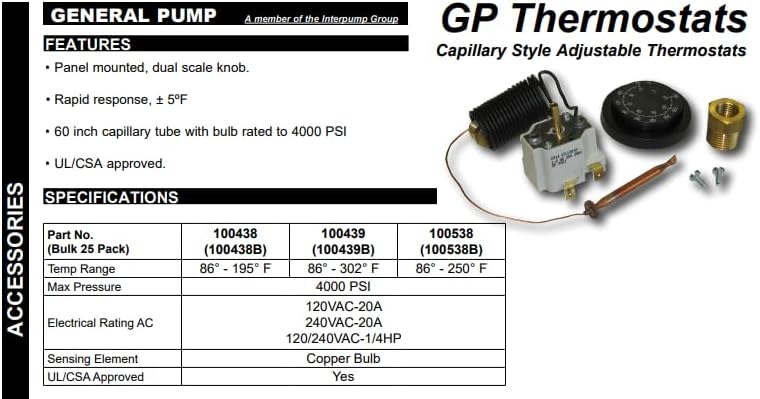
This diagram provides a visual representation of the thermostat and lists key specifications. It highlights features such as panel mounting, dual scale knob, 60-inch capillary tube, 4000 PSI rating, and UL/CSA approval. A table details part numbers, temperature ranges, max pressure, electrical ratings, and sensing element material for various models, including #100438.
4. Specifications
| Attribute | Detail |
|---|---|
| Brand | General Pump |
| Model Number | 100438 |
| Temperature Range | 86° - 195° F (30° - 90.5° C) |
| Material | Copper (sensing bulb) |
| Power Source | Corded Electric |
| Voltage | 380 Volts |
| Electrical Rating | 16(4)A-380V |
| Capillary Tube Length | 60 inches |
| Max Pressure Rating | 4000 PSI (for capillary tube) |
| Certifications | UL/CSA Approved |
| Included Components | Thermostat, Knob, Tube, and Fittings |
| Product Dimensions | 7 x 5 x 2 inches |
| Item Weight | 6.31 Ounces |
| UPC | 768684035717 |
5. Installation
Proper installation is crucial for the accurate and safe operation of the thermostat. If you are unsure about any step, consult a qualified technician.
- Power Disconnection: Ensure the hot water pressure washer is completely powered off and disconnected from its power source before beginning installation.
- Mounting the Thermostat:
- Select a suitable panel location for the thermostat unit. The location should be easily accessible for temperature adjustment and protected from excessive moisture or vibration.
- Cut an appropriate opening in the panel for the thermostat body.
- Secure the thermostat unit to the panel using the provided mounting hardware.
- Attach the control knob to the thermostat shaft.
- Capillary Tube and Bulb Installation:
- The copper sensing bulb must be inserted into the hot water stream or a thermowell within the pressure washer system where accurate temperature measurement is required.
- Use the provided brass fitting to secure the sensing bulb in place, ensuring a watertight seal.
- Route the 60-inch capillary tube carefully, avoiding sharp bends, kinks, or contact with hot surfaces that could damage the tube or affect its accuracy. The tube should be protected from physical damage.
- Ensure the capillary tube is not under tension.
- Electrical Wiring:
- Connect the thermostat's electrical terminals to the pressure washer's heating element control circuit. Refer to your pressure washer's wiring diagram for specific connection points.
- The thermostat is rated for 16(4)A-380V. Ensure your system's electrical load and voltage are compatible.
- All wiring must comply with local electrical codes and standards.
- Final Checks:
- Double-check all connections for security and proper insulation.
- Verify that the sensing bulb is correctly positioned and sealed.
- Ensure the capillary tube is free from obstructions and potential damage points.
6. Operation
Once installed, operating the General Pump Remote Thermostat is straightforward.
- Power On: Restore power to the hot water pressure washer.
- Set Temperature: Rotate the control knob on the thermostat to your desired water temperature within the 86° - 195° F range. The dual scale knob allows for precise adjustment.
- Monitoring: The thermostat will automatically activate or deactivate the heating element to maintain the set temperature. Monitor the water temperature to ensure it is within the expected range.
Note: The thermostat is designed for rapid response, typically within ±5°F of the set point, to maintain consistent water temperature.
7. Maintenance
Regular maintenance ensures the longevity and accuracy of your thermostat.
- Periodic Inspection: Regularly inspect the capillary tube for any signs of damage, kinks, or wear. Ensure the sensing bulb remains securely in its position.
- Electrical Connections: Periodically check electrical connections for tightness and corrosion.
- Cleaning: Keep the thermostat control knob and panel area clean and free from dirt or debris. Use a soft, dry cloth for cleaning. Do not use abrasive cleaners or solvents.
- Calibration Check: If you suspect temperature inaccuracies, compare the thermostat's readings with an external, calibrated thermometer. If significant discrepancies are found, the unit may require professional inspection or replacement.
8. Troubleshooting
This section addresses common issues you might encounter with your thermostat.
| Problem | Possible Cause | Solution |
|---|---|---|
| Thermostat not controlling temperature |
|
|
| Inaccurate temperature readings |
|
|
| Heating element constantly on/off (cycling rapidly) |
|
|
If troubleshooting steps do not resolve the issue, contact General Pump customer support or a qualified service technician.
9. Warranty and Support
For information regarding warranty coverage, technical support, or replacement parts for your General Pump Remote Thermostat #100438, please refer to the official General Pump website or contact their customer service department. Keep your purchase receipt and model information handy when contacting support.
Manufacturer: General Pump
Website: www.generalpump.com (Please verify the actual website for the most current information)
Contact: Refer to the website for current contact information.
Related documents100438


Ask a question about this manual
Ask about setup, troubleshooting, compatibility, parts, safety, or missing instructions. Manuals+ will review the question and use this page’s manual context to help answer it.