
1. Product Overview
The SAMDO Universal Digital Motorcycle Speedometer and Tachometer (Model 132244) is a multi-functional instrument designed for motorcycles, ATVs, and quads. It provides essential riding information including speed, RPM, odometer, trip distance, fuel level, and various indicator lights. This unit is compatible with DC 12V systems and adjustable for wheel sizes from 8 to 22 inches. It supports 1, 2, and 4-cylinder (4-stroke) engines.

Image 1.1: Front view of the SAMDO Universal Digital Motorcycle Speedometer, displaying the analog tachometer and digital display area.
2. Key Features
- Multi-functional Display: Digital speed (0-299 km/h or mph), digital trip distance (0-999.9 km or miles), digital odometer (0-99999.9 km or miles), analog RPM (0-15000).
- Fuel Level Indicator: LED display with low fuel warning and blinking alert.
- Indicator Lights: LED indicators for left turn, right turn, neutral gear (N), high-beam, engine status, and battery status.
- Adjustable Units: Easily switch between kilometers per hour (km/h) and miles per hour (mph).
- Customizable Backlight: Features 7 selectable backlight colors: blue, blue/red, red, red/green, green, green/blue, and white. The default backlight color is blue.
- Time Display: Integrated clock function.
- Universal Compatibility: Designed for DC 12V systems and adjustable for wheel perimeters (8-22 inches).
- Engine Type Support: Compatible with 1, 2, and 4-cylinder (4-stroke) engines. Note: RPM function is not compatible with Electric Fuel Injection (EFI) engines.
3. Specifications
| Dimensions (H x W x L) | 4.3 cm x 10 cm x 14 cm (approximately 1.7 in x 3.9 in x 5.5 in) |
| Working Temperature | -30°C to 85°C (-22°F to 185°F) |
| Working Voltage | DC 9-16V |
| Material | Polycarbonate (PC) |
| Item Weight | 250 g (approximately 8.8 oz) |

Image 3.1: Diagram illustrating the dimensions of the speedometer unit.
4. Package Contents
Verify that all items are present in the package:
- 1x SAMDO Universal Digital Motorcycle Speedometer and Tachometer unit
- 1x Speed Sensor (cable length 950mm)
- 2x Magnets
- 1x English Instruction Manual (including wiring diagram)
5. Installation Guide
Proper installation is crucial for accurate operation. It is recommended to have this unit installed by a qualified technician if you are unfamiliar with motorcycle electrical systems.
5.1 Wiring Connection
Refer to the included English manual for the detailed wiring diagram. The speedometer comes with a wiring harness designed for direct plug-in.

Image 5.1: The main wiring harness connecting to the speedometer and the separate speed sensor with its connector.

Image 5.2: A detailed view of the wiring connectors, showing multiple colored wires for various functions.
- Power Supply: Connect to a DC 12V power source.
- RPM Signal:
- For 1 and 2-cylinder motors: Connect the RPM cable to the trigger signal line's positive pole.
- For 4-cylinder motors: Connect the RPM cable to the ignition coil input line.
- Indicator Lights: Connect wires for left/right turn signals, high-beam, neutral gear, engine, and battery as per the wiring diagram.
5.2 Speed Sensor and Magnet Installation
The speed sensor operates using a Hall effect. Install the sensor near a rotating part of the wheel (e.g., brake disc) and attach the magnets to the wheel so they pass by the sensor. Ensure proper alignment and a small gap between the sensor and magnets for accurate readings.
6. Setup and Calibration
After installation, calibrate the speedometer for accurate readings.
6.1 Switching Speed Units (km/h or mph)
- Locate the button on the speedometer unit.
- Press and hold the button for approximately 3 seconds.
- While still holding, the unit will cycle between "km/h" and "MPH". Release the button when your desired unit is displayed.

Image 6.1: Visual guide for changing the speed unit from km/h to mph by pressing and holding the button.
6.2 Wheel Perimeter Adjustment
The speedometer requires calibration based on your vehicle's wheel perimeter for accurate speed and distance readings. Consult your vehicle's manual or measure the wheel circumference directly. The adjustment procedure is detailed in the full English manual provided in the package.
6.3 Pulse Adjustment
This setting fine-tunes the RPM reading based on the engine's ignition system. Refer to the detailed instructions in the included manual for the correct pulse setting for your engine type.
6.4 Backlight Color Change
The backlight color can be changed to one of seven options. The method for cycling through colors is typically done via a short press of the adjustment button or a specific sequence. Refer to the included manual for precise instructions.
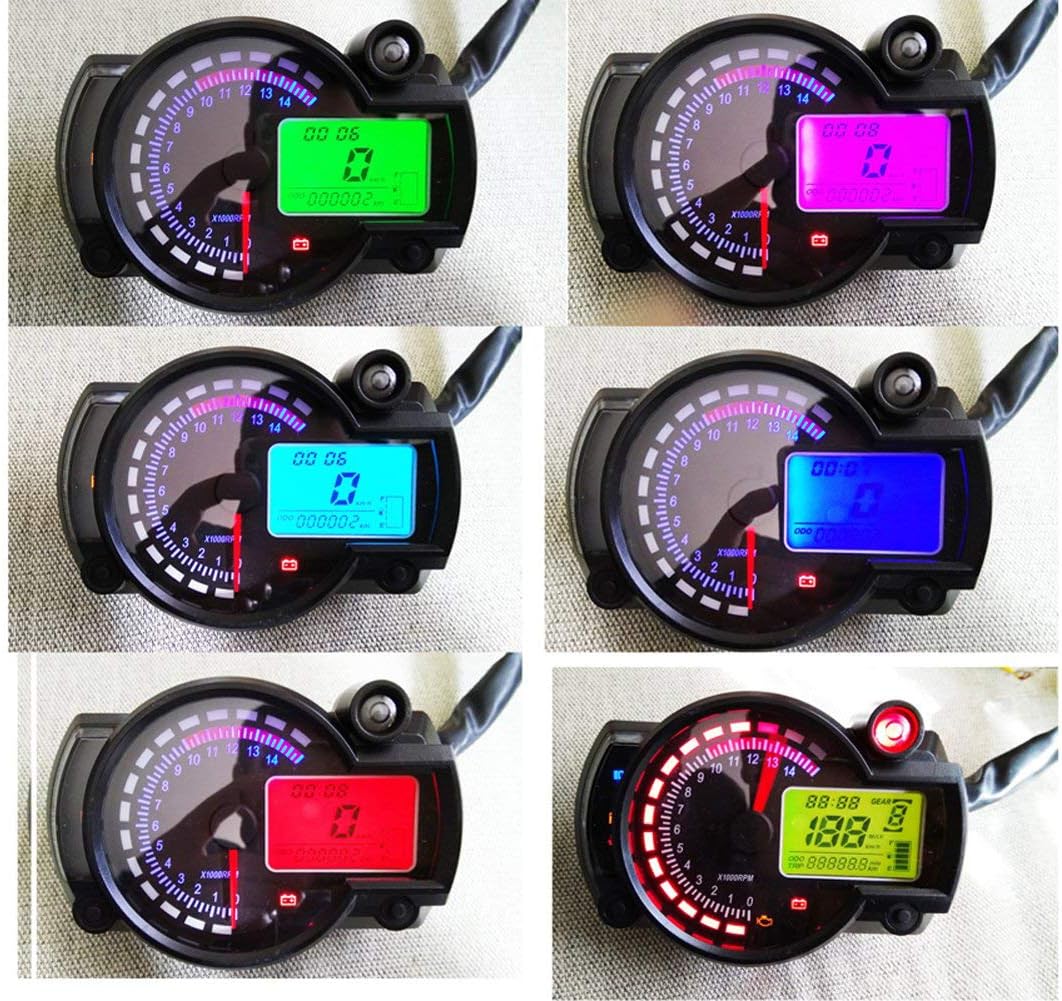
Image 6.2: Examples of the speedometer display with different backlight color options.
7. Operating Instructions
- Speed Display: The digital display shows current speed.
- Tachometer: The needle indicates engine RPM.
- Odometer: Displays total accumulated distance.
- Trip Meter: Displays distance for the current trip. This can typically be reset. Refer to the manual for reset procedure.
- Fuel Gauge: LED segments indicate fuel level. A blinking segment or dedicated icon will warn of low fuel.
- Indicator Lights: Observe the LED indicators for turn signals, neutral gear, high-beam, engine warnings, and battery status.
8. Troubleshooting
If you encounter issues with your SAMDO speedometer, consider the following common problems and solutions:
- No Display/Power:
- Check all power connections and fuses.
- Ensure the working voltage is within the 9-16V DC range.
- Inaccurate Speed/Distance:
- Verify the speed sensor is correctly installed and aligned with the magnets.
- Ensure the magnets are securely attached and strong enough to trigger the sensor.
- Recalibrate the wheel perimeter setting according to your vehicle's specifications.
- RPM Function Not Working:
- Confirm the RPM cable is connected to the correct signal source for your engine type (trigger signal for 1/2 cylinder, ignition coil for 4 cylinder).
- Important: The RPM function is not compatible with Electric Fuel Injection (EFI) engines. If your vehicle has an EFI engine, the RPM display will not function.
- Check the pulse adjustment setting.
- Inaccurate Fuel Readings:
- Ensure the fuel sensor wire is correctly connected.
- Some fuel sending units may not be fully compatible, leading to fluctuating readings.
- Moisture Inside Unit:
- While designed for outdoor use, extreme moisture exposure can affect performance. Ensure proper sealing during installation.
9. Warranty and Support
For warranty information, technical support, or replacement parts, please contact SAMDO customer service directly. Refer to the contact details provided in your product packaging or on the official SAMDO website.