1. Introduction
This manual provides essential information for the proper installation, operation, and maintenance of your Himore 3000 PSI Pressure Washer Water Pump. Please read this manual thoroughly before using the product to ensure safe and efficient operation. This pump is designed as a replacement for Simoniz models 039-8583 and 039-8593.
It is crucial to verify product compatibility with your existing pressure washer unit. If you are uncertain about compatibility, please consult the specifications provided in this manual or contact customer support with your unit's model, sub-model, spec/type number, code/serial number, year, and engine horsepower.
2. Safety Information
WARNING:
- Do not run any pressure washer pump above its maximum PSI rating. Exceeding the maximum PSI can result in damage to the pump and/or serious bodily injury.
- Always wear appropriate personal protective equipment (PPE) when operating or maintaining the pressure washer.
- Ensure all connections are secure before operating the pump.
- This product may contain chemicals known to the State of California to cause cancer and birth defects or other reproductive harm.
3. Product Overview
The Himore 3000 PSI Pressure Washer Water Pump is a horizontal pump designed for various cleaning tasks. It features a brass head for durability and includes essential components for immediate use.
Key Features:
- Brass Head Pump
- 3000 PSI Maximum Pressure
- 2.5 GPM Maximum Flow
- 3450 RPM Maximum Pump Speed
- 3/4" Horizontal Shaft
- Standard Garden Hose Inlet Connection
- 22mm Male Outlet Tube Connection
- Includes: Horizontal Pressure Washer Pump with Keyway, hose, Chemical Injector, Unloader Valve, Thermal Release Valve & Outlet Tube.
Component Identification:

Figure 3.1: Pump Connections Diagram. This image illustrates the various connection points on the pump, including the high-pressure outlet, unloader, chemical injector, garden hose inlet, and thermal release valve.

Figure 3.2: Chemical Injector Hose. This image shows the included hose for the chemical injector system.
Dimensions:

Figure 3.3: Shaft and Bolt Pattern Dimensions. This image highlights the 3/4 inch shaft diameter and the 4-bolt pattern with 2 5/8 inches center-to-center spacing between outer holes.
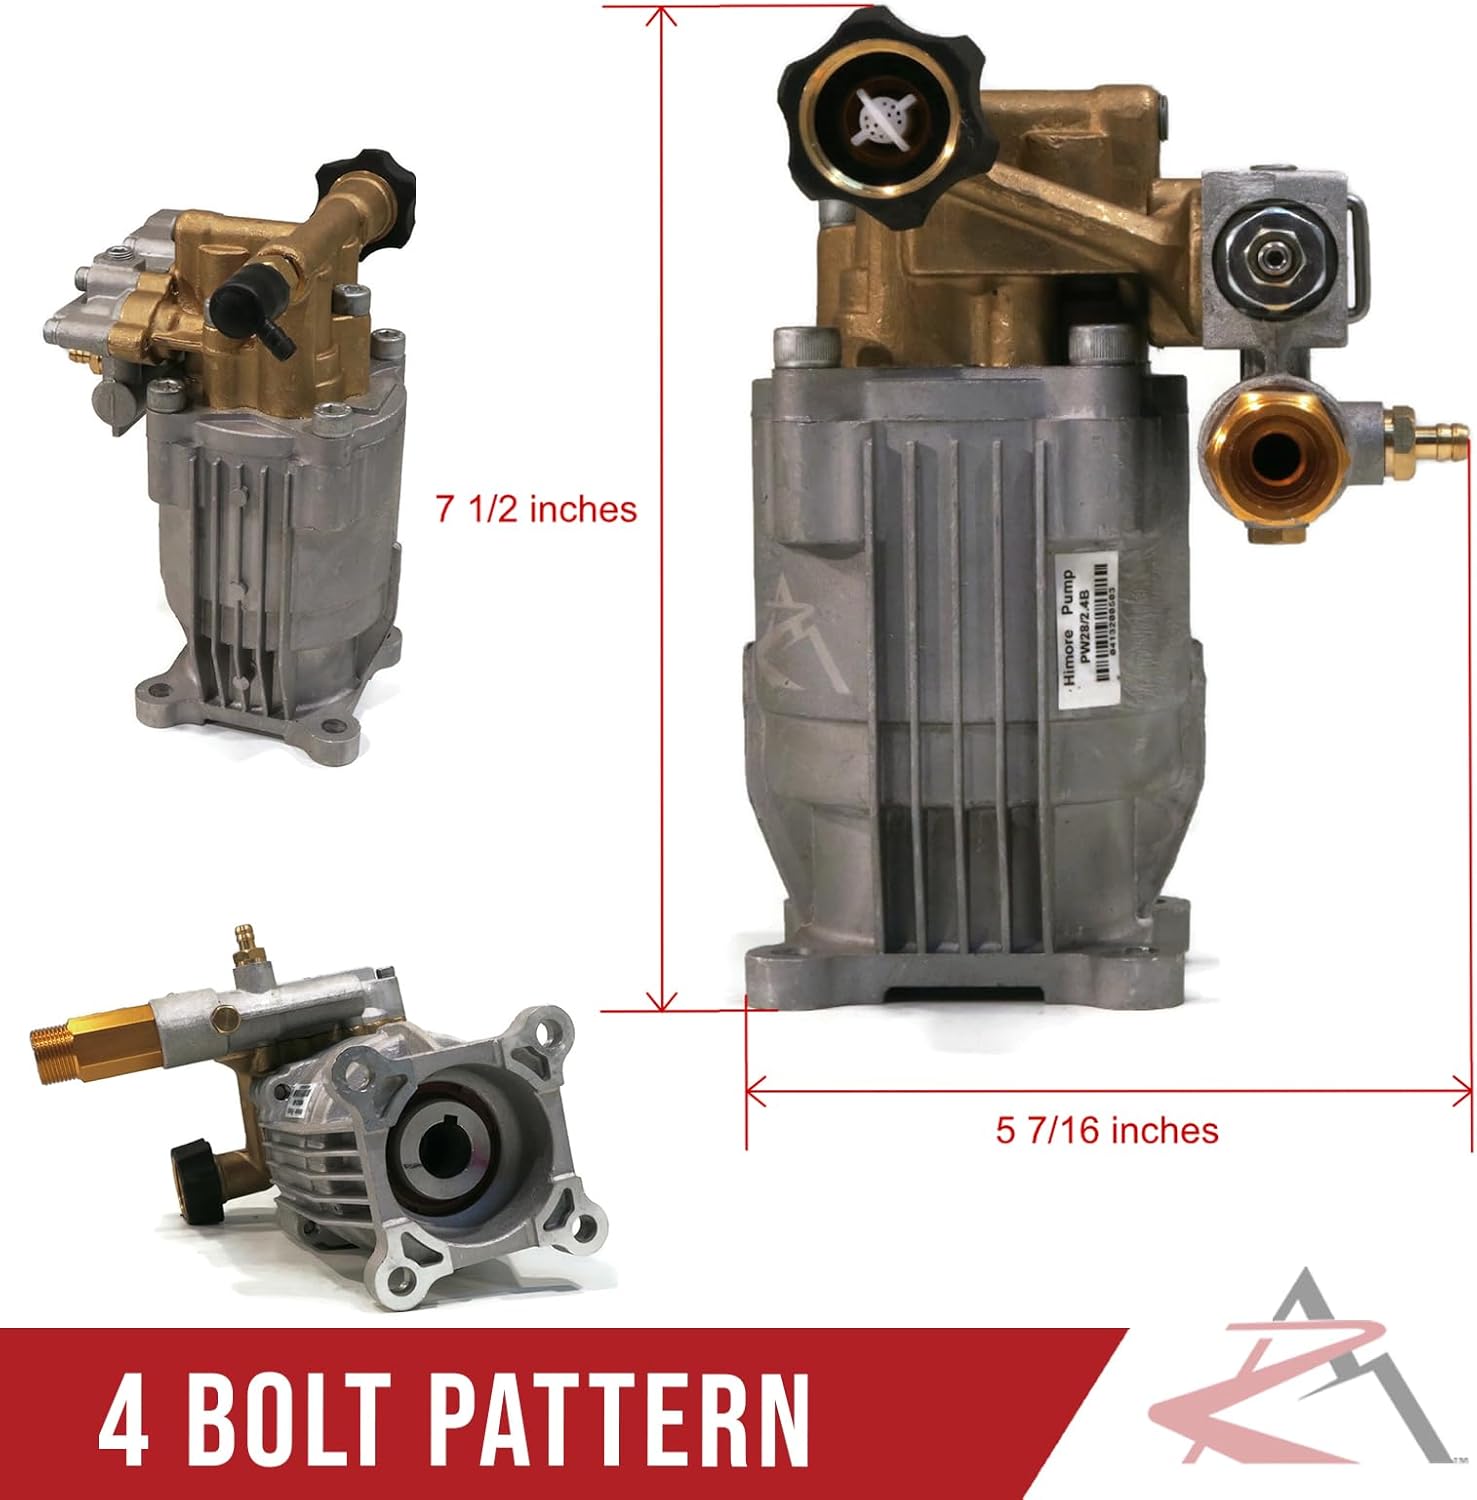
Figure 3.4: Overall Pump Dimensions. This image provides the approximate height of 7 1/2 inches and width of 5 7/16 inches for the pump unit.
Product Overview Video:
Video 3.1: Product Overview. This video provides a visual overview of the Himore pressure washer pump, showcasing its design and features from multiple angles.
4. Specifications
| Specification | Value |
|---|---|
| Brand | Himore |
| Maximum Pressure | 3000 PSI |
| Maximum Flow Rate | 2.5 Gallons Per Minute (GPM) |
| Maximum Pump Speed | 3450 RPM |
| Shaft Diameter | 3/4" Shaft |
| 4 Bolt Pattern | 2 5/8" Center to Center between Outer Holes |
| Maximum Water Temperature | 140° F |
| Inlet Connection Type | Standard Garden Hose |
| Outlet Tube Connection | 22mm Male |
| Minimum Horsepower Required | 6 HP |
| Material | Brass Head |
| Item Weight | 8.13 Pounds |
| Model Number | 039-8583 |
| Manufacturer Part Number | 100950_A180 |
5. Installation
This pump is designed for horizontal mounting and can be oriented in any direction that allows for accessible hose connections. The pump head cannot be flipped, but the entire pump unit can be mounted in different directions to suit your pressure washer's configuration.
General Installation Steps:
- Preparation: Ensure your pressure washer unit is turned off, unplugged (if electric), and depressurized. Disconnect all hoses.
- Remove Old Pump: Carefully detach the old pump from the engine/motor. Note the mounting bolt locations and shaft connection.
- Inspect Shaft: Ensure the engine shaft is clean and free of debris.
- Mount New Pump: Align the new Himore pump with the engine shaft and mounting holes. Secure it using the appropriate bolts. The 4-bolt pattern is 2 5/8" center to center between outer holes.
- Connect Hoses: Connect the standard garden hose to the inlet and the 22mm male high-pressure hose to the outlet. Ensure all connections are tight to prevent leaks.
- Chemical Injector: Connect the chemical injector hose if you plan to use detergents.
- Thermal Release Valve: Ensure the thermal release valve is properly installed and clear.
Refer to your pressure washer's original manual for specific instructions on pump replacement if available.

Figure 5.1: Versatile Mounting Options. This image demonstrates that the water inlets and outlets are versatile, allowing the pump to be mounted facing front or rear depending on the pressure washer's design.
6. Operation
Once the pump is correctly installed and all connections are secure, you can begin operating your pressure washer. Always follow the safety guidelines outlined in Section 2.
Starting the Pressure Washer:
- Water Supply: Connect a garden hose to the pump's inlet and ensure the water supply is turned on fully.
- Purge Air: Squeeze the trigger on the spray gun to purge air from the pump and hose until a steady stream of water emerges.
- Start Engine/Motor: Start your pressure washer's engine or turn on the electric motor according to its manufacturer's instructions.
- Begin Cleaning: Release the trigger to allow the pump to build pressure, then squeeze the trigger to begin cleaning.
Using the Chemical Injector:
If using detergents, ensure the chemical injector hose is submerged in the detergent solution. The chemical injector typically operates at low pressure. To apply detergent, switch to a low-pressure nozzle or adjust the spray gun as per your pressure washer's instructions.
7. Maintenance
Regular maintenance is essential to ensure the longevity and optimal performance of your Himore pressure washer pump.
After Each Use:
- Flush System: Run clean water through the pump to flush out any remaining detergent or debris.
- Drain Water: Disconnect the water supply and squeeze the spray gun trigger to drain any remaining water from the pump and hoses.
- Clean Exterior: Wipe down the pump's exterior to remove dirt and grime.
Seasonal/Storage Maintenance:
- Winterization: If storing in freezing temperatures, use a pump saver or non-toxic antifreeze solution to protect the pump from freezing and corrosion.
- Inspect: Periodically inspect hoses, connections, and the pump for any signs of wear, damage, or leaks. Replace worn parts as necessary.
8. Troubleshooting
This section provides solutions to common issues you might encounter with your pressure washer pump.
Common Issues and Solutions:
- No Pressure or Low Pressure:
- Check water supply: Ensure the garden hose is fully connected and the water tap is completely open.
- Air in system: Purge air from the pump by squeezing the spray gun trigger until a steady stream of water flows.
- Clogged inlet filter: Clean or replace the inlet filter.
- Nozzle issue: Ensure the correct nozzle is used and it is not clogged.
- Water Leaks:
- Loose connections: Tighten all hose and accessory connections.
- Damaged O-rings/seals: Inspect and replace any worn or damaged O-rings or seals.
- Pump Pulsates:
- Air in system: Purge air as described above.
- Insufficient water supply: Ensure adequate water flow to the pump.
- Pump Overheating:
- Running dry: Never run the pump without a water supply.
- Bypass mode too long: Avoid leaving the pressure washer in bypass mode (running with the trigger released) for extended periods.
- Thermal release valve: The thermal release valve will activate if the water temperature in the pump becomes too high. Allow the pump to cool down.
If you encounter issues not listed here or if the suggested solutions do not resolve the problem, please contact customer support.
9. Warranty and Support
For information regarding product warranty, please refer to the documentation provided at the time of purchase or contact the retailer. For technical assistance, replacement parts, or further inquiries, please contact Himore customer support through the retailer or manufacturer's official channels.
When contacting support, please have your product model number (039-8583 or 039-8593) and manufacturer part number (100950_A180) readily available.