1. Product Overview
The CLY Solar Outdoor Projector LED is an energy-efficient lighting solution designed for various outdoor applications such as gardens, lawns, patios, and shrubs. It features a separate solar panel for optimal sun exposure and a powerful LED light unit, offering adjustable color temperatures and brightness levels. This manual provides essential information for the safe and effective use of your solar projector.

Image 1.1: Overview of the CLY Solar Outdoor Projector LED, showing the light unit and separate solar panel.
Key Features:
- Solar Powered: Integrated 5000mAh lithium-ion battery charges automatically under sunlight.
- High Efficiency: Up to 18% photovoltaic conversion rate.
- Bright Illumination: 60 super bright LED chips providing up to 2600 Lumens.
- Adjustable Color Temperature: Selectable from 2700K (Warm White), 4000K (Natural White), and 6500K (Cool White).
- Dimmable Brightness: Multiple brightness levels (100%, 70%, 50%) for varying durations.
- Automatic Operation: Light activates automatically at dusk and deactivates at dawn.
- Durable & Waterproof: IP66 rated for all-weather use, featuring die-cast aluminum housing and tempered glass.
- Flexible Installation: Can be wall-mounted or ground-mounted with a 5-meter cable connecting the solar panel and light.
- Remote Control: Full control over settings including ON/OFF, brightness, color temperature, dynamic modes, and timing functions.
2. Package Contents
Please check the package for the following items:
- LED Projector Light Unit
- Solar Panel with 5-meter cable
- Mounting Brackets
- Screws and Wall Plugs
- Ground Stakes
- Remote Control
- User Manual (this document)
3. Setup and Installation
Before installation, ensure the solar panel is exposed to direct sunlight for at least 6-8 hours to fully charge the battery. The light unit has an ON/OFF button, typically located on the back or side, which should be pressed once to activate the automatic dusk-to-dawn function.
Choosing a Location:
- Solar Panel: Select a location that receives maximum direct sunlight throughout the day, free from shadows cast by buildings, trees, or other obstructions.
- Light Unit: Position the light unit to illuminate the desired area. The 5-meter cable allows for flexible placement of the solar panel away from the light unit.

Image 3.1: Illustration of the solar panel charging process, dimensions of the light unit, and the location of the ON/OFF and brightness adjustment buttons on the light unit.
Mounting Options:
The projector can be installed in two ways:
- Wall Mounting:
- Attach the mounting brackets to the light unit and solar panel using the provided screws.
- Mark the desired drilling points on the wall.
- Drill holes, insert wall plugs, and secure the brackets with screws.
- Adjust the angle of the solar panel for optimal sun exposure and the light unit for desired illumination.
- Ground Mounting:
- Attach the ground stakes to the mounting brackets of both the light unit and solar panel.
- Insert the stakes firmly into the ground in your chosen locations.
- Adjust the angle of the solar panel and light unit as needed.
Connecting the Components:
Connect the 5-meter cable from the solar panel to the light unit. Ensure the connection is secure and waterproof. The connector is designed to prevent incorrect polarity.
4. Operating Instructions
The CLY Solar Outdoor Projector LED operates automatically from dusk till dawn once activated. Further control and customization are available via the included remote control.

Image 4.1: Detailed view of the remote control for the CLY Solar Outdoor Projector LED, highlighting various function buttons.
Remote Control Functions:
- ON/OFF: Turns the light on or off.
- Brightness Adjustment: Buttons for High Brightness (100%), Medium Brightness (70%), and Low Brightness (50%).
- Color Temperature Selection: Buttons for 2700K (Warm White), 4000K (Natural White), and 6500K (Cool White).
- Stepless Color Temperature Adjustment: Use the '+' and '-' buttons to fine-tune the color temperature.
- Dynamic Modes:
- Smooth (Gradient): Cycles through color temperatures from 2700K to 6500K. Speed can be adjusted.
- Flash (Strobe): Flashes the current color temperature. Speed can be adjusted.
- Timing Functions: Set the light to turn off automatically after 2H, 3H, 4H, or 6H.
- Forced Lighting: Activates the light for 2 hours, regardless of ambient light conditions (day or night).

Image 4.2: Visual representation of the three available color temperatures and three brightness settings.
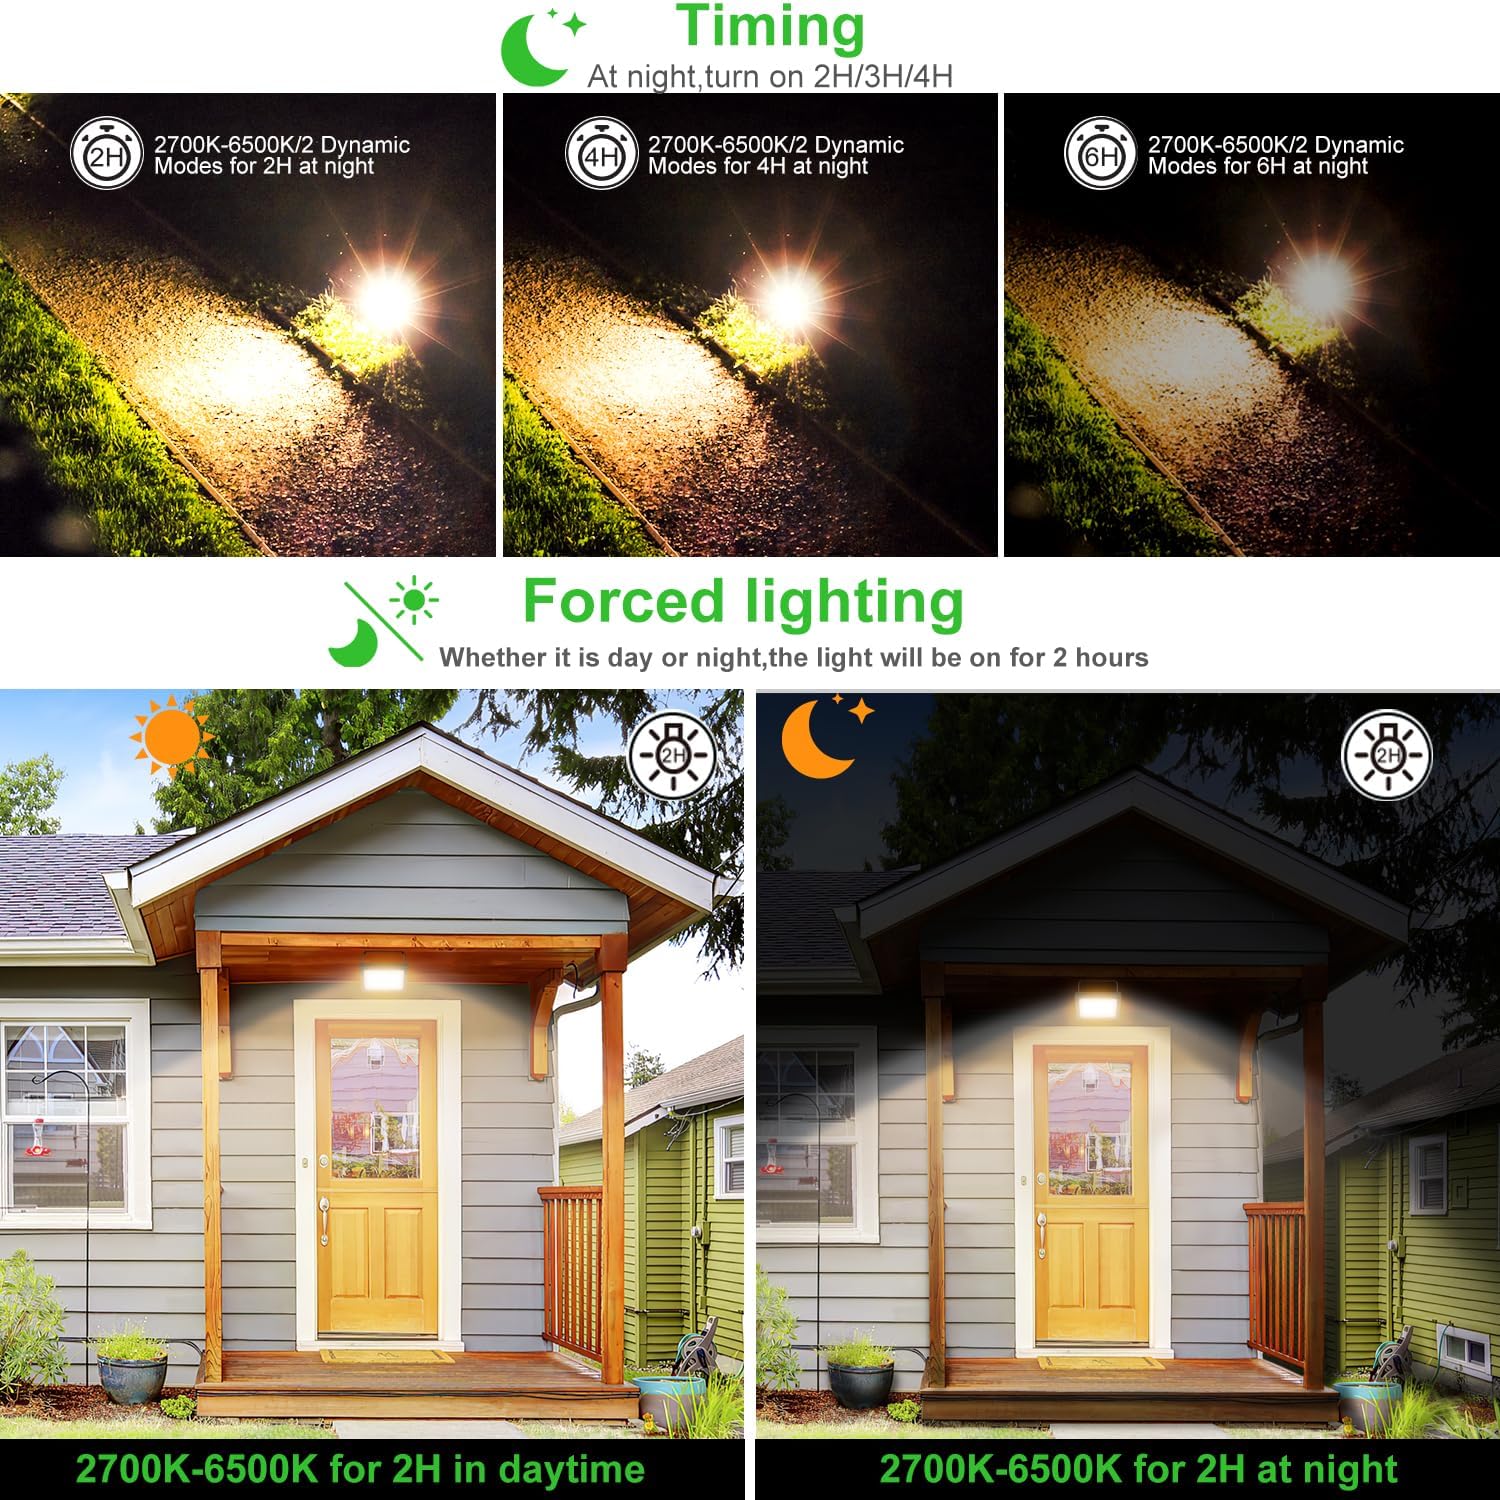
Image 4.3: Illustrations of the cyclic gradient and strobe dynamic modes, along with timing options and forced lighting feature.
Indicator Lights:
The light unit features several indicator lights:
- Working Indicator: Green light indicates normal power supply.
- Brightness Indicator: Green (Low), Yellow (Medium), Red (High).
- Charging Indicator: Red light indicates the solar panel is charging.
- Battery Indicator: Shows battery level (30%, 70%, 100%).
The projector includes a memory function, retaining the last selected mode and settings when it turns on again.
5. Maintenance
Regular maintenance ensures optimal performance and longevity of your solar projector.
- Solar Panel Cleaning: Periodically wipe the solar panel with a soft, damp cloth to remove dust, dirt, and debris. A clean panel ensures efficient charging.
- Battery Replacement: The integrated 5000mAh lithium-ion battery is replaceable. If the battery life significantly diminishes after approximately 500 charge cycles, replace it with a battery of the same type and specifications.
- General Cleaning: Clean the light unit and housing with a soft, damp cloth as needed. Avoid abrasive cleaners or solvents.
6. Troubleshooting
If you encounter issues with your CLY Solar Outdoor Projector, refer to the following common problems and solutions:
| Problem | Possible Cause | Solution |
|---|---|---|
| Light does not turn on at night. | 1. Insufficient solar panel charging. 2. ON/OFF switch is off. 3. Solar panel is in a shaded area. 4. Battery is depleted or faulty. | 1. Ensure solar panel receives 6-8 hours of direct sunlight daily. 2. Press the ON/OFF button on the light unit or remote to activate. 3. Relocate the solar panel to an unshaded area. 4. Allow several days of full charging. If issue persists, consider battery replacement. |
| Light is dim or runs for a short duration. | 1. Insufficient solar panel charging. 2. Solar panel is dirty. 3. Battery capacity reduced. | 1. Ensure solar panel receives maximum direct sunlight. 2. Clean the solar panel regularly. 3. Replace the battery if it no longer holds a sufficient charge. |
| Remote control not working. | 1. Remote battery is dead. 2. Obstruction between remote and light unit. 3. Remote is out of range. | 1. Replace the remote control battery. 2. Ensure a clear line of sight to the light unit. 3. Operate the remote within 12 meters of the light unit. |
7. Specifications
| Feature | Specification |
|---|---|
| Model Number | 10606002-DW |
| Battery Type | 1 x Lithium-polymer (included) |
| Battery Capacity | 5000 mAh |
| Light Unit Dimensions (L x W x H) | 12.6 x 4.2 x 10.6 cm (approx. 4.96 x 1.65 x 4.17 inches) |
| Solar Panel Dimensions (L x W) | 17.8 x 17.8 cm (approx. 7.01 x 7.01 inches) |
| Weight | 1.01 kg (approx. 2.23 lbs) |
| Material | Aluminum (housing), Plastic (lampshade) |
| Waterproof Rating | IP66 |
| Light Source | LED (60 chips) |
| Luminous Flux | 2600 Lumens |
| Wattage | 30 Watts |
| Voltage | 6 Volts |
| Color Temperatures | 2700K, 4000K, 6500K |
| Cable Length | 5 meters (between solar panel and light) |
| Control Method | Remote Control |
| Mounting Type | Wall or Ground Mount |
| Ideal Mounting Height | 2-4 meters (6.56-13.12 feet) |
| Optimal Light Range | > 6 x 6 meters |
| Remote Control Distance | Up to 12 meters |

Image 7.1: Technical specifications and recommended installation parameters for the CLY Solar Outdoor Projector LED.

Image 7.2: The IP66 waterproof rating ensures the CLY Solar Outdoor Projector LED is usable in all weather conditions, including rain and snow.
8. Warranty and Support
For warranty information or technical support, please refer to the product packaging or contact CLY customer service directly. Keep your purchase receipt as proof of purchase.