1. Important Safety Instructions
Read all instructions before using the appliance. Keep this manual for future reference. Failure to follow these instructions may result in electric shock, fire, or personal injury.
- This appliance is intended for household use only.
- Do not install or store this appliance where it will be exposed to the weather.
- Do not dry unwashed items in the tumble dryer.
- Items soiled with substances such as cooking oil, acetone, alcohol, petrol, kerosene, spot removers, turpentine, waxes, and wax removers should be washed in hot water with an extra amount of detergent before being dried in the tumble dryer.
- Remove all objects from pockets such as lighters and matches.
- Ensure the appliance is properly earthed.
- Supervise children to ensure they do not play with the appliance.
2. Product Overview
The Beko DH 8433 RXM is an 8kg capacity, A++ energy-rated heat pump dryer designed for efficient and gentle drying of your laundry. Its front-loading design and intuitive controls make it easy to use.
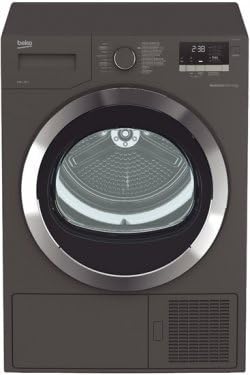
This image displays the front of the Beko DH 8433 RXM heat pump dryer, featuring a dark grey finish, a large circular door for front loading, and a control panel with a central dial and digital display.
3. Installation and Setup
3.1 Unpacking
- Remove all packaging materials and transport bolts.
- Inspect the appliance for any damage.
3.2 Placement
- Place the dryer on a firm, level floor. Adjust the feet to ensure stability.
- Ensure adequate ventilation around the appliance. Do not block the ventilation openings.
- Maintain a minimum clearance of 10 cm from walls or other objects.
3.3 Electrical Connection
- Connect the dryer to a grounded power outlet with the correct voltage and current rating (refer to the rating label on the appliance).
- Do not use extension cords or multiple socket adapters.
3.4 Drainage Connection
This heat pump dryer collects condensed water in a water tank. For continuous drainage, you can connect a drain hose to a suitable drain point. Refer to the diagram in your appliance's specific manual for hose connection details.
4. Operating Instructions
4.1 Control Panel Overview
The control panel typically includes a program selection dial, a digital display, and buttons for functions such as Start/Pause, Delay Start, Drying Level, and Anti-crease.
4.2 Loading Laundry
- Open the dryer door.
- Load laundry loosely into the drum, ensuring not to overload. The maximum capacity is 8kg.
- Close the door firmly.
4.3 Selecting a Program
- Turn the program selection dial to choose the desired drying program (e.g., Cotton, Synthetics, Delicates, Jeans).
- Adjust additional options if available (e.g., drying level, anti-crease).
4.4 Starting and Ending a Cycle
- Press the 'Start/Pause' button to begin the drying cycle.
- The display will show the remaining time.
- At the end of the cycle, an audible signal may sound, and the display will indicate 'End'.
- Remove laundry promptly to minimize creasing.
5. Maintenance and Cleaning
5.1 Cleaning the Lint Filter
Clean the lint filter after every drying cycle to maintain drying efficiency and prevent fire hazards.
- Open the dryer door.
- Pull the lint filter upwards to remove it.
- Remove lint by hand or with a soft brush.
- Reinsert the filter until it clicks into place.
5.2 Emptying the Water Tank
Empty the water tank after every drying cycle. The 'Water Tank Full' indicator will illuminate when the tank needs emptying.
- Pull out the water tank from its housing.
- Pour out the collected water.
- Push the water tank back into its position until it is fully seated.
5.3 Cleaning the Condenser/Heat Exchanger
The condenser/heat exchanger should be cleaned periodically (e.g., every few months) to ensure optimal performance. Refer to your appliance's specific manual for detailed instructions on accessing and cleaning the condenser.
5.4 Cleaning the Exterior
Wipe the exterior surfaces with a soft, damp cloth. Do not use abrasive cleaners or solvents.
6. Troubleshooting Guide
| Problem | Possible Cause | Solution |
|---|---|---|
| Dryer does not start | No power supply; Door not closed properly; Program not selected. | Check power plug; Close door firmly; Select a program and press Start. |
| Clothes not drying properly | Lint filter clogged; Water tank full; Overloaded drum; Incorrect program. | Clean lint filter; Empty water tank; Reduce load size; Select appropriate program. |
| Excessive noise | Appliance not level; Foreign objects in drum. | Adjust feet to level dryer; Check drum for loose items. |
| Water tank full indicator remains on after emptying | Sensor malfunction or residue. | Ensure tank is fully inserted; Clean sensor area if accessible (refer to manual). |
If the problem persists after attempting these solutions, contact Beko customer service or a qualified technician.
7. Technical Specifications
- Model: Beko DH 8433 RXM
- Type: Heat Pump Dryer
- Loading Type: Front Load
- Drying Capacity: 8 kg
- Drum Volume: 118 Liters
- Energy Efficiency Class: A++
- Product Weight: 51 kg
- Dimensions (H x W x D): Refer to product label or Beko official website for exact measurements.
- Power Supply: 220-240V~, 50Hz (Specific power consumption details are on the appliance rating label).
8. Warranty and Support
Your Beko DH 8433 RXM heat pump dryer comes with a manufacturer's warranty. Please refer to the warranty card provided with your appliance for specific terms and conditions, including the warranty period and coverage details.
For technical assistance, spare parts, or to schedule a service appointment, please contact Beko customer support. You can find contact information on the Beko official website or in the documentation supplied with your product.
When contacting support, please have your appliance's model number (DH8433RXM) and serial number ready. The serial number is typically located on a label inside the dryer door or on the back of the appliance.


