
Sunbeam 4275-200
Sunbeam GreenSense SteamMaster Professional Iron User Manual
Model: 4275-200 | Brand: Sunbeam
1. Important Safety Instructions
When using your iron, basic safety precautions should always be followed, including the following:
- Read all instructions before using the iron.
- Use iron only for its intended use.
- To protect against a risk of electric shock, do not immerse the iron in water or other liquids.
- Always turn the iron OFF before plugging or unplugging from the electrical outlet. Never yank cord to disconnect from outlet; instead, grasp plug and pull to disconnect.
- Do not allow cord to touch hot surfaces. Let iron cool completely before putting away. Loop cord loosely around iron when storing.
- Always disconnect iron from electrical outlet when filling with water or emptying, and when not in use.
- Do not operate iron with a damaged cord or if the iron has been dropped or damaged. To avoid the risk of electric shock, do not disassemble the iron; take it to a qualified serviceman for examination and repair. Incorrect reassembly can cause a risk of electric shock when the iron is used.
- Close supervision is necessary for any appliance being used by or near children. Do not leave iron unattended while connected or on an ironing board.
- Burns could occur from touching hot metal parts, hot water, or steam. Use caution when you turn a steam iron upside down – there may be hot water in the reservoir.
- This iron features a Motion Smart 3-way auto-off feature: 30-second motionless shut-off when iron is horizontal or on its side and 15-minute shut-off when upright.
2. Product Overview
The Sunbeam 4275-200 SteamMaster Iron is designed for efficient and safe ironing. It incorporates several features to enhance user experience and garment care.

Figure 2.1: Main view of the Sunbeam SteamMaster Professional Iron. This image shows the overall design, including the black body, blue water tank, and the retractable cord at the back.

Figure 2.2: Side view of the iron, highlighting its ergonomic handle and the placement of the temperature dial and steam buttons.

Figure 2.3: A detailed view of the easy-to-operate fabric and temperature dial, along with the buttons for spray mist and shot of steam functions.
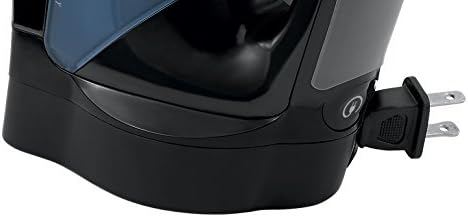
Figure 2.4: Close-up of the 8-foot retractable cord mechanism, designed for fast and convenient storage.
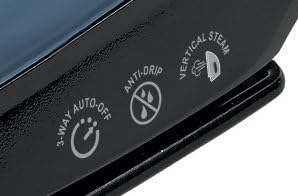
Figure 2.5: Icons indicating key features: 3-way auto-off for safety, anti-drip function to prevent water spots, and vertical steam capability.

Figure 2.6: Top view showing the water reservoir opening with its durable slide cover, and the various control buttons for steam and spray functions.
Key Features:
- ClearView LED Light: Makes ironing easier in any lighting environment.
- Versatile Steam Functions: Includes Spray Mist, Shot of Steam, Drip Free, and Vertical Steam.
- Safe Storage Strip: Indicates when it's safe to store the iron after use.
- Retractable Cord: An 8-foot cord that retracts for convenient storage.
- Non-Stick Soleplate: Ensures smooth gliding over fabrics.
- Self-Clean Feature: For easy maintenance and extended iron life.
- GreenSense Technology: Designed to deliver water savings of over 45% compared to standard irons.
- Easy-View Water Reservoir: With a durable slide cover for quick and spill-free filling and emptying.
3. Setup
3.1 Filling the Water Reservoir
- Ensure the iron is unplugged from the electrical outlet.
- Open the durable slide cover of the easy-view water reservoir.
- Fill the reservoir with tap water up to the "MAX" fill line. The GreenSense iron is designed to use tap water.
- Close the slide cover securely to prevent spills.
3.2 Plugging In the Iron
Once the water reservoir is filled (if using steam), plug the 8-foot retractable cord into a standard electrical outlet. The iron is now ready for use.
4. Operating Instructions
4.1 Setting Temperature and Fabric Type
Rotate the easy-to-operate fabric and temperature dial to select the appropriate setting for your garment. Refer to the fabric care label for recommended ironing temperatures. Allow the iron to heat up to the selected temperature before use.
4.2 Using Steam Functions
- Continuous Steam: Ensure the water reservoir is filled and the temperature dial is set to a steam-compatible setting (usually cotton, linen, etc.). The iron will produce continuous steam.
- Shot of Steam: Press the "Shot of Steam" button for an extra burst of steam to remove stubborn wrinkles.
- Spray Mist: Press the "Spray Mist" button to lightly dampen fabrics for easier ironing.
- Vertical Steam: Hold the iron upright and press the "Shot of Steam" button to steam hanging garments or drapes.
- Drip Free: This feature prevents water from dripping from the soleplate when the iron is not hot enough for steam.
4.3 ClearView LED Light
The integrated ClearView LED light illuminates your ironing path, making it easier to spot and remove wrinkles, especially in dimly lit areas.
4.4 Safe Storage Strip
The Safe Storage Strip changes color to indicate when the iron has cooled down sufficiently and is safe to store, reducing the risk of accidental burns or damage.
5. Maintenance and Cleaning
5.1 Self-Clean Feature
To maintain optimal performance and prevent mineral buildup, use the Self-Clean feature periodically:
- Fill the water reservoir to the MAX line.
- Set the temperature dial to the highest setting.
- Plug in the iron and allow it to heat up until the indicator light turns off.
- Unplug the iron.
- Hold the iron horizontally over a sink.
- Press and hold the Self-Clean button (refer to diagram in Product Overview if unsure of location). Water and steam will be expelled from the soleplate, flushing out mineral deposits.
- Continue until the reservoir is empty.
- Allow the iron to cool completely before storing.
5.2 Anti-Calc Feature
The iron is equipped with an anti-calc feature that helps to reduce mineral deposits, ensuring consistent steam performance over time. Regular use of the Self-Clean feature complements this system.
5.3 Cleaning the Soleplate
For the non-stick soleplate, wipe with a damp cloth after the iron has cooled down. Do not use abrasive cleaners or metallic scouring pads, as these can damage the soleplate coating.
5.4 Emptying Water Reservoir
After each use, it is recommended to empty any remaining water from the reservoir to prevent mineral buildup and prolong the life of the iron. Unplug the iron and allow it to cool before emptying.
6. Troubleshooting
| Problem | Possible Cause | Solution |
|---|---|---|
| Iron does not heat up. | Iron is not plugged in; power outlet is not working; temperature dial is set to OFF or too low. | Ensure iron is securely plugged into a working outlet. Adjust temperature dial to desired setting. Check household fuse/circuit breaker. |
| No steam or insufficient steam. | Water reservoir is empty; temperature is too low for steam; steam vents are clogged; iron needs self-cleaning. | Fill water reservoir. Set temperature to a steam-compatible setting (e.g., Cotton, Linen). Perform Self-Clean procedure to clear mineral deposits. |
| Water leaks from soleplate. | Temperature is too low for steam; iron is overfilled; Drip Free feature is not functioning optimally. | Ensure iron is heated to the correct temperature for steam. Do not overfill the water reservoir. If leaking persists, perform Self-Clean. |
| Retractable cord does not fully retract. | Cord mechanism may be jammed or partially obstructed. | Gently pull the cord out fully, then press the retract button. If it still doesn't retract, try guiding it gently. Avoid forcing the cord. |
| Iron automatically shuts off too quickly. | Motion Smart 3-way auto-off feature is active. | This is a safety feature. The iron will shut off after 30 seconds if horizontal/on its side, or 15 minutes if upright, without motion. Move the iron to reactivate. |
7. Specifications
| Attribute | Detail |
|---|---|
| Brand | Sunbeam |
| Model Number | 4275-200 |
| Color | Black and Blue |
| Special Feature | Non-stick, ClearView LED light, Retractable Cord, 3-way Auto-Off, Anti-Calc, Self-Clean |
| Recommended Uses | Vertical Steam |
| Base Material | Stainless Steel with Non-Stick Coating |
| Product Dimensions | 12.6 x 4.7 x 5.5 inches |
| Item Weight | 2.7 pounds |
| UPC | 027045765879 |
8. Warranty and Support
8.1 Product Warranty
This Sunbeam product is covered by a limited warranty. Please refer to the warranty card included with your purchase for specific terms and conditions, or visit the official Sunbeam website for detailed warranty information.
8.2 Customer Support
For technical assistance, troubleshooting, or to inquire about replacement parts, please contact Sunbeam Customer Service. Contact information can typically be found on the product packaging or the official Sunbeam website.
You can also visit the Sunbeam Store on Amazon for more product information and support resources.
Related documents4275-200


Ask a question about this manual
Ask about setup, troubleshooting, compatibility, parts, safety, or missing instructions. Manuals+ will review the question and use this page’s manual context to help answer it.