1. Introduction
Thank you for choosing the Lisciani SCIENZA HI TECH Off-Road Vehicle Construction Kit. This manual provides essential information for the safe assembly, operation, and maintenance of your new remote-controlled vehicle. Please read these instructions carefully before beginning assembly and keep them for future reference.
This kit is designed to offer an engaging and educational experience, allowing you to build a functional remote-controlled off-road vehicle. Adult supervision is recommended during assembly and operation, especially for younger users.
2. Safety Information
- Small Parts Warning: This kit contains small parts that may pose a choking hazard for children under 3 years old. Keep all components out of reach of infants and toddlers.
- Battery Safety:
- Do not mix old and new batteries.
- Do not mix alkaline, standard (carbon-zinc), or rechargeable (nickel-cadmium) batteries.
- Insert batteries with correct polarity (+ and -).
- Remove exhausted batteries promptly.
- Do not short-circuit battery terminals.
- Non-rechargeable batteries are not to be recharged.
- Rechargeable batteries are only to be charged under adult supervision.
- Remove rechargeable batteries from the toy before charging.
- Adult Supervision: Adult supervision is recommended during assembly and operation to ensure proper use and safety.
- Operating Environment: Operate the vehicle in open, clear areas, away from obstacles, people, pets, and water.
3. Package Contents
Please check the box contents against the list below. If any parts are missing or damaged, contact Lisciani customer support.
- Construction pieces for the off-road vehicle
- Remote control unit
- Rechargeable battery pack for the vehicle
- USB charging cable for the vehicle battery
- Instruction manual (this document)
- Assembly booklet with detailed diagrams
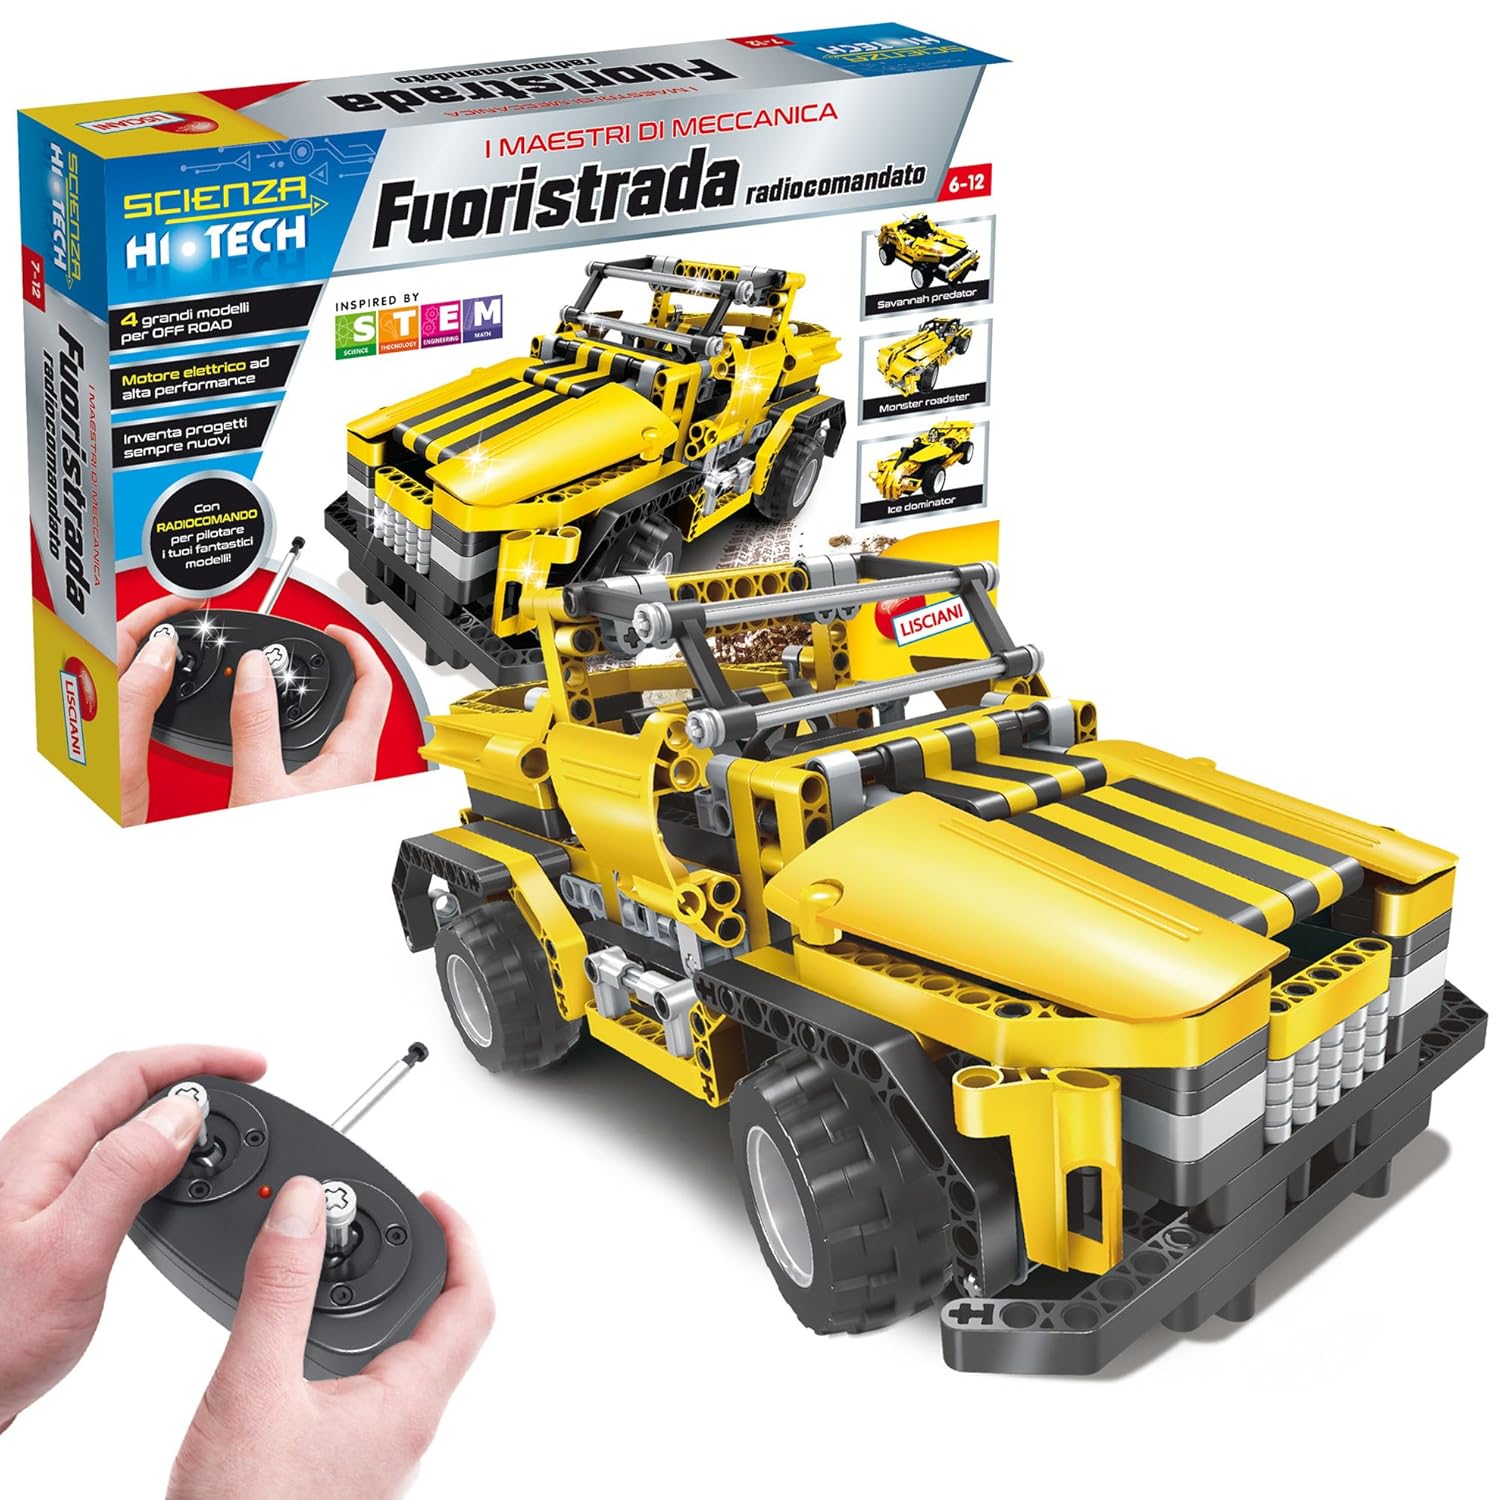
Image 3.1: SCIENZA HI TECH Off-Road Vehicle kit packaging and components.
This image displays the product packaging, showcasing the assembled off-road vehicle and the remote control unit. The box highlights the "SCIENZA HI TECH" branding and indicates that it's a remote-controlled vehicle construction kit.
4. Assembly Instructions
The assembly of the SCIENZA HI TECH Off-Road Vehicle requires careful attention to detail. Refer to the separate, detailed assembly booklet included in your package for step-by-step instructions and diagrams.
- Unpack Components: Carefully remove all construction pieces from their bags. It is recommended to sort pieces by type or color to facilitate assembly.
- Follow Assembly Booklet: Use the provided assembly booklet as your primary guide. The diagrams illustrate the connection points and sequence for each step.
- Attention to Detail: Some diagrams in the booklet may be small or dark. Pay close attention to the specific pins and connectors required for each step. If a step is unclear, try to visualize the connection based on surrounding steps.
- Secure Connections: Ensure all pieces are firmly connected to prevent the vehicle from falling apart during operation.
- Motor and Wiring: Install the electric motor and connect any necessary wiring as indicated in the assembly booklet. Ensure connections are secure and wires are not pinched.
- Battery Compartment: Assemble the battery compartment according to the instructions. This will house the rechargeable battery pack for the vehicle.
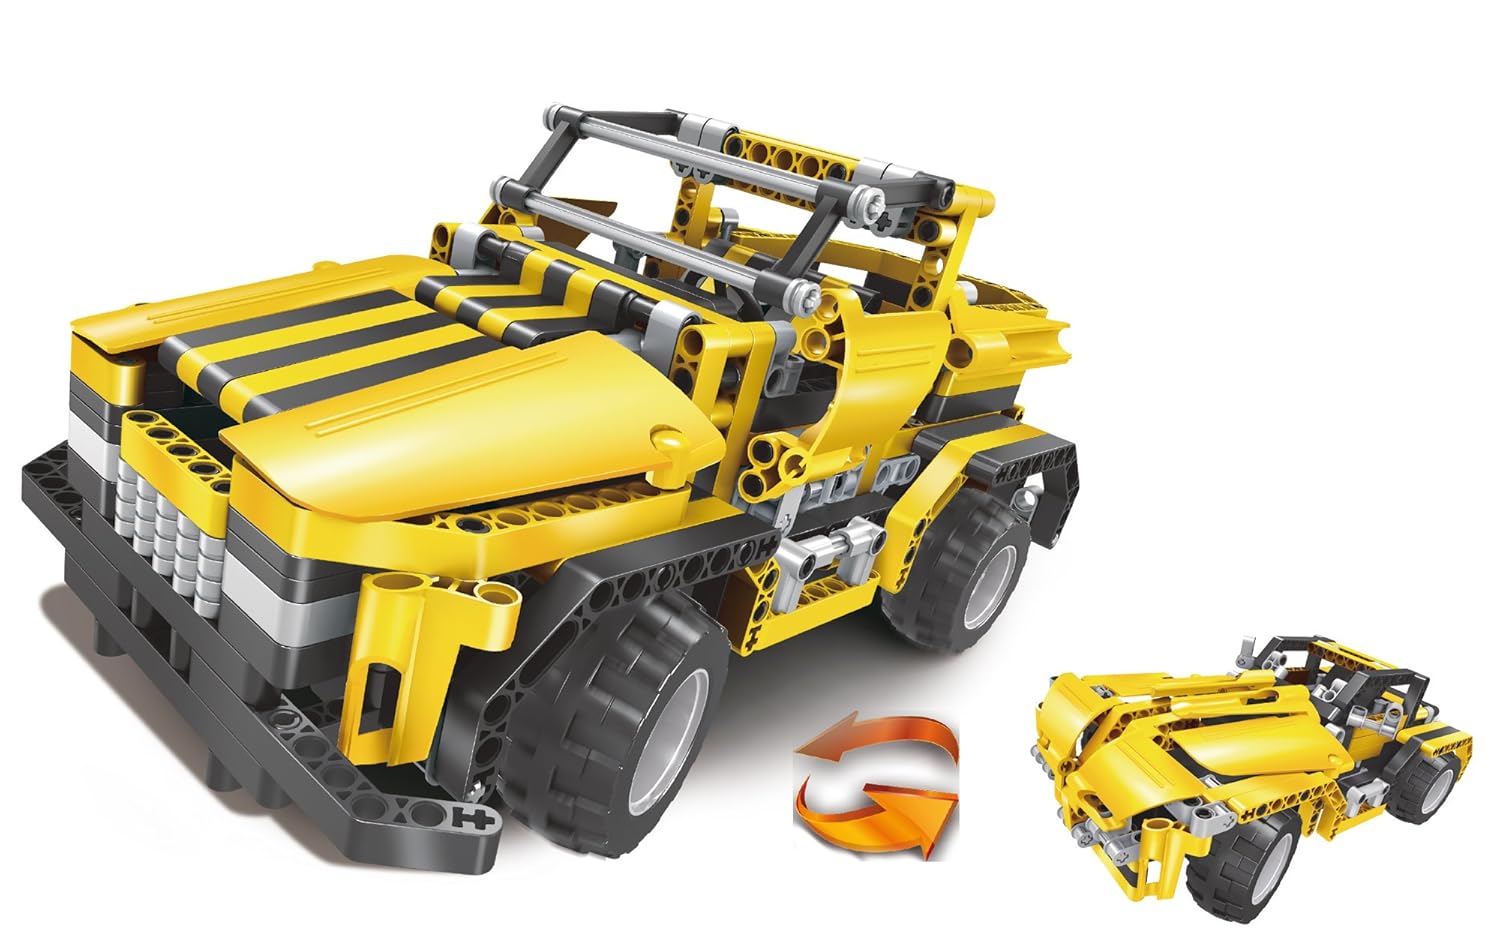
Image 4.1: Assembled SCIENZA HI TECH Off-Road Vehicle.
This image shows the fully assembled SCIENZA HI TECH Off-Road Vehicle, highlighting its yellow and black construction, robust wheels, and intricate mechanical details. An arrow indicates the possibility of transforming the vehicle into another configuration, suggesting modularity.
5. Operating Instructions
5.1. Battery Installation (Remote Control)
- Locate the battery compartment on the back of the remote control.
- Open the battery compartment cover.
- Insert 3 x AAA batteries (not included) into the compartment, ensuring correct polarity (+ and -).
- Close the battery compartment cover securely.
5.2. Charging the Vehicle Battery
The vehicle uses a rechargeable battery pack. It is recommended to fully charge the battery before first use.
- Locate the rechargeable battery pack within the vehicle's battery compartment. You may need to unscrew the compartment cover.
- Connect the USB charging cable to the battery pack.
- Connect the other end of the USB charging cable to a standard USB power source (e.g., computer USB port, USB wall adapter).
- The charging indicator (if present) will show the charging status. Charge until the indicator shows a full charge.
- Once charged, disconnect the cable and securely close the battery compartment.
5.3. Pairing the Remote Control
Typically, the vehicle and remote control will pair automatically upon powering on. If not, follow these steps:
- Ensure both the vehicle and the remote control have fresh or fully charged batteries.
- Turn on the vehicle using its power switch.
- Turn on the remote control using its power switch.
- The remote control and vehicle should connect automatically. If not, try turning both off and on again, ensuring they are close to each other.
5.4. Driving the Vehicle
- Use the left joystick/lever to control forward and backward movement.
- Use the right joystick/lever to control left and right steering.
- Practice in an open area to get accustomed to the controls.
- The vehicle is designed for off-road use but avoid excessively rough terrain or water.
6. Maintenance
- Cleaning: Wipe the vehicle and remote control with a soft, dry cloth. Do not use water or chemical cleaners, as this can damage electronic components.
- Battery Care:
- Remove batteries from the remote control if it will not be used for an extended period.
- Do not overcharge the vehicle's rechargeable battery.
- Store batteries in a cool, dry place.
- Component Check: Periodically check all assembled components to ensure they are still securely connected. Tighten any loose parts if necessary.
- Storage: Store the vehicle and remote control in a dry, dust-free environment when not in use.
7. Troubleshooting
| Problem | Possible Cause | Solution |
|---|---|---|
| Vehicle does not move. | Vehicle battery is low or not charged. Remote control batteries are low or incorrectly installed. Vehicle or remote control is not powered on. Not paired. | Charge vehicle battery. Replace remote control batteries, ensuring correct polarity. Turn on both vehicle and remote. Re-pair if necessary (see Section 5.3). |
| Remote control not responding. | Remote control batteries are low or incorrectly installed. Remote control is not powered on. Not paired. | Replace remote control batteries, ensuring correct polarity. Turn on remote. Re-pair if necessary (see Section 5.3). |
| Short operating time. | Vehicle battery is not fully charged. Battery is old or damaged. | Ensure vehicle battery is fully charged before use. If battery life remains short, the battery may need replacement. |
| Vehicle moves erratically. | Loose connections in assembly. Interference. | Check all assembled parts for secure connections. Operate in an area free from other radio-controlled devices or strong electromagnetic fields. |
8. Specifications
- Model: 63857
- Brand: Lisciani
- Product Name: SCIENZA HI TECH Off-Road Vehicle
- ASIN: B071WWJMBR
- Publisher: Liscianigiochi
- Publication Date (Kit): October 26, 2017
- Language (Manual): English
- Item Weight: Approximately 3.48 pounds (1.58 kg)
- Dimensions (Box): Approximately 22.83 x 15.16 x 3.74 inches (58 x 38.5 x 9.5 cm)
- Remote Control Batteries: 3 x AAA (not included)
- Vehicle Battery: Rechargeable pack (included)
9. Warranty and Support
Lisciani products are manufactured to high-quality standards. For any questions regarding assembly, operation, or if you encounter any issues with your SCIENZA HI TECH Off-Road Vehicle, please contact Lisciani customer support.
Please retain your proof of purchase for any warranty claims. Specific warranty terms and conditions may vary by region. Refer to the Lisciani official website or contact their customer service for detailed warranty information.
Lisciani Official Website: www.liscianigiochi.it (Note: Website content may be in Italian.)


