1. Introduction
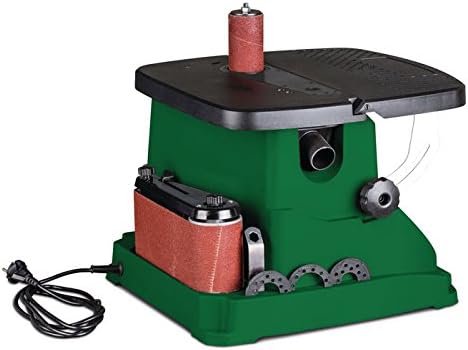
This manual provides essential information for the safe operation, maintenance, and troubleshooting of your Holzstar OBSS 100 Oscillating Spindle and Belt Sander. The OBSS 100 is a versatile woodworking tool designed for sanding molded parts, internal radii, round and straight edges, cutouts, and other intricate shapes. It combines both belt and spindle sanding functionalities in a single unit, offering efficient and precise material removal.
Key features include a powerful 450 W motor, quick and tool-free conversion between sanding modes, and an oscillating action for superior finish quality. Its compact and lightweight design facilitates easy transport and storage. The work table is continuously adjustable from 0° to 45°, with fixed angle stops for common settings.
2. Safety Instructions
Always observe the following safety precautions to reduce the risk of electric shock, fire, and serious injury.
- Read the entire manual: Understand all instructions and warnings before operating the sander.
- Wear appropriate personal protective equipment (PPE): Always wear safety glasses, hearing protection, and a dust mask. Avoid loose clothing or jewelry that could get caught in moving parts.
- Ensure a safe work environment: Keep the work area clean, well-lit, and free from clutter. Do not operate in damp or wet conditions.
- Secure the workpiece: Always clamp or otherwise secure the material being sanded to prevent movement during operation.
- Maintain proper footing and balance: Do not overreach.
- Disconnect power: Always unplug the sander before making adjustments, changing accessories, or performing maintenance.
- Use the correct abrasive: Ensure the abrasive belt or sleeve is appropriate for the material and task.
- Connect to dust extraction: Utilize the integrated dust extraction ports to connect an external vacuum system to minimize airborne dust.
- Keep guards in place: Never operate the sander without all guards properly installed.
- Avoid forcing the tool: Allow the sander to work at its own pace. Forcing it can lead to poor results and potential injury.
- Store safely: When not in use, store the sander in a dry, secure location out of reach of children.
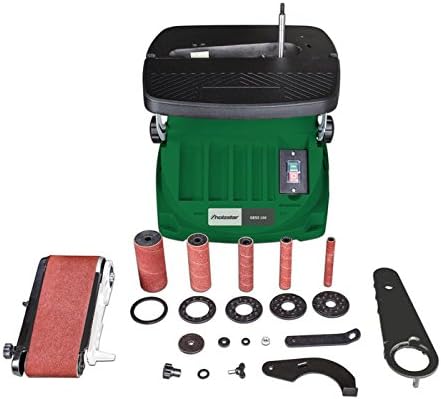
3. Package Contents
Verify that all items listed below are present in your package:
- Holzstar OBSS 100 Oscillating Spindle and Belt Sander
- 5 Abrasive Sleeves K80 (Ø 13 mm, 19 mm, 26 mm, 38 mm, 51 mm)
- 4 Rubber Abrasive Rollers (Length 115 mm, Ø 19 mm, 26 mm, 38 mm, 51 mm)
- 5 Table Inserts (Ø 13 mm, 19 mm, 26 mm, 38 mm, 51 mm)
- 3 Spindle Discs (Ø 15 mm, 21 mm, 45 mm)
- Abrasive Belt Attachment
- Cover for Abrasive Belt
- Workpiece Stop
- Assembly Tool
- Abrasive Belt
4. Setup
4.1 Unpacking and Placement
- Carefully remove the sander and all accessories from the packaging.
- Inspect the unit for any signs of damage that may have occurred during shipping. Contact your dealer immediately if damage is found.
- Place the sander on a stable, level workbench or surface. Ensure there is adequate space around the machine for safe operation and material handling.
4.2 Power Connection and Dust Extraction
- Ensure the power switch on the sander is in the "OFF" position before plugging it in.
- Connect the power cord to a grounded 230V, 50Hz electrical outlet.
- Locate the integrated dust extraction port (38 mm diameter) on the rear of the sander.
- Connect a suitable external dust extraction unit or shop vacuum to this port using a compatible hose. Effective dust extraction is crucial for a clean work environment and operator safety.
5. Operating Instructions
5.1 Switching Between Spindle and Belt Sanding Modes
The Holzstar OBSS 100 allows for quick, tool-free conversion between spindle and belt sanding modes.
- For Spindle Sanding: Ensure the belt sanding attachment is removed. Select the appropriate rubber abrasive roller and abrasive sleeve for your task. Slide the roller onto the spindle and secure it. Choose the correct table insert that matches the diameter of the abrasive sleeve and place it around the spindle on the work table.
- For Belt Sanding: Remove any spindle sanding components. Attach the belt sanding unit to the designated mounting points on the machine. Ensure it is securely fastened. Install the abrasive belt onto the unit, ensuring proper tension and alignment.


5.2 Changing Abrasive Belts and Sleeves
- Always disconnect the power supply before changing abrasives.
- For Spindle Sleeves: Loosen the retaining nut at the top of the spindle. Slide off the old sleeve and rubber roller. Replace with the desired size, ensuring the new sleeve fits snugly over the roller. Re-tighten the retaining nut.
- For Belt Sander: Follow the instructions specific to the belt sanding attachment for releasing tension and replacing the abrasive belt. Ensure the belt is correctly oriented and tensioned before use.
5.3 Adjusting the Work Table
- The work table can be tilted continuously from 0° to 45°.
- To adjust, loosen the locking knob located beneath the table.
- Tilt the table to the desired angle, using the angle scale for precision. Fixed angle stops are available at 0°, 15°, 22.5°, 30°, and 45°.
- Once the desired angle is set, securely tighten the locking knob.
5.4 General Sanding Operation
- Turn on the dust extraction system before starting the sander.
- Switch on the sander using the power switch.
- Gently bring the workpiece into contact with the abrasive surface. Apply even, moderate pressure.
- Move the workpiece smoothly across the abrasive to ensure even material removal and prevent burning.
- For spindle sanding, rotate the workpiece around the spindle to sand curves and contours.
- For belt sanding, guide the workpiece along the belt, utilizing the full width of the abrasive.
- Always sand with the rotation of the abrasive, not against it.
- When finished, switch off the sander and allow it to come to a complete stop before leaving the machine.
6. Maintenance
Regular maintenance ensures the longevity and optimal performance of your Holzstar OBSS 100.
- Always disconnect the power supply before performing any maintenance.
- Cleaning: After each use, clean the machine thoroughly. Remove dust and debris from the work table, spindle, belt unit, and motor vents using a brush, compressed air, or a vacuum cleaner.
- Abrasive Replacement: Replace worn or clogged abrasive belts and sleeves promptly. Using dull abrasives can lead to poor results, overheating, and increased motor strain.
- Inspection: Periodically inspect the power cord for damage. Check all fasteners and knobs for tightness. Ensure all moving parts operate smoothly.
- Lubrication: The motor bearings are typically sealed and do not require lubrication. Refer to the manufacturer's guidelines for any specific lubrication points, if applicable.
- Storage: Store the sander in a dry, clean, and secure location. Keep all accessories organized in their designated storage areas on the machine or in a separate container.
7. Troubleshooting
This section addresses common issues you might encounter. For problems not listed here, contact customer support.
| Problem | Possible Cause | Solution |
|---|---|---|
| Sander does not start | No power supply; Power switch off; Faulty power cord/outlet | Check power connection; Ensure switch is ON; Test outlet with another device; Inspect power cord for damage. |
| Poor sanding results / Slow material removal | Worn or clogged abrasive; Incorrect abrasive grit for material; Excessive pressure; Workpiece not secured | Replace abrasive; Use appropriate grit; Apply moderate, even pressure; Secure workpiece firmly. |
| Excessive vibration or noise | Loose components; Unbalanced abrasive sleeve/belt; Damaged bearings | Check all fasteners; Ensure abrasive is correctly installed and balanced; If problem persists, contact service. |
| Dust accumulation is high | Dust extraction not connected or inefficient; Clogged dust port | Connect or check dust extraction system; Clear any blockages in the dust port and hose. |
| Motor overheats | Overloading the motor; Blocked ventilation slots; Dull abrasive | Reduce pressure; Clear ventilation slots; Replace abrasive; Allow motor to cool. |
8. Technical Specifications
| Feature | Specification |
|---|---|
| Model | Holzstar OBSS 100 (5903501) |
| Power | 450 W (0.45 kW) |
| Voltage | 230 V |
| Frequency | 50 Hz |
| Max Rotational Speed | 10000 rpm |
| Oscillation Stroke | 16 mm |
| Oscillations per Minute | 58 min-1 |
| Work Table Dimensions (L x W) | 430 mm x 410 mm |
| Work Table Tilt Range | 0° to 45° |
| Abrasive Belt Dimensions (L x W) | 610 mm x 100 mm |
| Abrasive Belt Speed | 8 m/s |
| Spindle Diameter | 12.7 mm |
| Abrasive Sleeve Diameters | 13, 19, 26, 38, 51 mm |
| Dust Port Diameter | 38 mm |
| Overall Dimensions (L x W x H) | Approx. 530 mm x 480 mm x 480 mm |
| Weight | Approx. 12 kg |
9. Warranty and Support
For warranty information, please refer to the documentation provided with your purchase or contact your authorized Holzstar dealer. Keep your proof of purchase for warranty claims.
For technical support, spare parts, or service inquiries, please contact your local Holzstar service center or the retailer from whom you purchased the product. Provide the model number (OBSS 100) and serial number (if applicable) when seeking assistance.