1. Introduction
This manual provides comprehensive instructions for the installation, operation, and maintenance of the AUBER Wireless Dual Outputs Program Humidity Controller, model AW-HD330. Please read this manual thoroughly before using the device to ensure proper functionality and safety.
2. Product Features
- Controller measures and controls both humidity remotely.
- Two independent on/off control outputs: one for humidifier, another for dehumidifier.
- Reliable sensor can be used in high humidity (>85% RH) and condensing environments.
- Plug-n-play controller. No wiring is needed.
- Features high and low limit alarms.
- Built-in audio buzzer for alarms.
- Wireless connectivity for remote monitoring and control via mobile application.
3. Package Contents
Upon opening the package, verify that all the following components are present:
- AW-HD330 Wireless Humidity Controller Unit
- Humidity Sensor Probe with Cable
- Power Cord
- User Manual (this document)
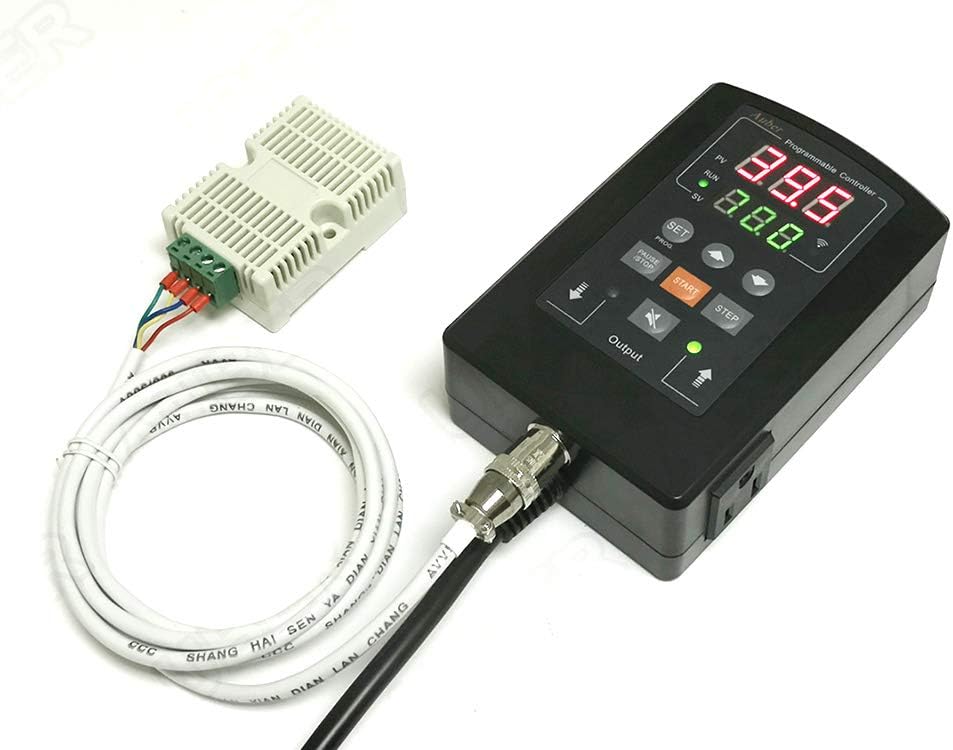
Image: The AW-HD330 controller unit, showing the main display, control buttons, and the connected humidity sensor probe with its cable.
4. Specifications
| Parameter | Value |
|---|---|
| Model Number | HD330-W |
| Product Dimensions | 3.58 x 1.81 x 5.51 inches |
| Item Weight | 1.2 pounds |
| Control Outputs | 2 (Humidifier, Dehumidifier) |
| Sensor Type | Humidity Probe |
| Connectivity | Wireless |
5. Setup Instructions
5.1 Physical Connection
- Unpack the controller and sensor.
- Connect the humidity sensor probe to the designated port on the controller unit. Ensure a secure connection.
- Plug the power cord into the controller unit, then into a standard electrical outlet.
- Connect your humidifier and/or dehumidifier devices to the respective output sockets on the controller.
5.2 Initial Power On and Wireless Pairing
- Once powered on, the controller display will illuminate.
- Download the "AuberSmart" application from your mobile device's app store (available for iOS and Android).
- Open the AuberSmart app and follow the on-screen instructions to add a new device. You may need to put the controller into pairing mode (refer to the controller's display or a specific button combination, typically indicated by a blinking wireless icon).
- Ensure your mobile device is connected to a 2.4GHz Wi-Fi network during the pairing process.
- Once successfully paired, the controller's wireless indicator will show a steady light, and the device will appear in your AuberSmart app.

Image: Screenshot of the AuberSmart mobile application displaying a list of connected devices, indicating successful wireless pairing.
6. Operating Instructions
6.1 Setting Humidity Targets (Set Value - SV)
- On the controller, press the SET button to enter the setting mode.
- Use the UP and DOWN arrow buttons to adjust the desired humidity set point (SV).
- Press SET again to confirm and save the value.
- Alternatively, use the AuberSmart app to adjust the set value remotely. Navigate to the device details and modify the SV.
6.2 Monitoring Humidity (Process Value - PV)
The current humidity level (Process Value - PV) is continuously displayed on the controller's main screen. You can also monitor the PV in real-time through the AuberSmart mobile application, which provides a graphical representation of humidity trends over time.

Image: Screenshot of the AuberSmart app displaying a humidity trend graph, showing the Process Value (PV) and Set Value (SV) over a 2-hour period.
6.3 Program Mode and Advanced Settings
The AW-HD330 supports programmable humidity control. Access advanced settings and program modes via the AuberSmart application. Key parameters include:
- AH (Deviation High Alarm): Sets the upper limit for humidity deviation before an alarm triggers.
- AL (Deviation Low Alarm): Sets the lower limit for humidity deviation before an alarm triggers.
- HY (Humidity Control Hysteresis Band): Defines the deadband for humidity control to prevent rapid cycling of devices.
- HYD (Dehumidifier Hysteresis Band): Specific hysteresis for dehumidifier operation.
- HYH (Humidifier Hysteresis Band): Specific hysteresis for humidifier operation.
- OFS (Humidity Offset): Allows calibration of the humidity sensor reading.
- AS (Anti-short Cycle Delay): Prevents rapid on/off cycling of connected devices.
- AM (Power Outage/Start-up Modes): Configures behavior after power restoration.
- PRG (Program Mode): Enables or disables programmed control sequences.
- SFA (Sensor Failure Operation): Defines controller behavior if the sensor fails.

Image: Screenshot of the AuberSmart app's settings screen, displaying various configurable parameters for the humidity controller.
7. Maintenance
- Cleaning: Wipe the controller unit and sensor probe with a soft, dry cloth. Do not use abrasive cleaners or immerse the unit in water.
- Sensor Care: The humidity sensor is sensitive. Avoid physical impact or exposure to corrosive substances. If the sensor becomes dirty, gently clean it according to specific instructions provided by AUBER, if any.
- Firmware Updates: Periodically check the AuberSmart app for available firmware updates for your controller. Updates can improve performance and add new features.
- Storage: If storing the device for an extended period, disconnect it from power, clean it, and store it in a cool, dry place away from direct sunlight.
8. Troubleshooting
| Problem | Possible Cause | Solution |
|---|---|---|
| Controller not powering on. | No power supply; loose connection. | Check power cord connection and wall outlet. Ensure power is available. |
| Cannot connect to Wi-Fi/App. | Incorrect Wi-Fi password; 5GHz network; controller not in pairing mode. | Verify Wi-Fi password. Ensure mobile device is on 2.4GHz network. Put controller into pairing mode. Restart router. |
| Humidity reading is inaccurate. | Sensor dirty or damaged; calibration needed. | Gently clean the sensor. Use the "Humidity Offset" (OFS) parameter in the app for calibration if you have a reference. |
| Connected device (humidifier/dehumidifier) not turning on/off. | Incorrect set point; hysteresis settings; device not plugged in correctly. | Check SV and PV values. Adjust HY, HYD, HYH parameters. Ensure connected device is functional and properly plugged into the controller's output. |
| Alarm sounding frequently. | AH/AL limits set too narrow; environmental fluctuations. | Adjust AH and AL parameters to wider acceptable ranges. Ensure stable environmental conditions. |
9. Warranty and Support
AUBER Instruments provides a limited warranty for the AW-HD330 controller against defects in materials and workmanship. For specific warranty terms and conditions, please refer to the warranty card included with your product or visit the official AUBER Instruments website.
For technical support, troubleshooting assistance, or to inquire about replacement parts, please contact AUBER Instruments customer service:
- Website: www.auberins.com
- Email: Refer to website for contact information.
- Phone: Refer to website for contact information.
When contacting support, please have your product model number (HD330-W) and purchase date available.